# Micro Frontends
Micro Frontendsとは、フロントエンドアプリケーションを細分化し、チームごとに独立させて開発するためのアーキテクチャです。Micro Frontendsの考え方は、バックエンドのマイクロサービスのアイデアを適用したもので、モノリシックなフロントエンドのアーキテクチャをマイクロサービスのように機能ごと、或いはページごとに分割して開発します。扱う技術やフレームワークはサービスごとに変えることができ、基本的にコードを共有することもありません(共通コンポーネントなどを除いて)。そのため、各チームごとで自由度の高い開発が可能となります。
# Micro Frontendsの必要性
Micro Frontendsは、どのような背景で必要となったのでしょうか。
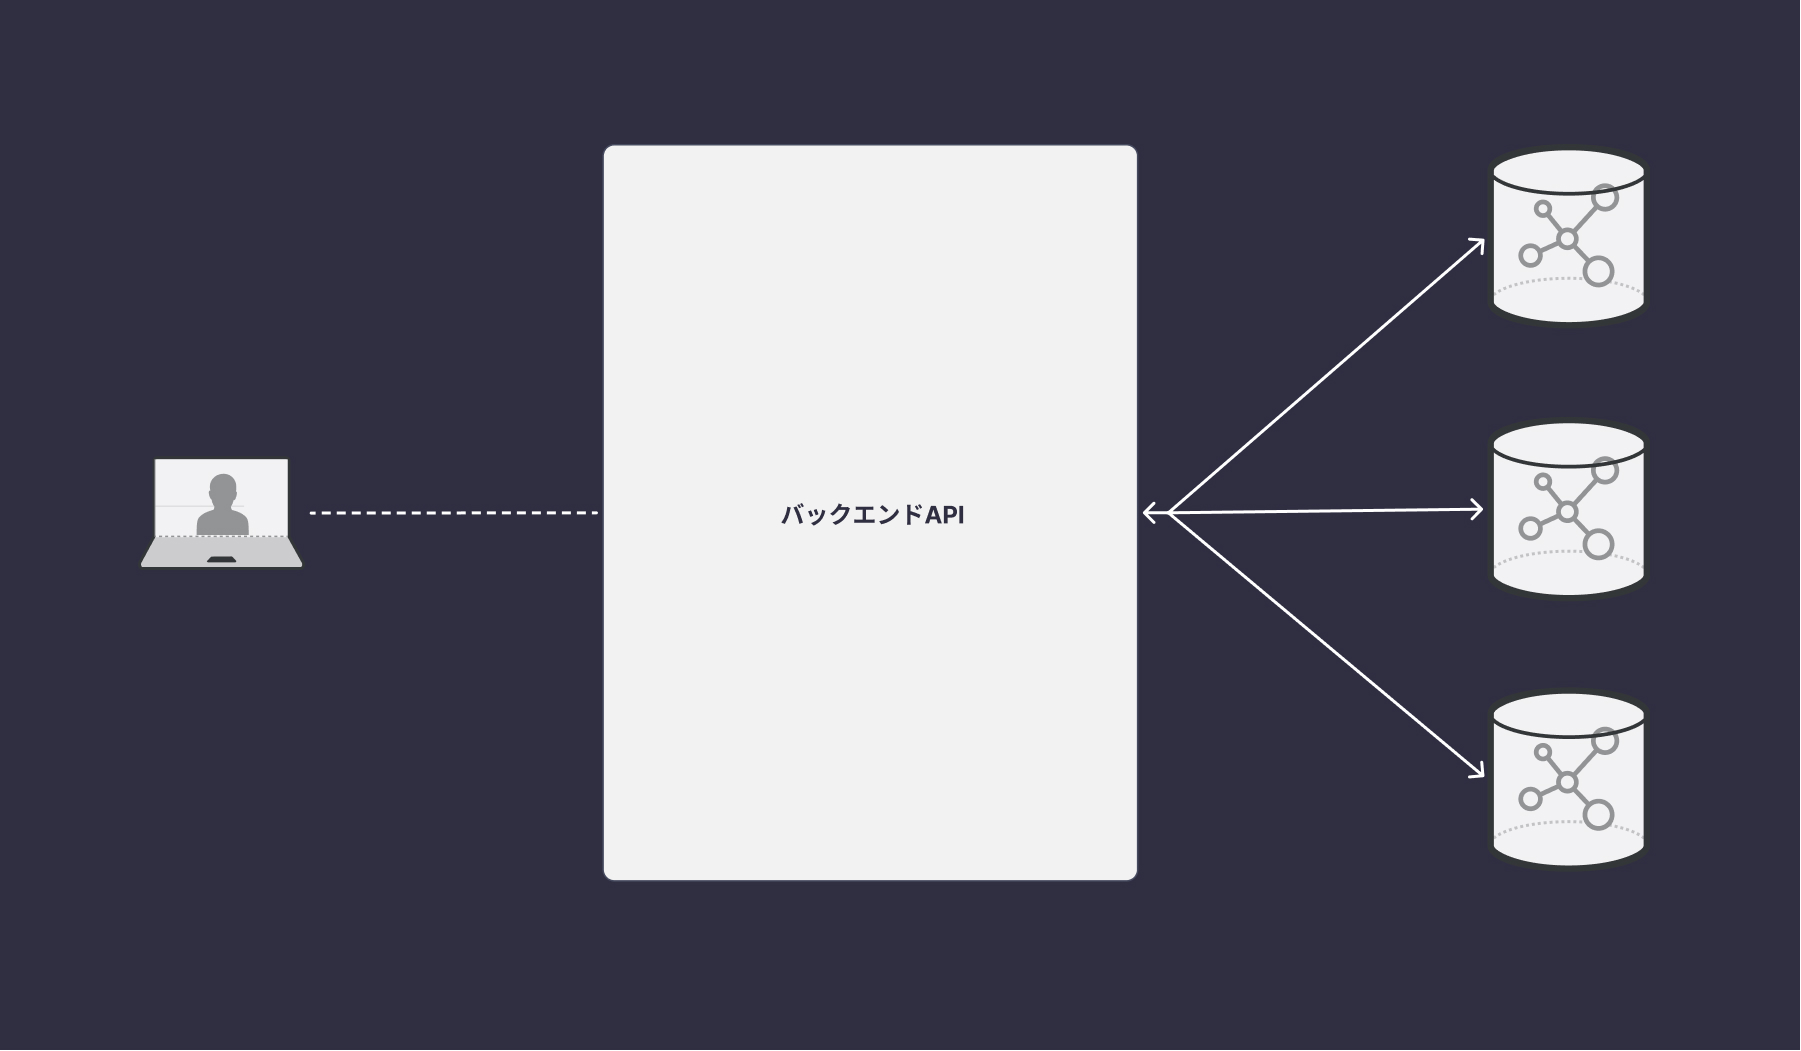
バックエンドのマイクロサービスという考え方は、モノリシックなアーキテクチャによる問題点を解決するために生まれました。従来のサーバーサイドアプリケーションは、一つのエンドポイントで全ての機能を実装していました。データベースへの取得、認証・認可、全文検索などを一つのサーバで構成し、複数のチームが同じコードベースで開発をしていました。このようなモノリシックなアーキテクチャは、サービスや組織が拡大するにつれ、運用コストが増加していきます。チームごとの調整や設計にリソースが割かれると開発スピードが落ち、アプリケーション全体のリリースサイクルが遅れてしまいます。
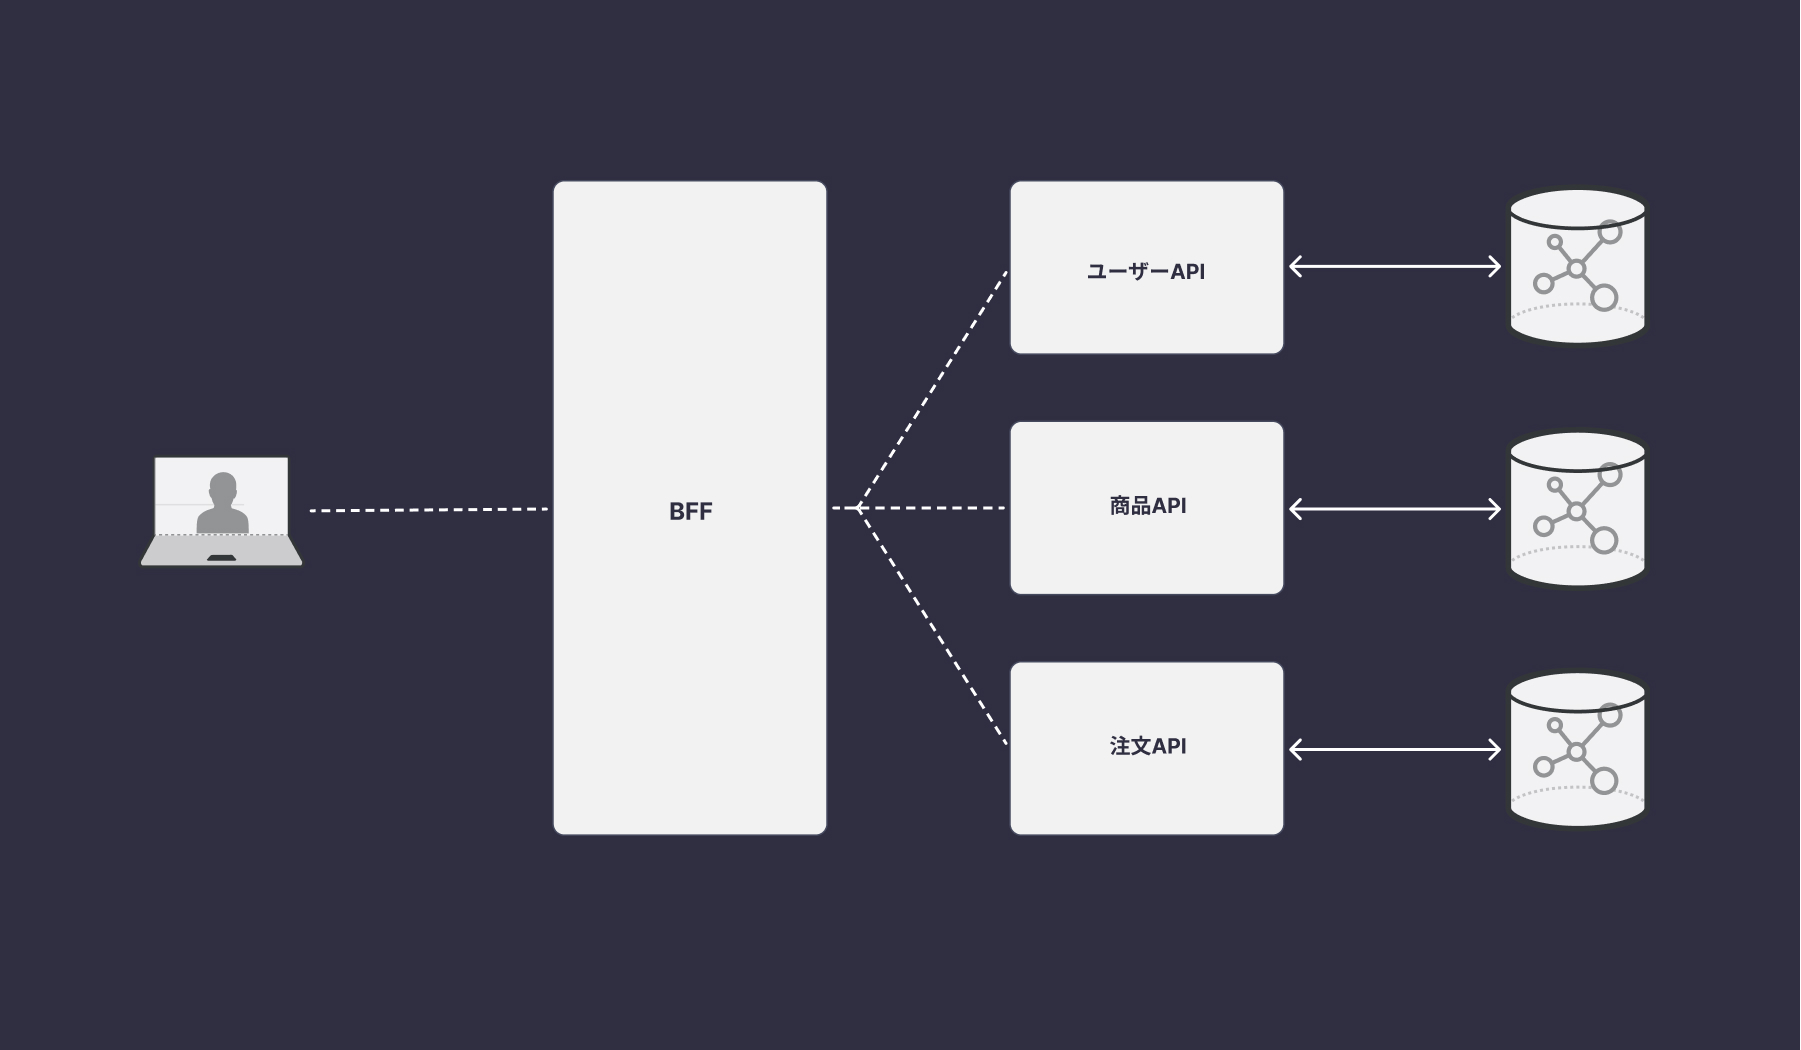
このような問題を解決すべく、マイクロサービスはチームを細分化し、それぞれの機能を独立することで自由度の高い開発ができるようになりました。マイクロサービスでは、各チームで異なる技術やプロトコルを使うことができます。また、コードを共有しないため、チーム間の調整を最小限に抑えることができます。そのため、モノリシックアプリケーションよりも柔軟なリリースサイクルを実現することができます。
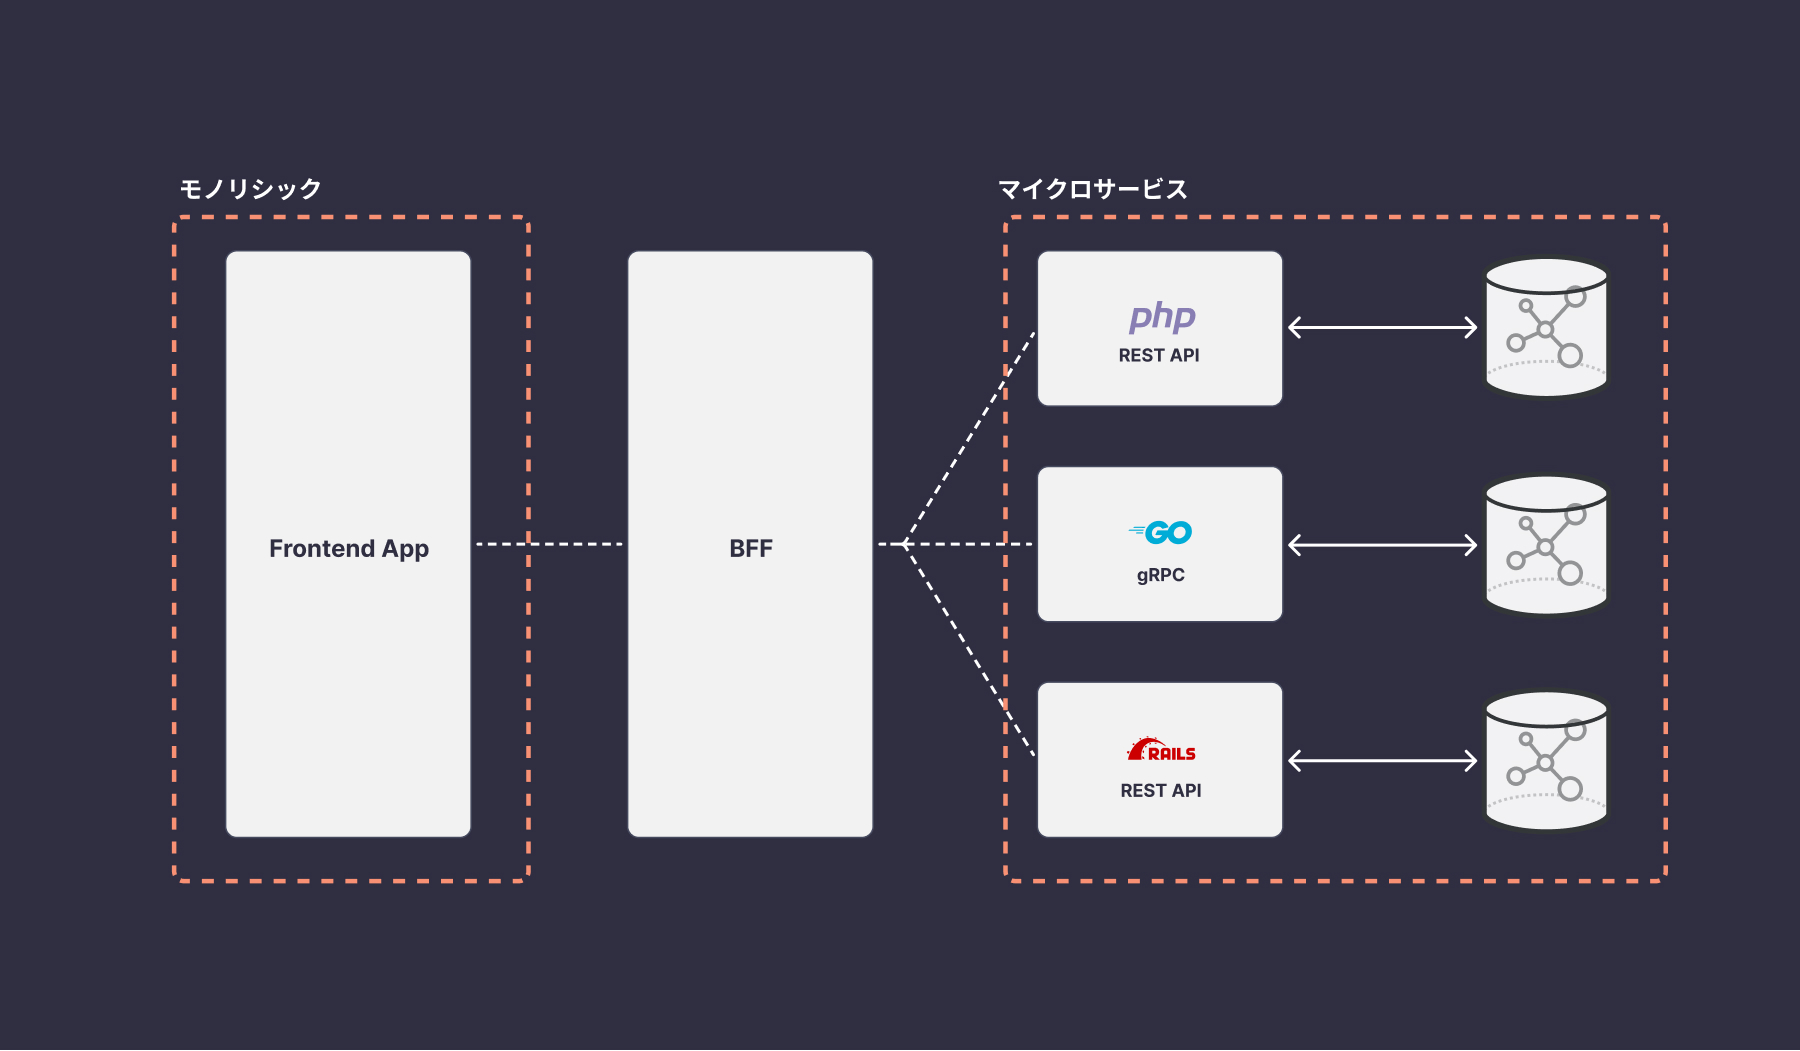
一方、フロントエンドアプリケーションは依然として一つのコードベースで開発をしなければなりません。マイクロサービスでバックエンドチームが細分化されても、フロントエンドチームは横断的に対応しなければならず、アプリケーションが大きくなるにつれモノリシックアーキテクチャと同じような問題を抱えることになります。
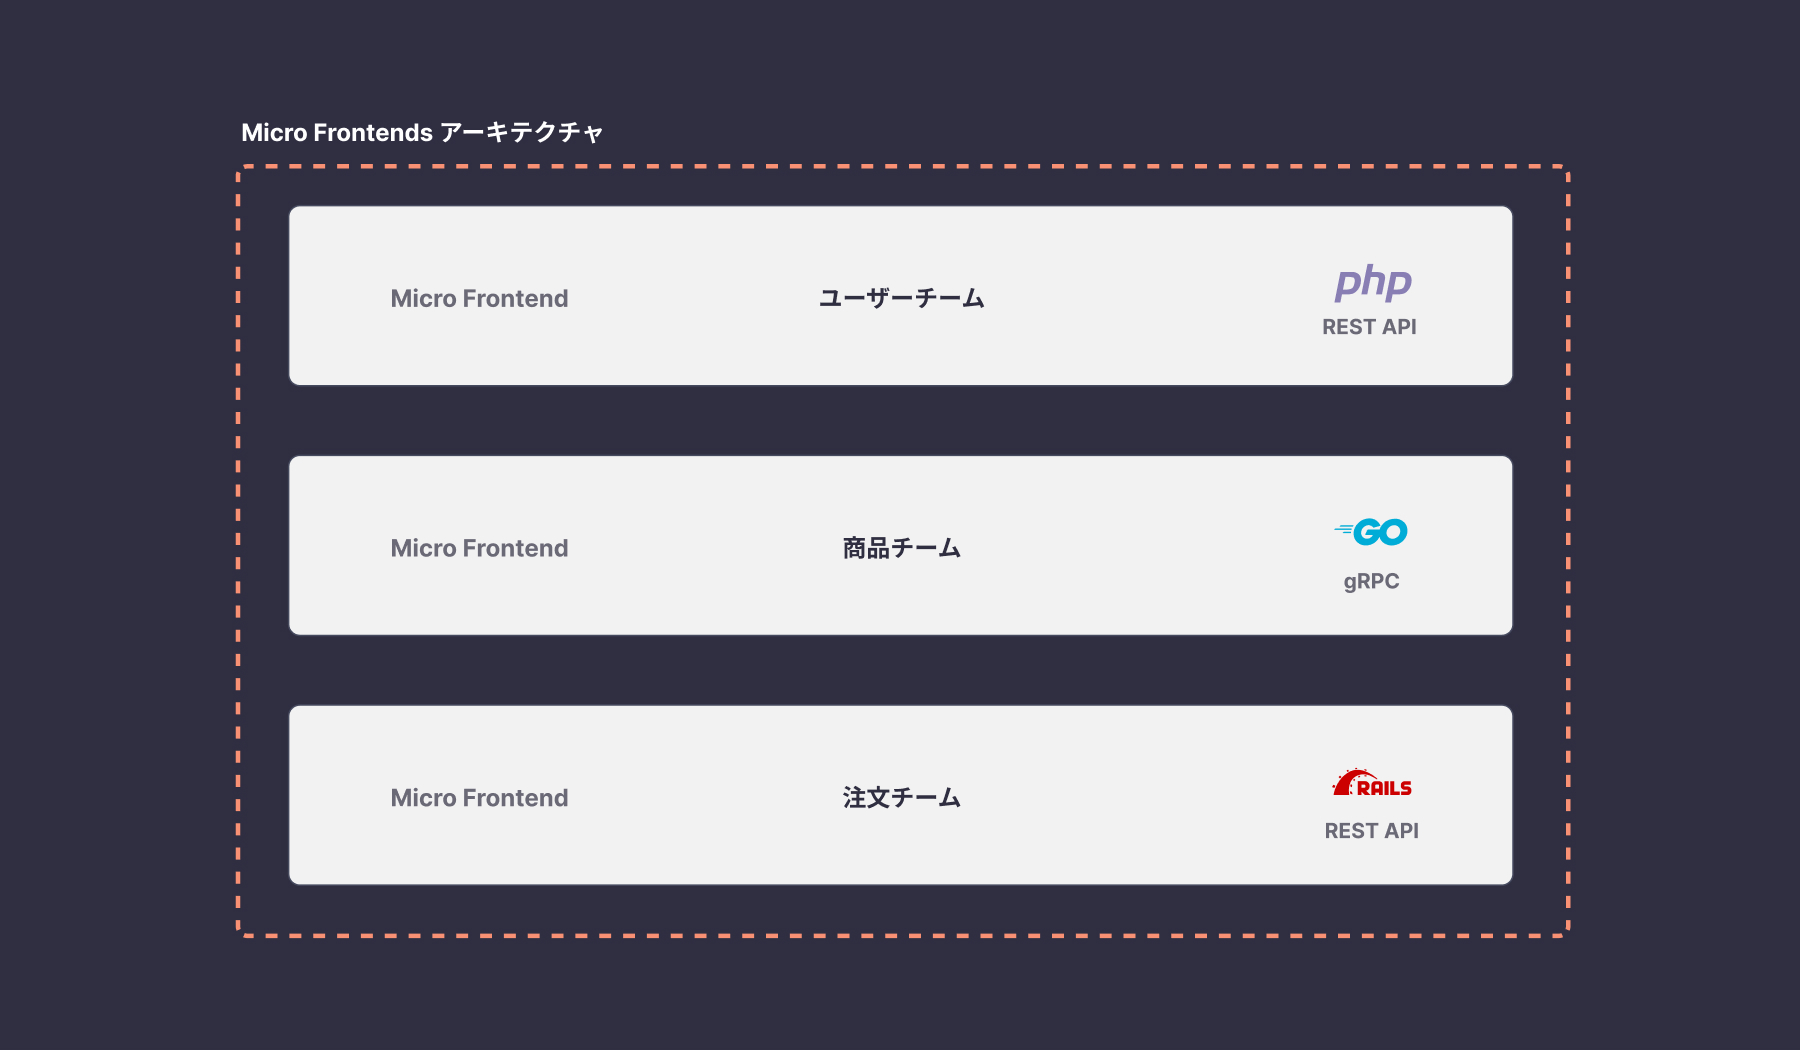
このようなフロントエンドアプリケーションの複雑性を緩和するため、Micro Frontendsが登場しました。Micro Frontendsの考え方は、マイクロサービスの考え方を拡張したものです。一つのチームにバックエンド、データベースエンジニア、フロントエンド、デザイナーが一緒になって開発をすることで、効率的にかつ自主的な開発を目指します。
# メリット
# 柔軟な開発体制
Micro Frontendsの大きなメリットは、柔軟な開発体制を構築できることです。
チームを細分化することで、コードベースを分けることができます。そのため、新規機能やリファクタリングなどの影響範囲をチーム内のスコープだけに抑えることができます。 影響範囲を限定的にするメリットは、他にもあります。特定ドメインの知識をもつチームで分散させることで、設計コストや運用コストを抑えることができ、リリースサイクルのスピードを上げることができます。また、リリースの範囲が小さくなるのでテストがしやすくなり、リグレッションテストのコストも下がります。不具合があったときも、バグの特定から修正までがしやすくなるでしょう。
また、チームごとに異なる言語やフレームワークを選定できるため、モノリシックアーキテクチャよりも自由度が高い開発が可能となります。依存関係のバージョンアップのコストも小さくなり、チームごとに新しいフレームワークやアーキテクチャを導入することもできます。モノリシックアーキテクチャの場合、いずれかの機能が使用しているライブラリのせいで、バージョンアップができないといったことも起こり得ます。しかし、Micro Frontendsでは、独立した依存関係になるため、他のチームに影響を与えずに自身のサービスのバージョンアップが可能となります。
そのため、Micro Frontendsは組織の複雑性を解決することを目的とする側面が強いと言えるでしょう。
# デメリット
# 重複したコードの発生
Micro Frontendsでは、チームごとにコードベースをメンテナンスするため、処理内容によっては重複したコードが発生する可能性があります。例えば、汎用的な関数や特定のパッケージなどが当てはまります。
Webpackでは、重複したコードを排除するためにModule Federation (opens new window)という技術を使うことができます。これは、共通のライブラリやUI、ロジックを共有するための仕組みで、サービス間で共通するコードの重複を回避することができます。
# 設計コスト
Micro Frontendsは、複数のサービスを結合してアプリケーションを構築します。各チームが独立して開発できるとはいえ、共通のサービスを使っている場合、依存関係の違いによって不具合を起こす可能性があります。そのため、共通サービスの変更は横断的にテストする必要があり、デプロイのタイミングも考慮する必要があります。 また、サービスの分割を機能ごと(水平分割)にするのか、ページごと(垂直分割)にするのかを考えなければなりません。
そういった点を設計の段階で検討しなければならないため、通常のモノリシックアーキテクチャに比べると設計コストが高くなる可能性があります。
# Micro Frontendsの分割パターン
続いて、Micro Frontendsの分割パターンを見てみましょう。
マイクロサービスと違って、Micro Frontendsでは、全てのサービスを一つのアプリケーションに結合しなければなりません。その際に、それぞれのチームをどの単位で分けるかが重要になります。適切な粒度でチーム分けをしないと、思ったように機能しないケースは多々あります。この粒度は、所属する組織やチームによって異なるでしょう。
ここでは一般的な分割ポリシーを見ていきます。
# 機能・ドメインごと(水平分割パターン)
機能、ドメインごとに分割するパターンになります。ドメインやマイクロサービスごとにチームを分けて、関連するUIを開発します。いわゆる水平分割のパターンになります。
例えば、Micro Frontendsを導入しているSpotifyでは、以下のように画面内の機能ごとにチームを分割しています。
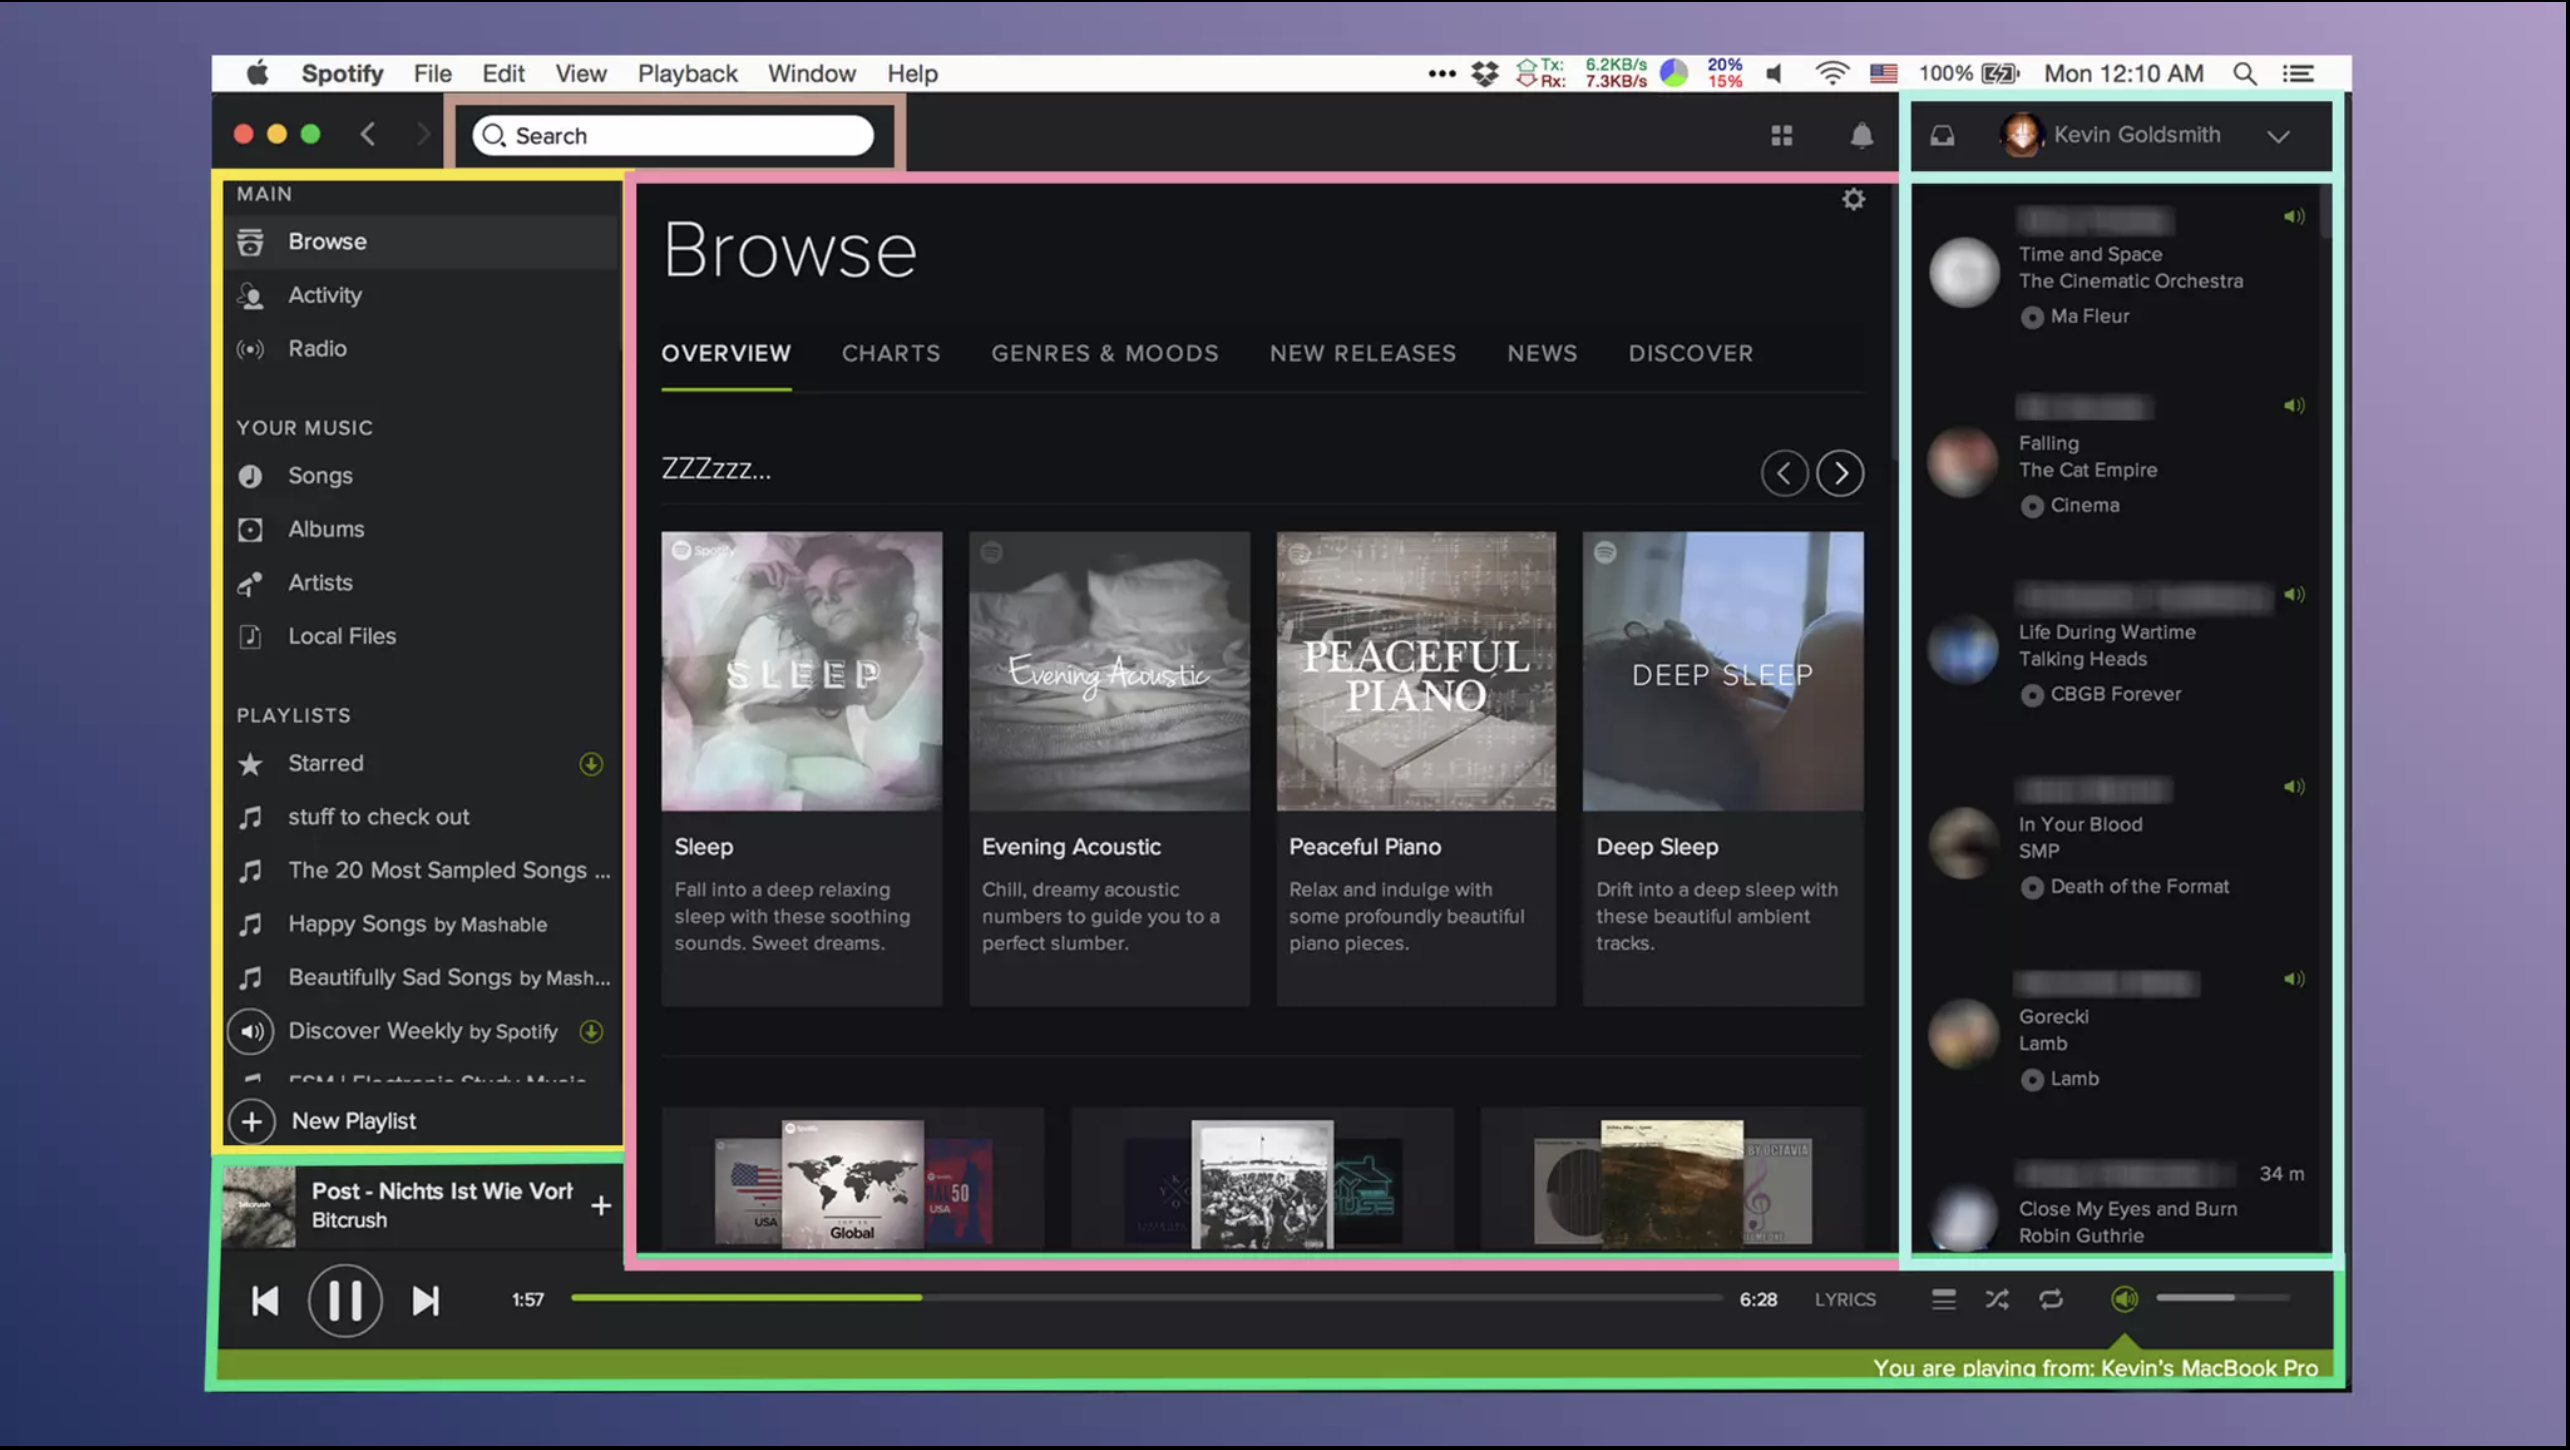
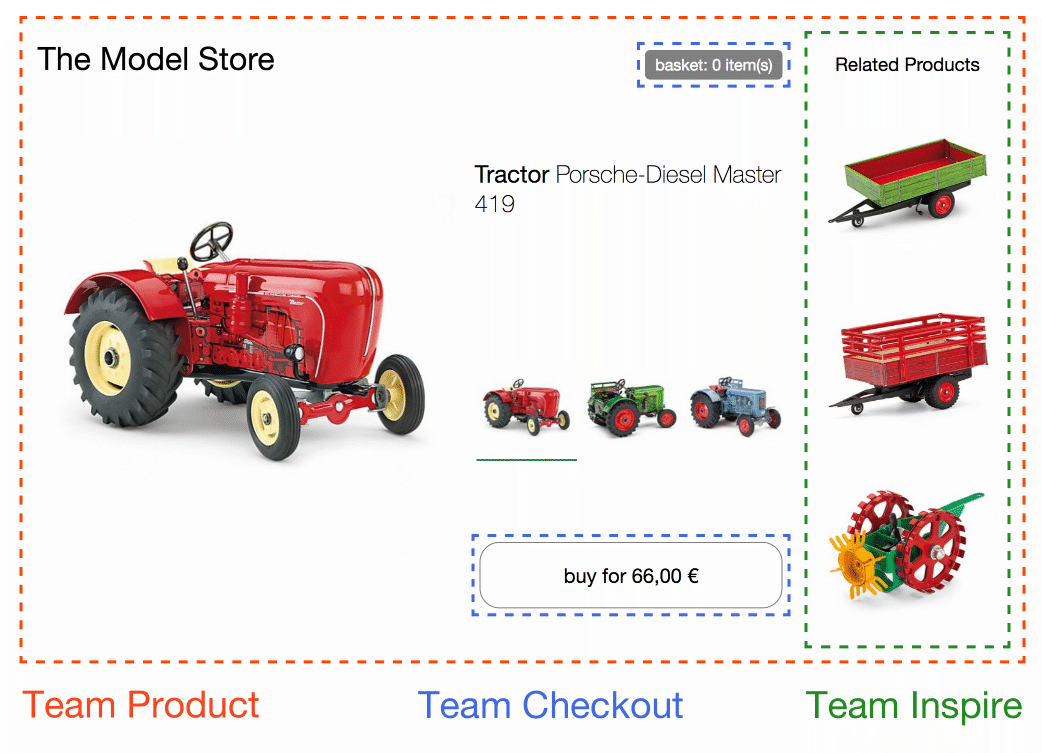
Spotifyの場合、画面のUIごとに機能が独立していますが、アプリケーションのよってはドメインが求めるUIは複数あるため、必ずしもUIごとになるとは限りません。例えばECサイトの場合、購入に関するドメインだと、カートや購入ボタンなど複数のUIを実装する必要があります。水平分割パターンでは、複数のUIが横断的に関わることなります。細かいモジュールで細分化するため、大規模なチーム開発に適しています。
出典: Micro Frontends extending the microservice idea to frontend development (opens new window)
# 画面ごと(垂直分割パターン)
画面ごとに分割するパターンで、ページごとに1:1でチームを分割します。垂直分割パターンと呼ばれるものです。例えばTwitterのようなSNSの場合、ホーム、通知、メッセージ、ブックマーク、プロフィールなどでチームを分割します。
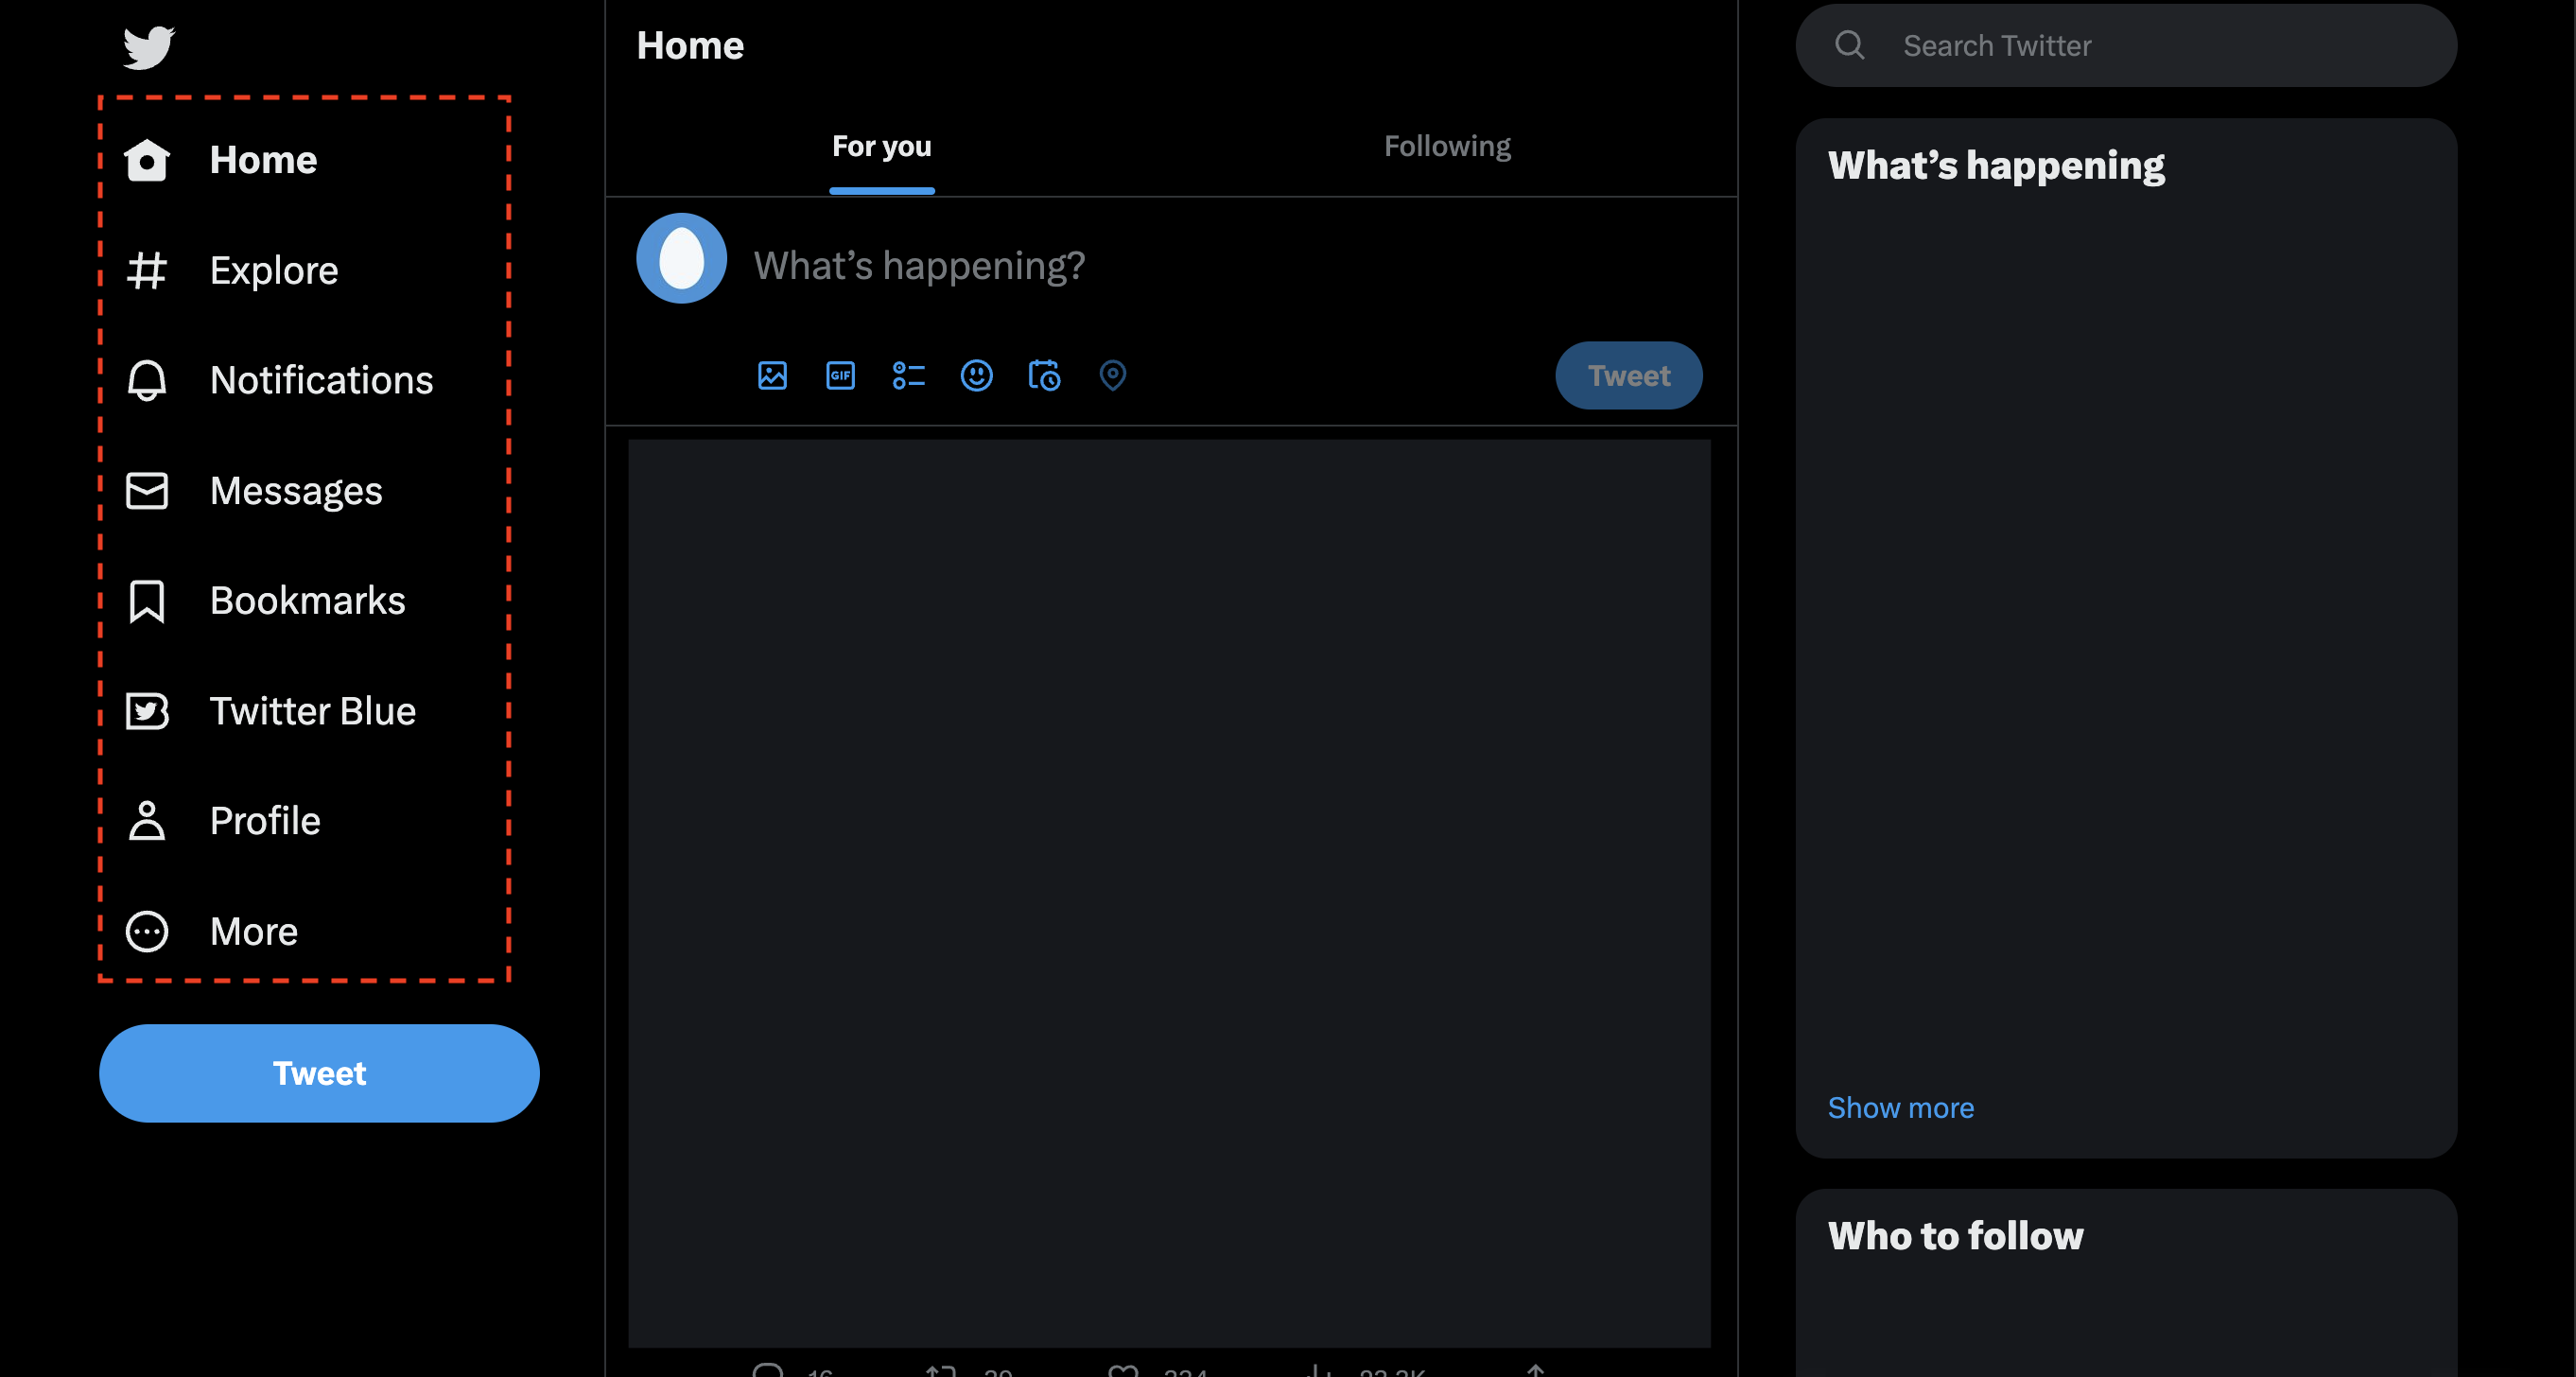 出典: Twitter (opens new window)
垂直分割パターンは、画面を横断する共通のビジネスロジックやドメイン知識がない、または共有する状態管理が少ない場合に有効でしょう。ページごとに完結しているので、影響範囲も明確にすることができます。ただ、ページによって開発の規模やリリースの頻度が変わったり、共通のドメイン知識が多くなった場合に、チームの責務が不明瞭になる可能性があります。また、何百人もの開発体制で行う場合はモジュール単位で細かく分けられる水平分割の方が適しているケースもあります。垂直分割パターンは、数十人程度のチーム開発が有効と考えられます。
# Micro Frontendsの実装パターン
次に、Micro Frontendsが実際にどのように実装されるのか見ていきます。
Micro Frontendsは複数のサービスを組み合わせてアプリケーションを構築します。その組み合わせるパターンは、クライアント、サーバーサイド、エッジサイド、ビルドなどがあります。それぞれが扱う技術やフレームワークは異なるため、Micro Frontendsを導入する際はそれぞれのメリット、デメリットを理解した上で自身のアプリケーションに合った選定をする必要があります。
それでは、一つずつ見てみましょう。
# クライアント
各サービスをクライアントサイドで統合するパターンです。iframeやWeb ComponentsといったWeb標準の技術を使ってUIを構築します。クライアントサイドで全て完結させるため、SPAのようなインタラクティブなアプリケーションを統合する際に有効な設計です。
# iframe
iframeはブラウザ標準のAPIで、ページ内から別のHTMLをロードするために使われるインラインフレームです。iframeを使うことで、異なるリソース先からコンテンツを参照することができます。また、HTML5から導入されたサンドボックス属性 (opens new window)を使うことで、JavaScriptロジックの制御やフォーム送信の制御など、外部に影響を与えないようにセキュリティを担保することができます。サンドボックス属性は許可する挙動を明示的にセットし、セキュリティ範囲を設定します。例えば、フォーム送信の許可やスクリプトの実行許可を設定することができます。具体的には以下のような属性値をセットすることができます。
| 属性値 | 許可項目 |
|---|---|
| allow-scripts | スクリプト(ポップアップを除く)の実行を許可 |
| allow-forms | フォームからのデータ送信を許可 |
| allow-same-origin | 通常のオリジンと同じポリシーを適用する |
Micro Frontendsでは、iframeを複数組み合わせてアプリケーションを構築します。iframeのリソースをサービスごとに細分化することで、チームごとに独立して開発をすることができます。
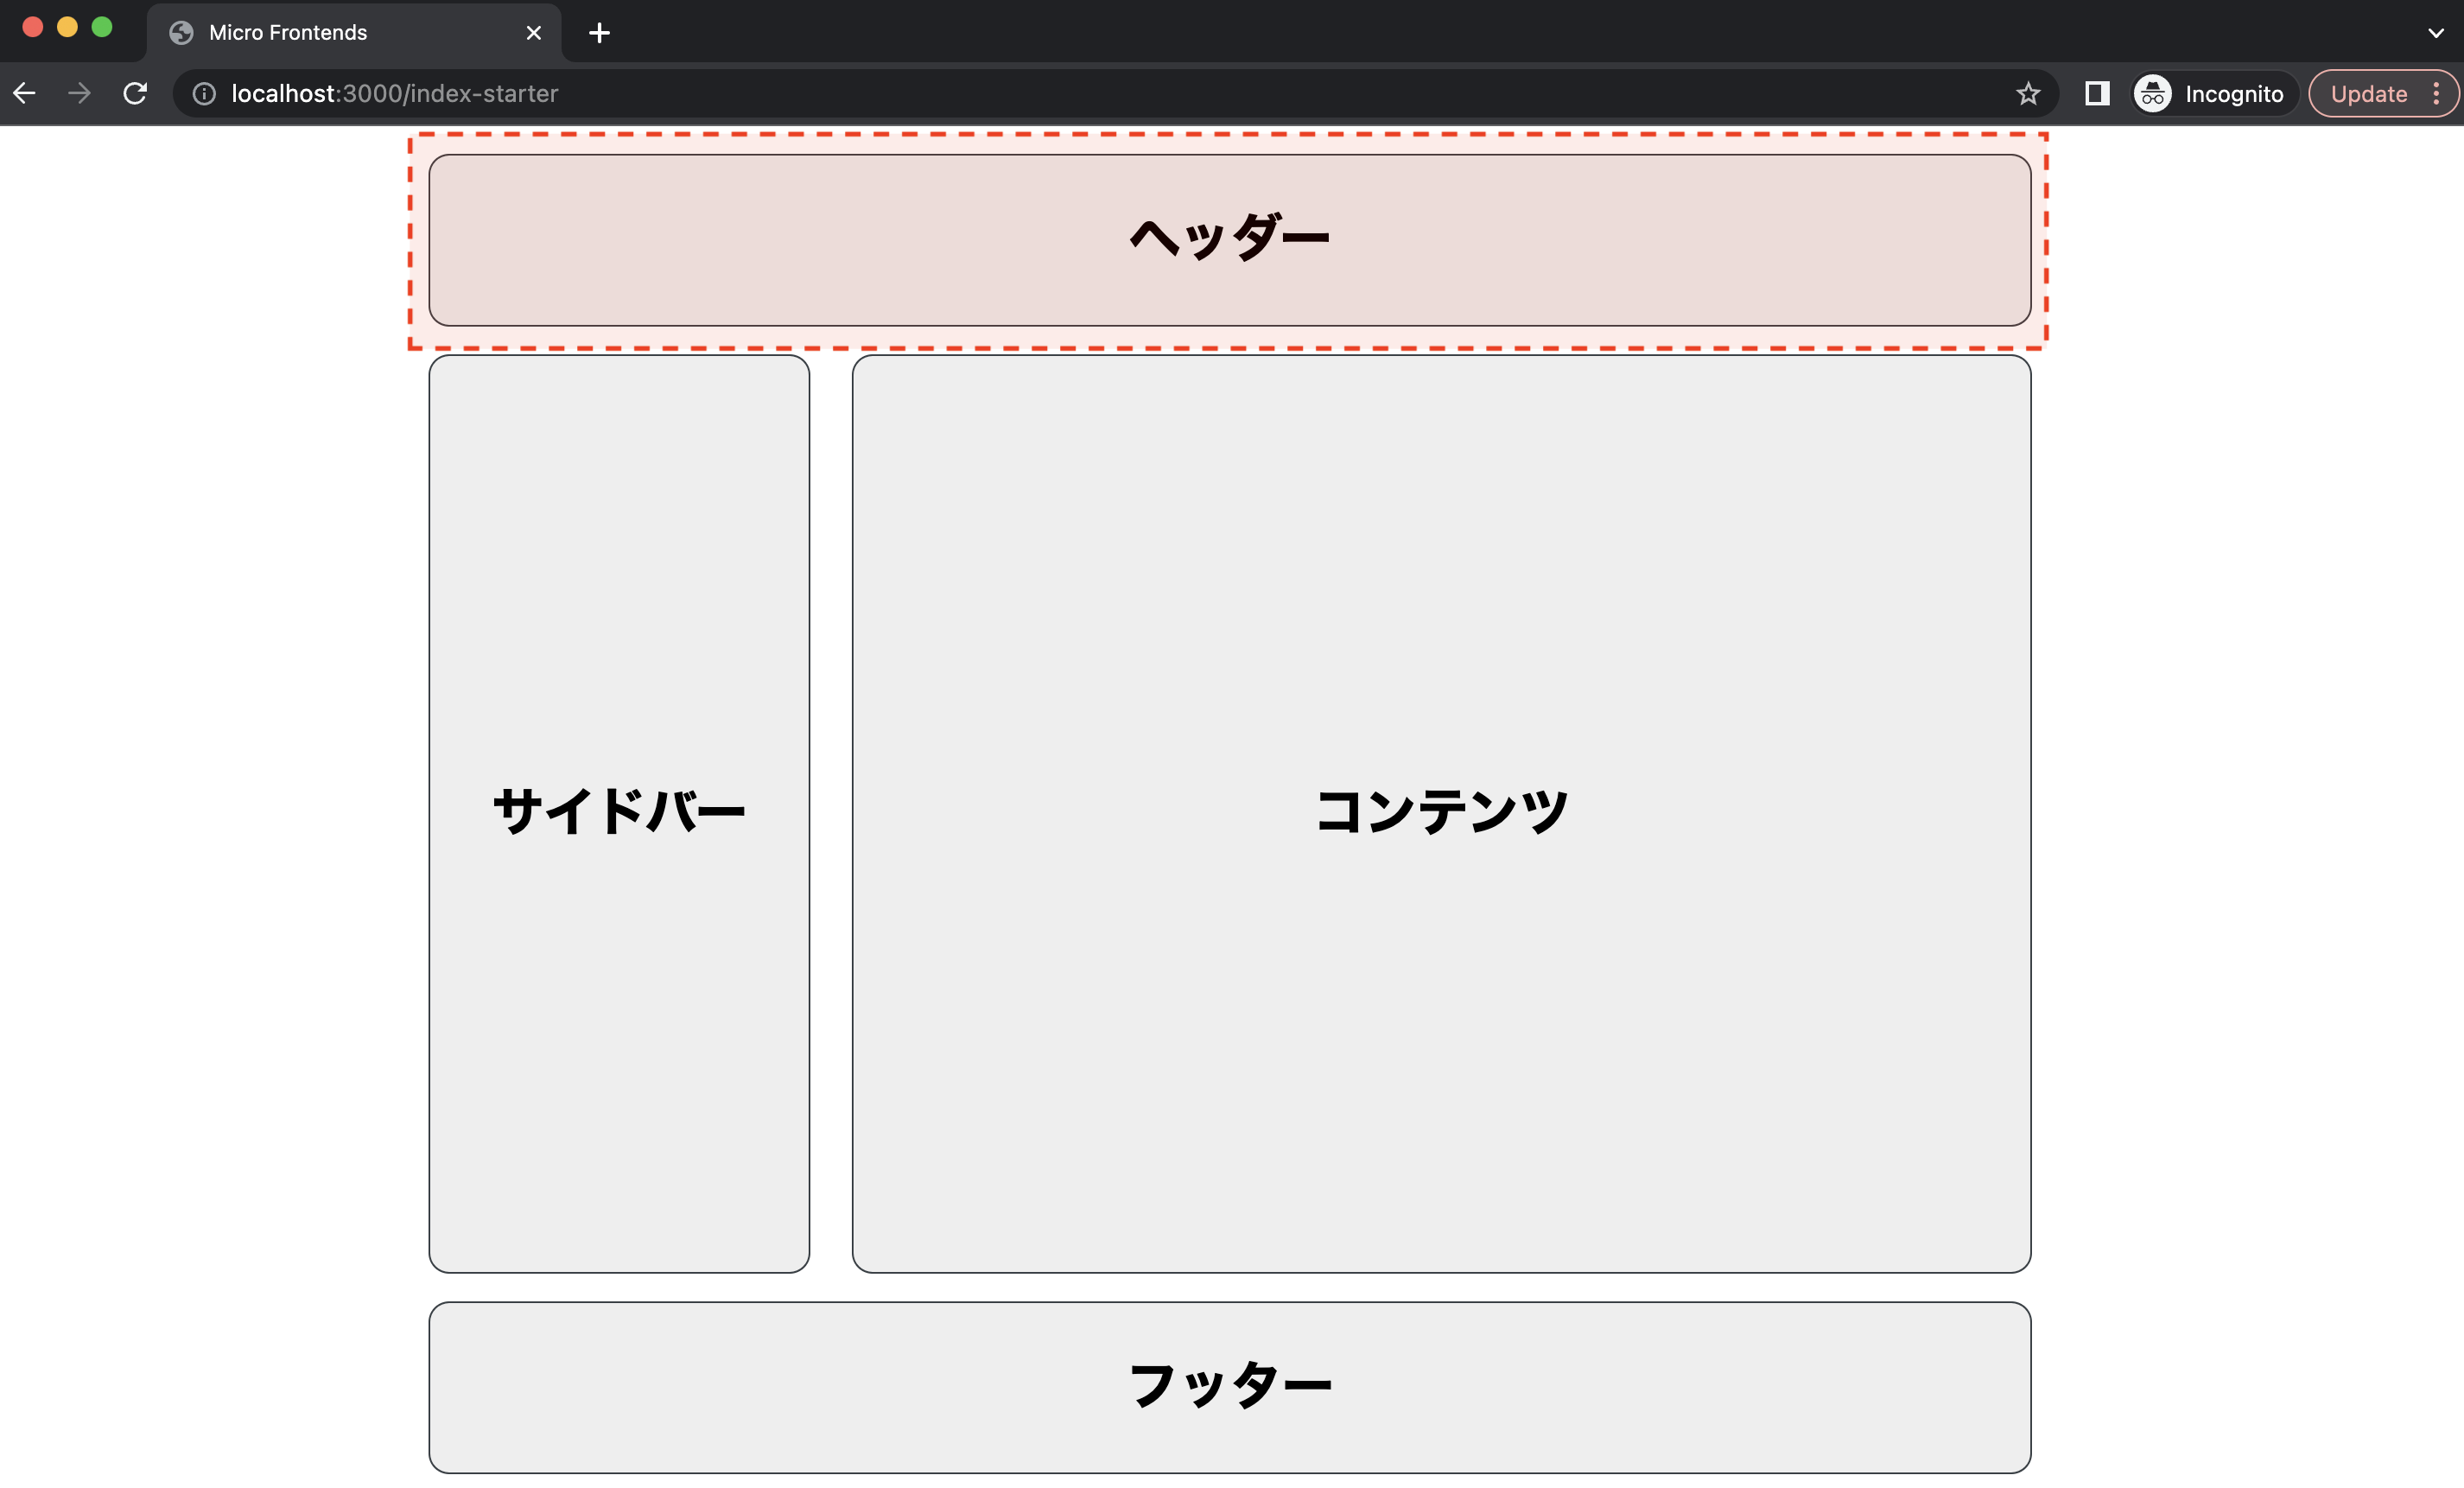
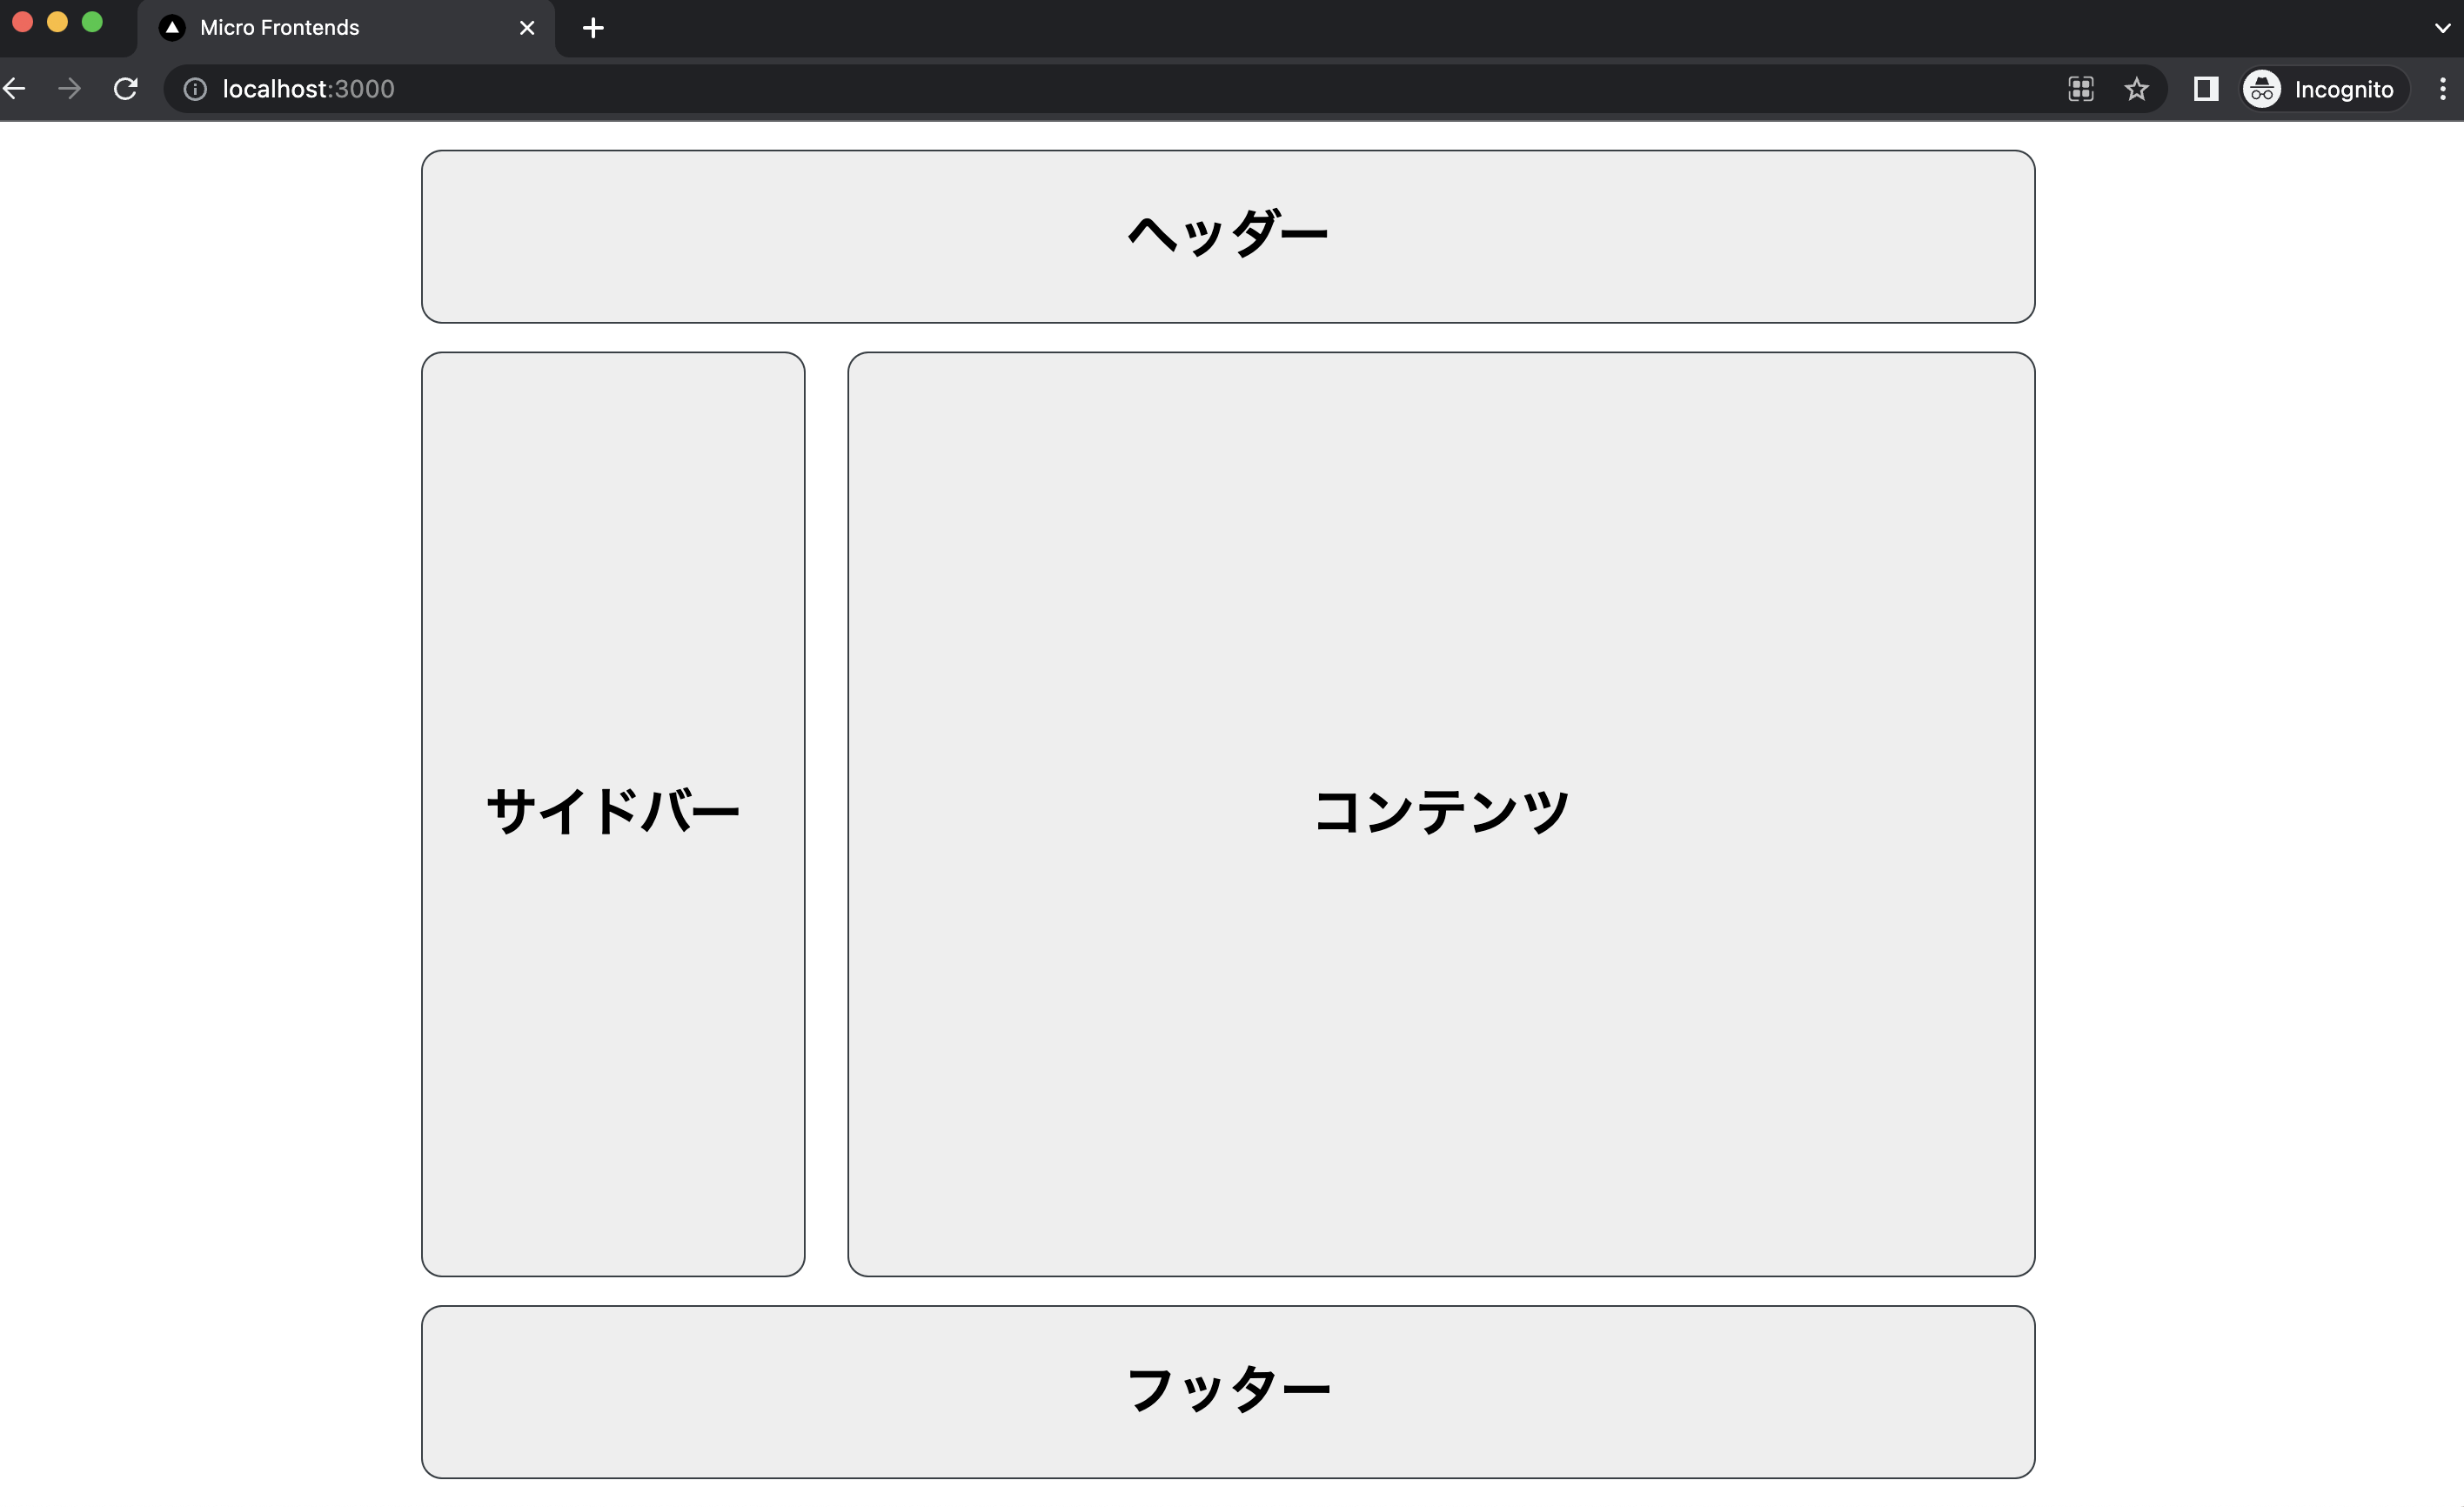
例えば、次のようなWebサイトを想定して、実際にどのようにiframeが機能するか見てみましょう。
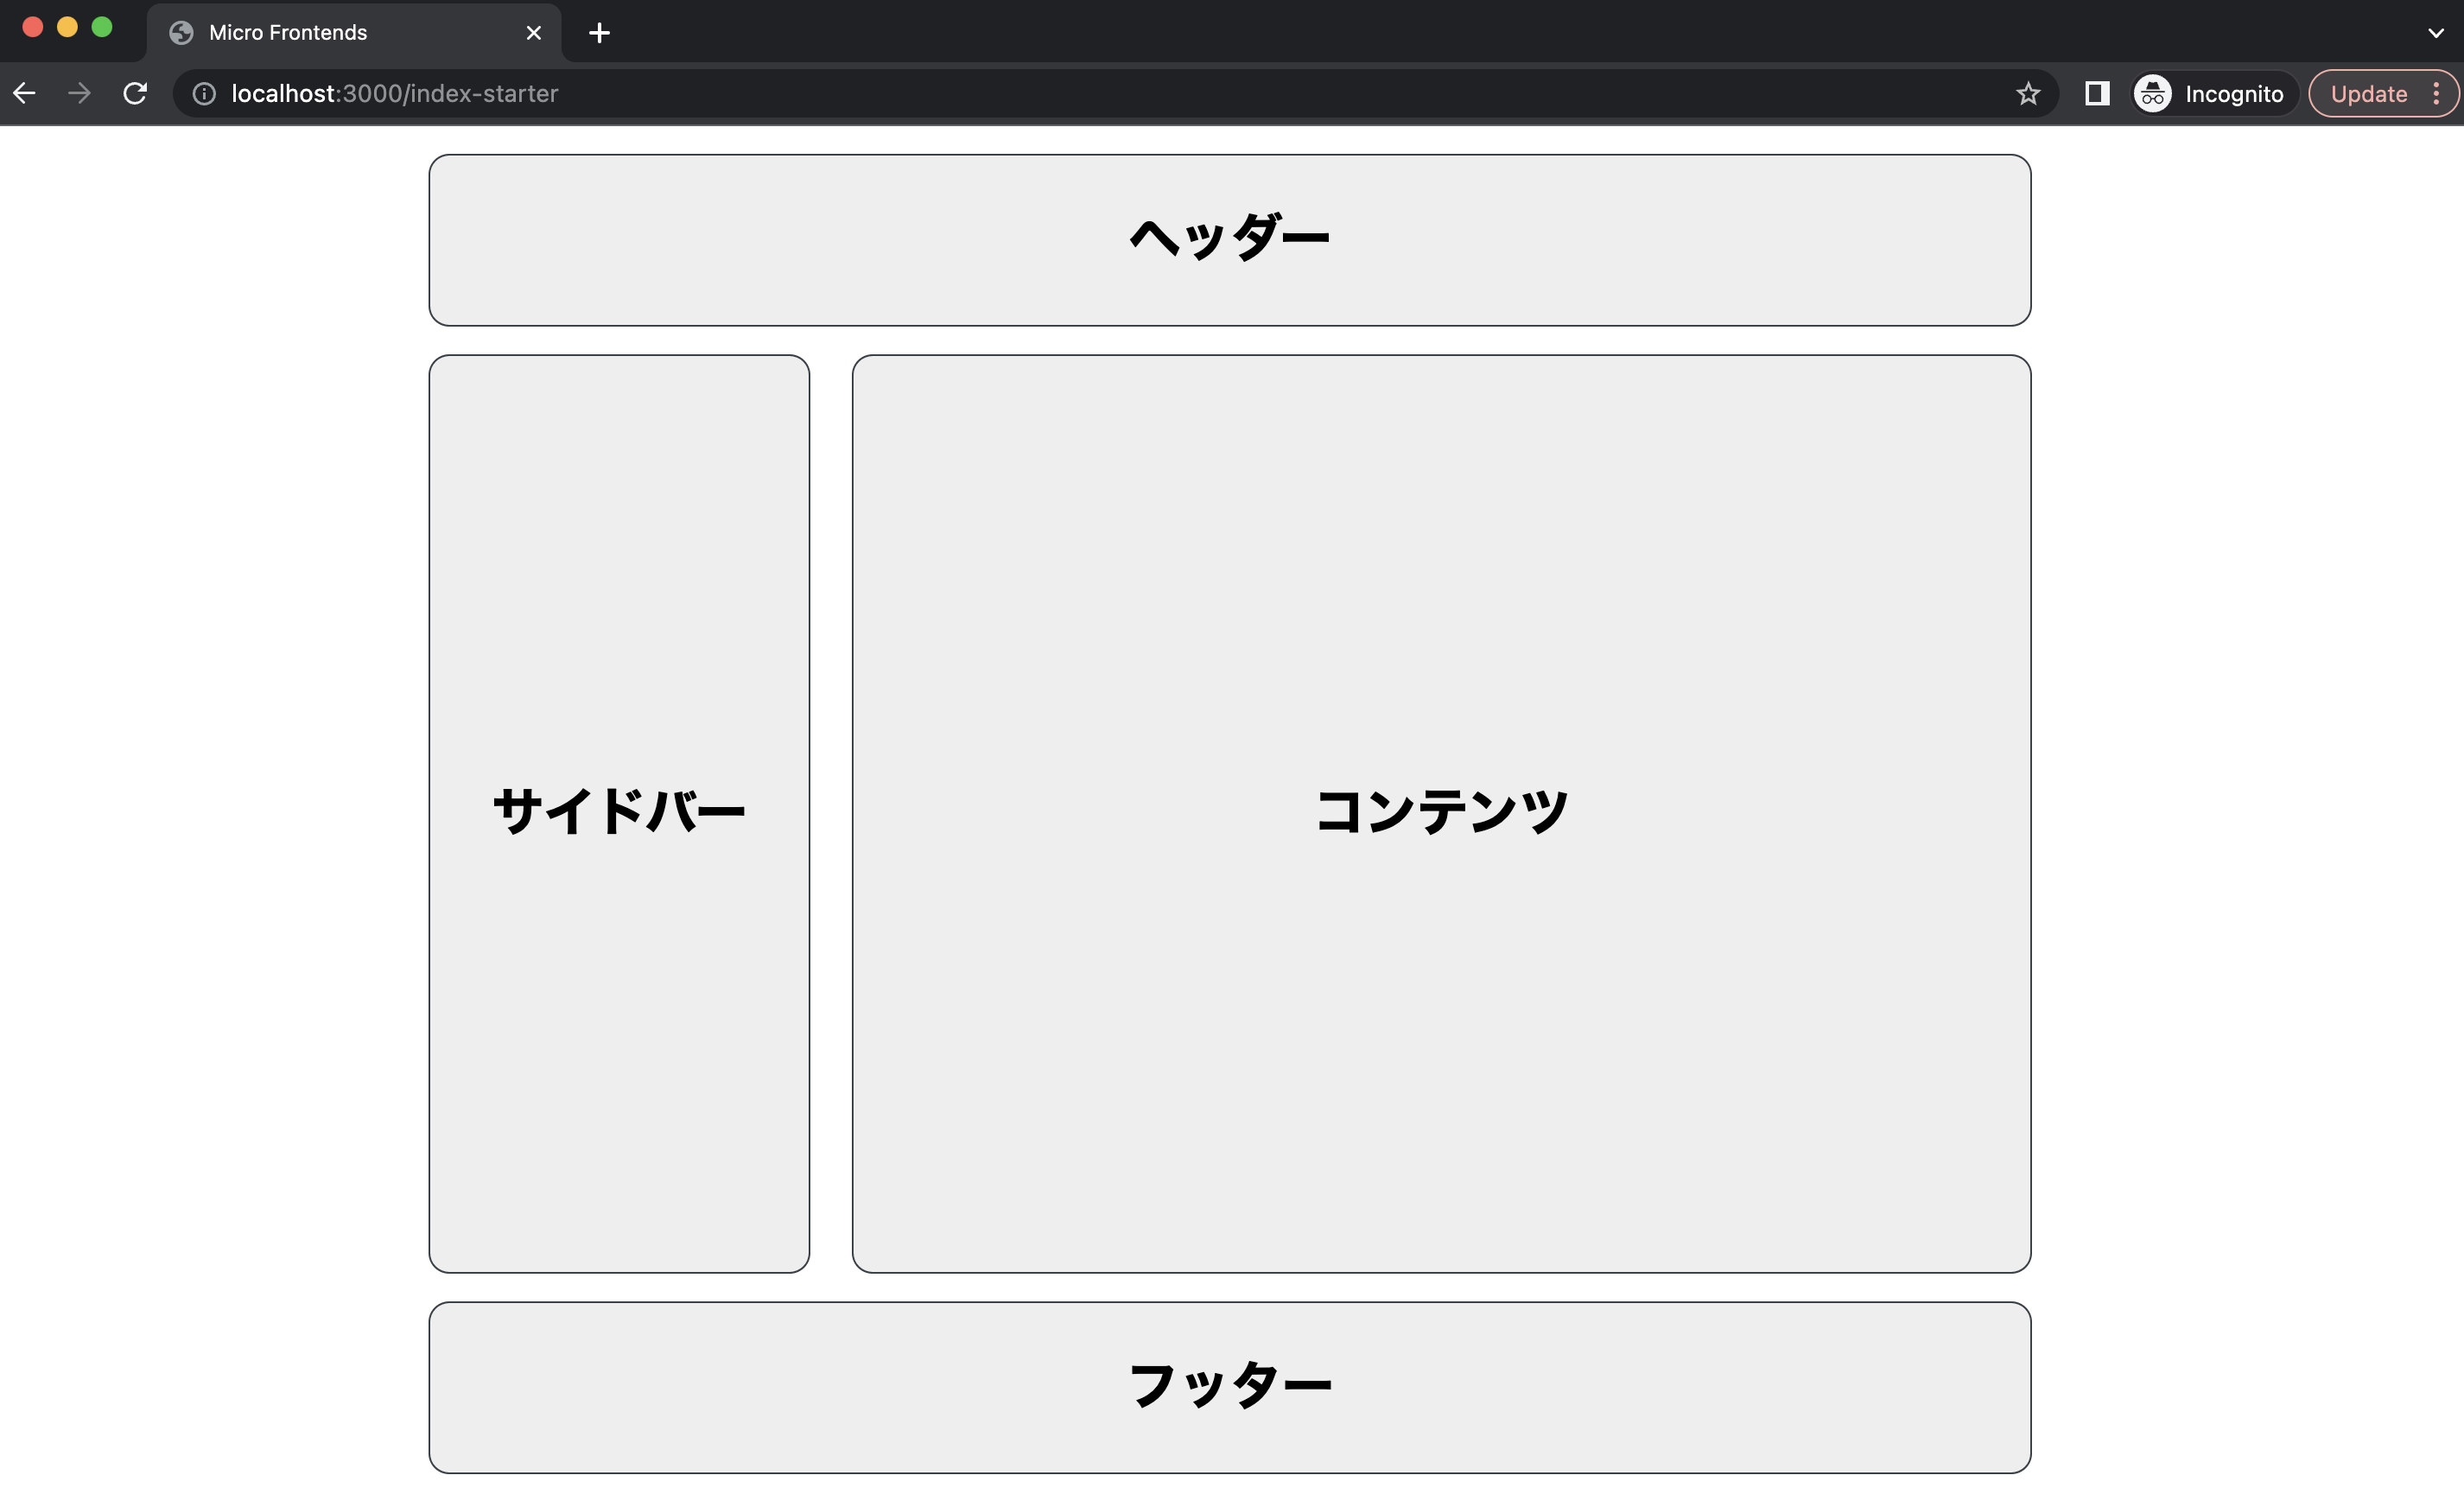
このサイトのHTMLは次のような構成になっています。
<main>
  <header class="header">ヘッダー</header>
  <div class="container">
    <nav class="nav">サイドバー</nav>
    <div class="content">コンテンツ</div>
  </div>
  <footer class="footer">フッター</footer>
</main>
このうち、ヘッダー部分をMicro Frontendsとして切り出してみましょう。
ヘッダー部分はhttp://localhost:3001から静的コンテンツを配信する想定で実装します。その場合、メインのHTMLに次のようなiframeを埋め込みます。
<main>
  <iframe id="header" src="http://localhost:3001" sandbox="allow-same-origin allow-scripts" onload="iFrameResize({ log: false }, '#header')"></iframe>
  <div class="container">
    <nav>サイドバー</nav>
    <div class="content">コンテンツ</div>
  </div>
  <footer>フッター</footer>
</main>
iframeのsrc属性に参照先のhttp://localhost:3001を指定します。onloadイベントに指定しているのはiframe-resizer (opens new window)というライブラリの関数です。iframeのデフォルトのheightが150pxなので、iframe-resizerを使用してheightを動的に変更しています。
では、ヘッダーを実装しましょう。新たにheader/index.htmlを作成し、既存のヘッダー部分を移動します。
<html>
<head>
  <meta charset="UTF-8">
  <link href="https://fonts.googleapis.com/css2?family=Roboto:wght@400;500;700&display=swap" rel="stylesheet">
  <link rel="stylesheet" href="https://unpkg.com/modern-css-reset/dist/reset.min.css" />
  <style>
    html {
      font-family: Roboto,serif;
    }
    header {
      width: 100%;
      height: 100px;
      background: #eeeeee;
      display: flex;
      align-items: center;
      justify-content: center;
      font-size: 30px;
      font-weight: bold;
      border-radius: 12px;
      border: 1px solid rgb(47 55 61 / 95%);
    }
  </style>
  <script src="./js/iframeResizer.contentWindow.min.js"></script>
</head>
<header>ヘッダー</header>
</html>
このHTMLをhttp://localhost:3001から配信して、メインのコンテンツと統合します。今回はserve (opens new window)パッケージを使って静的サーバを立ち上げます。
serve header -p 3001

   ┌──────────────────────────────────────────┐
   │                                          │
   │   Serving!                               │
   │                                          │
   │   - Local:    http://localhost:3001      │
   │   - Network:  http://192.168.11.2:3001   │
   │                                          │
   │   Copied local address to clipboard!     │
   │                                          │
   └──────────────────────────────────────────┘
これで、http://localhost:3001へアクセスすると上記のHTMLが返されます。
では、メインのサーバを立ち上げて動作確認してみましょう。
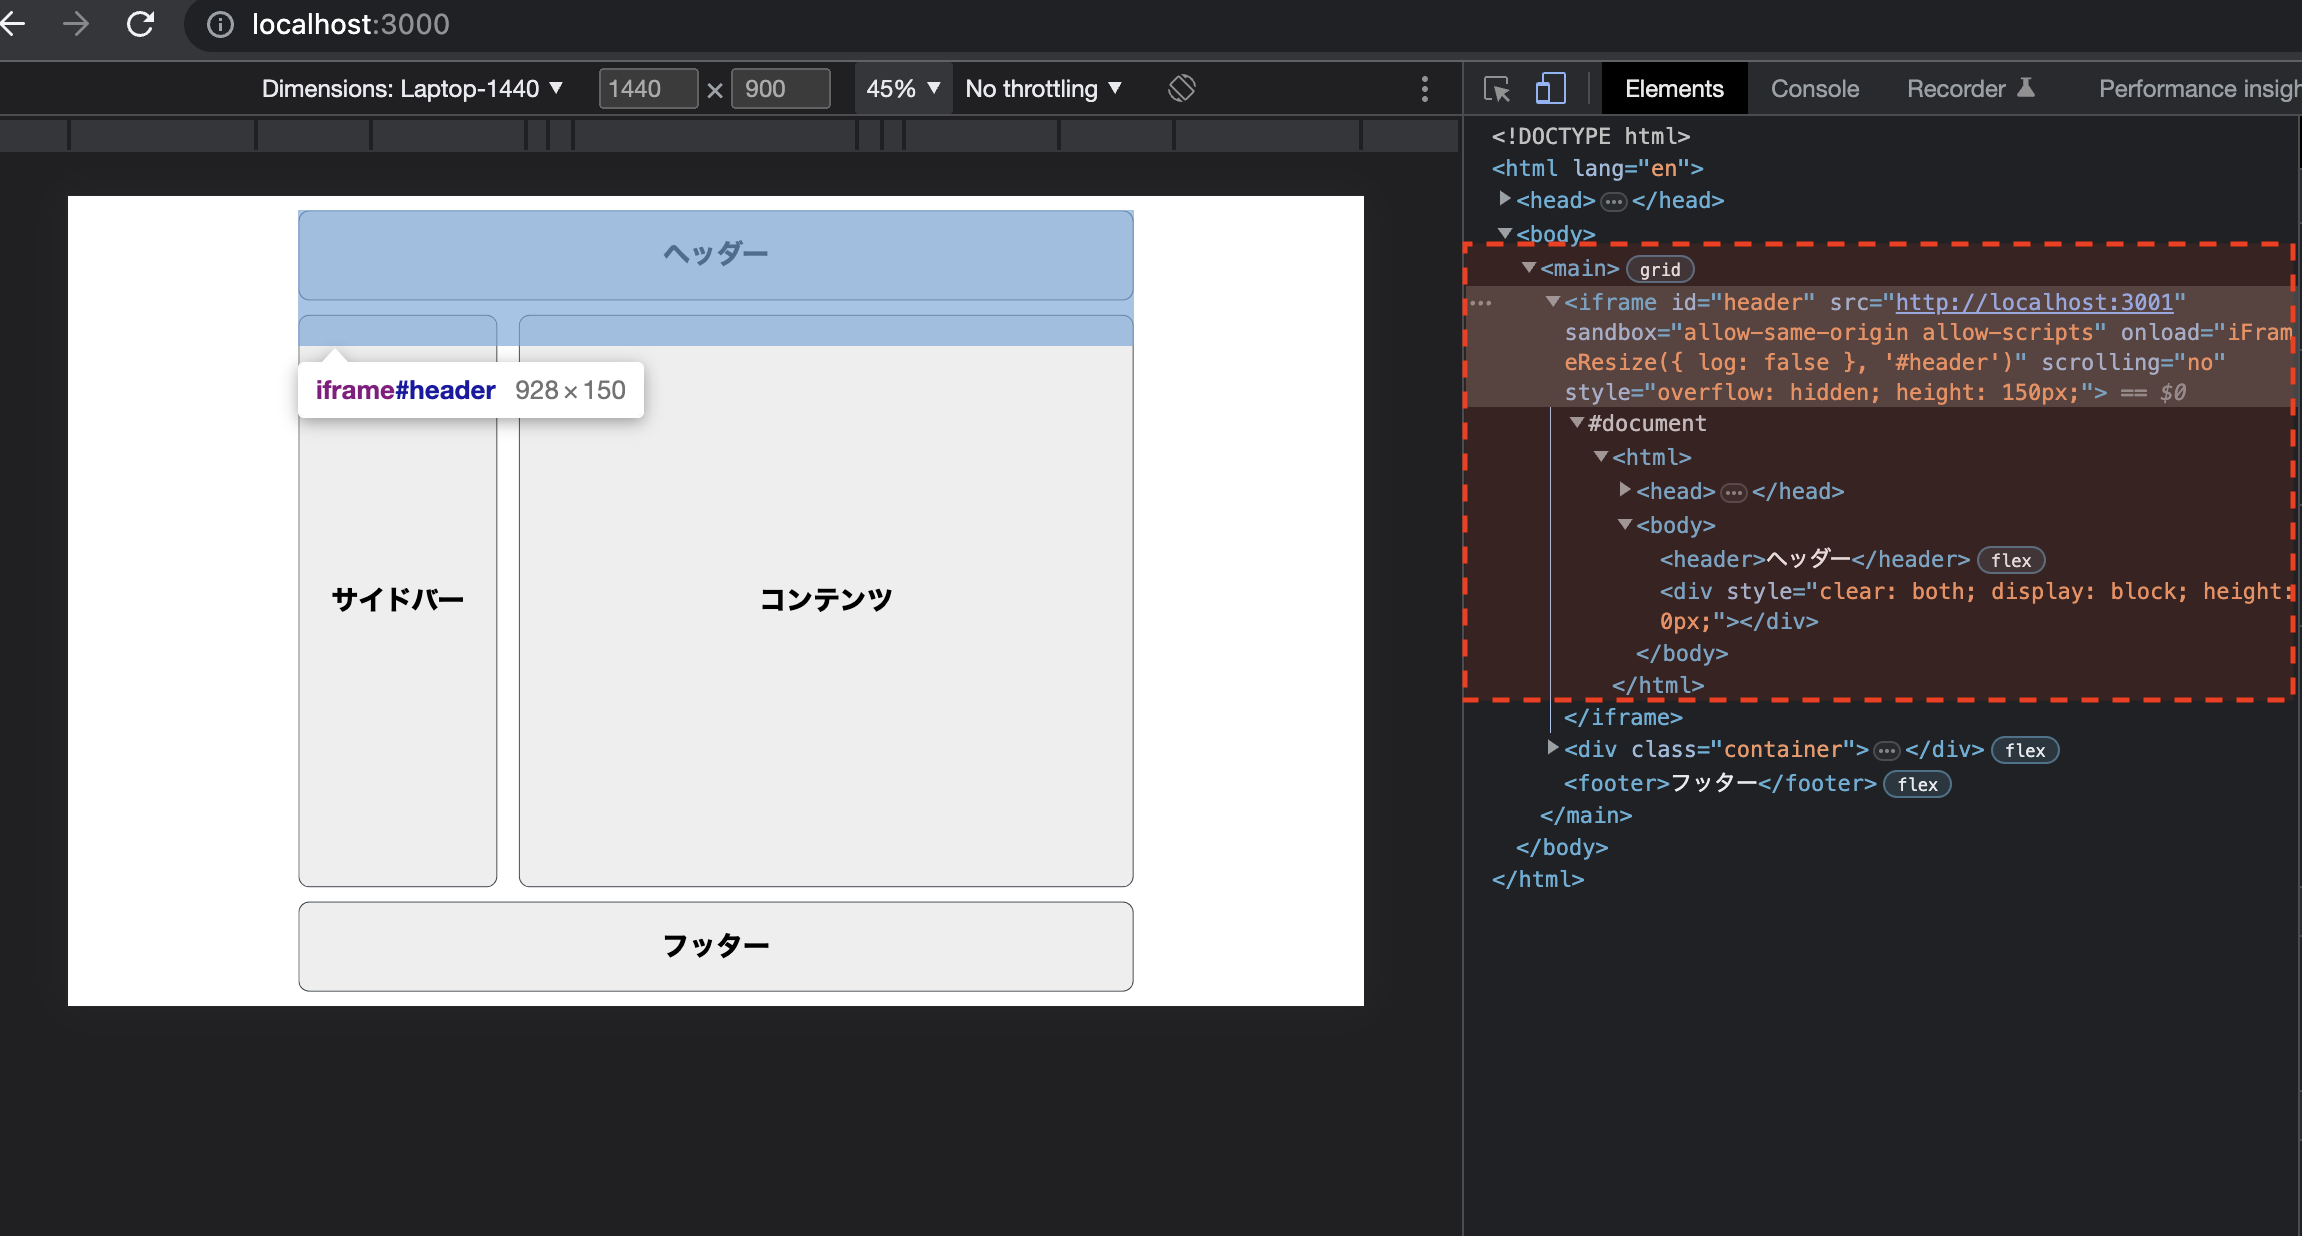
インスペクターで確認すると、iframeからヘッダーが表示されているのが分かります。このように、iframeを使用することで別のサーバから配信されているリソースを取得することができます。
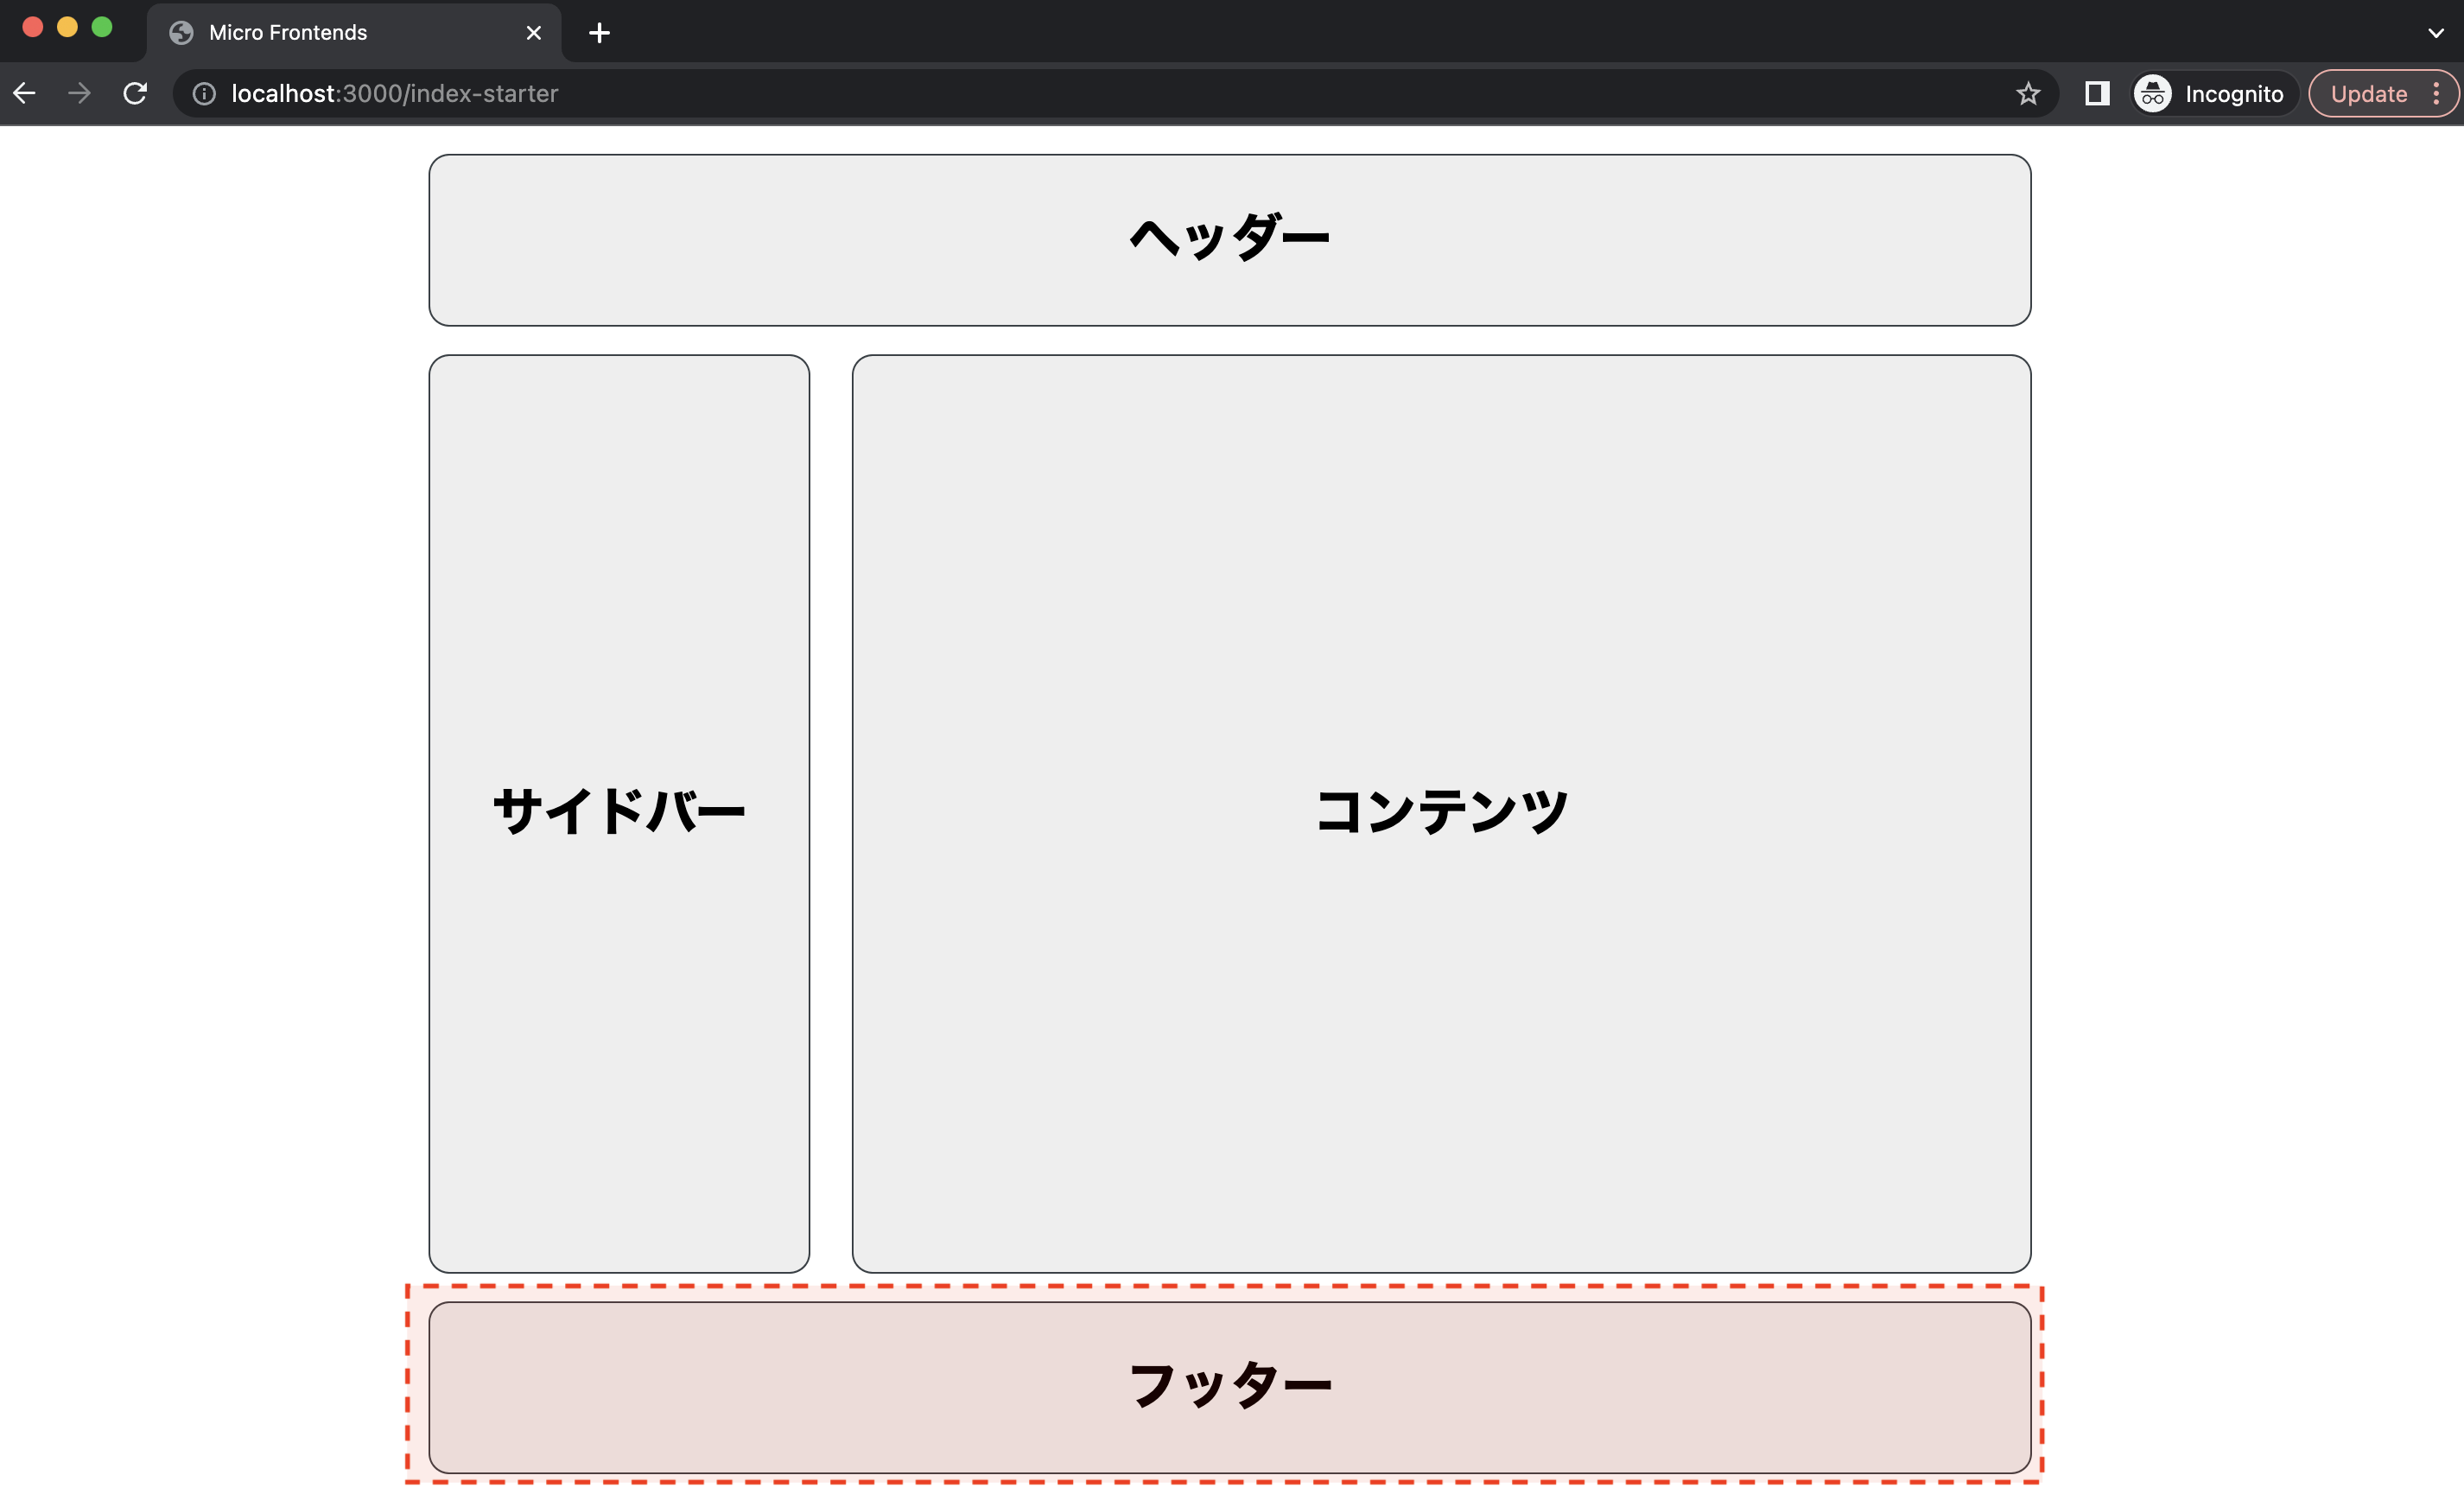
今回は単純なHTMLを静的サーバから配信するだけでしたが、実際の開発ではフレームワークを使うことがほとんどでしょう。続いては、フッター部分をNext.jsを使って配信してみましょう。
はじめに、footerフォルダを作成し、Next.jsをインストールします。
npx create-next-app@latest --typescript footer
インストールが終わると、次のようなフォルダ構成になります。
footer/
├── README.md
├── next-env.d.ts
├── next.config.js
├── package-lock.json
├── package.json
├── public
├── src
│ ├── pages
│ │ ├── _app.tsx
│ │ ├── _document.tsx
│ │ ├── api
│ │ │ └── hello.ts
│ │ └── index.tsx
│ └── styles
│     ├── Home.module.css
│     └── globals.css
├── tsconfig.json
└── yarn.lock
src/pages/index.tsxをフッター部分に置き換えます。
import styles from 'src/styles/Home.module.css'

export default function Home() {
  return (
    <footer className={styles.footer}>フッター</footer>
  )
}
Next.jsサーバはhttp://localhost:3002から配信したいので、package.jsonのdevにポートを指定します。
{
  "scripts": {
    "dev": "next dev -p 3002",
    "build": "next build",
    "start": "next start",
    "lint": "next lint"
  },
}
これで、Next.jsの準備が整いました。開発サーバを起動しましょう。
yarn dev

$ next dev -p 3002
ready - started server on 0.0.0.0:3002, url: http://localhost:3002
event - compiled client and server successfully in 712 ms (172 modules)
メインのHTMLに移って、フッター部分をNext.jsサーバに置き換えましょう。
<main>
<iframe id="header" src="http://localhost:3001" sandbox="allow-same-origin allow-scripts" onload="iFrameResize({ log: false }, '#header')"></iframe>
<div class="container">
<nav>サイドバー</nav>
<div class="content">コンテンツ</div>
</div>
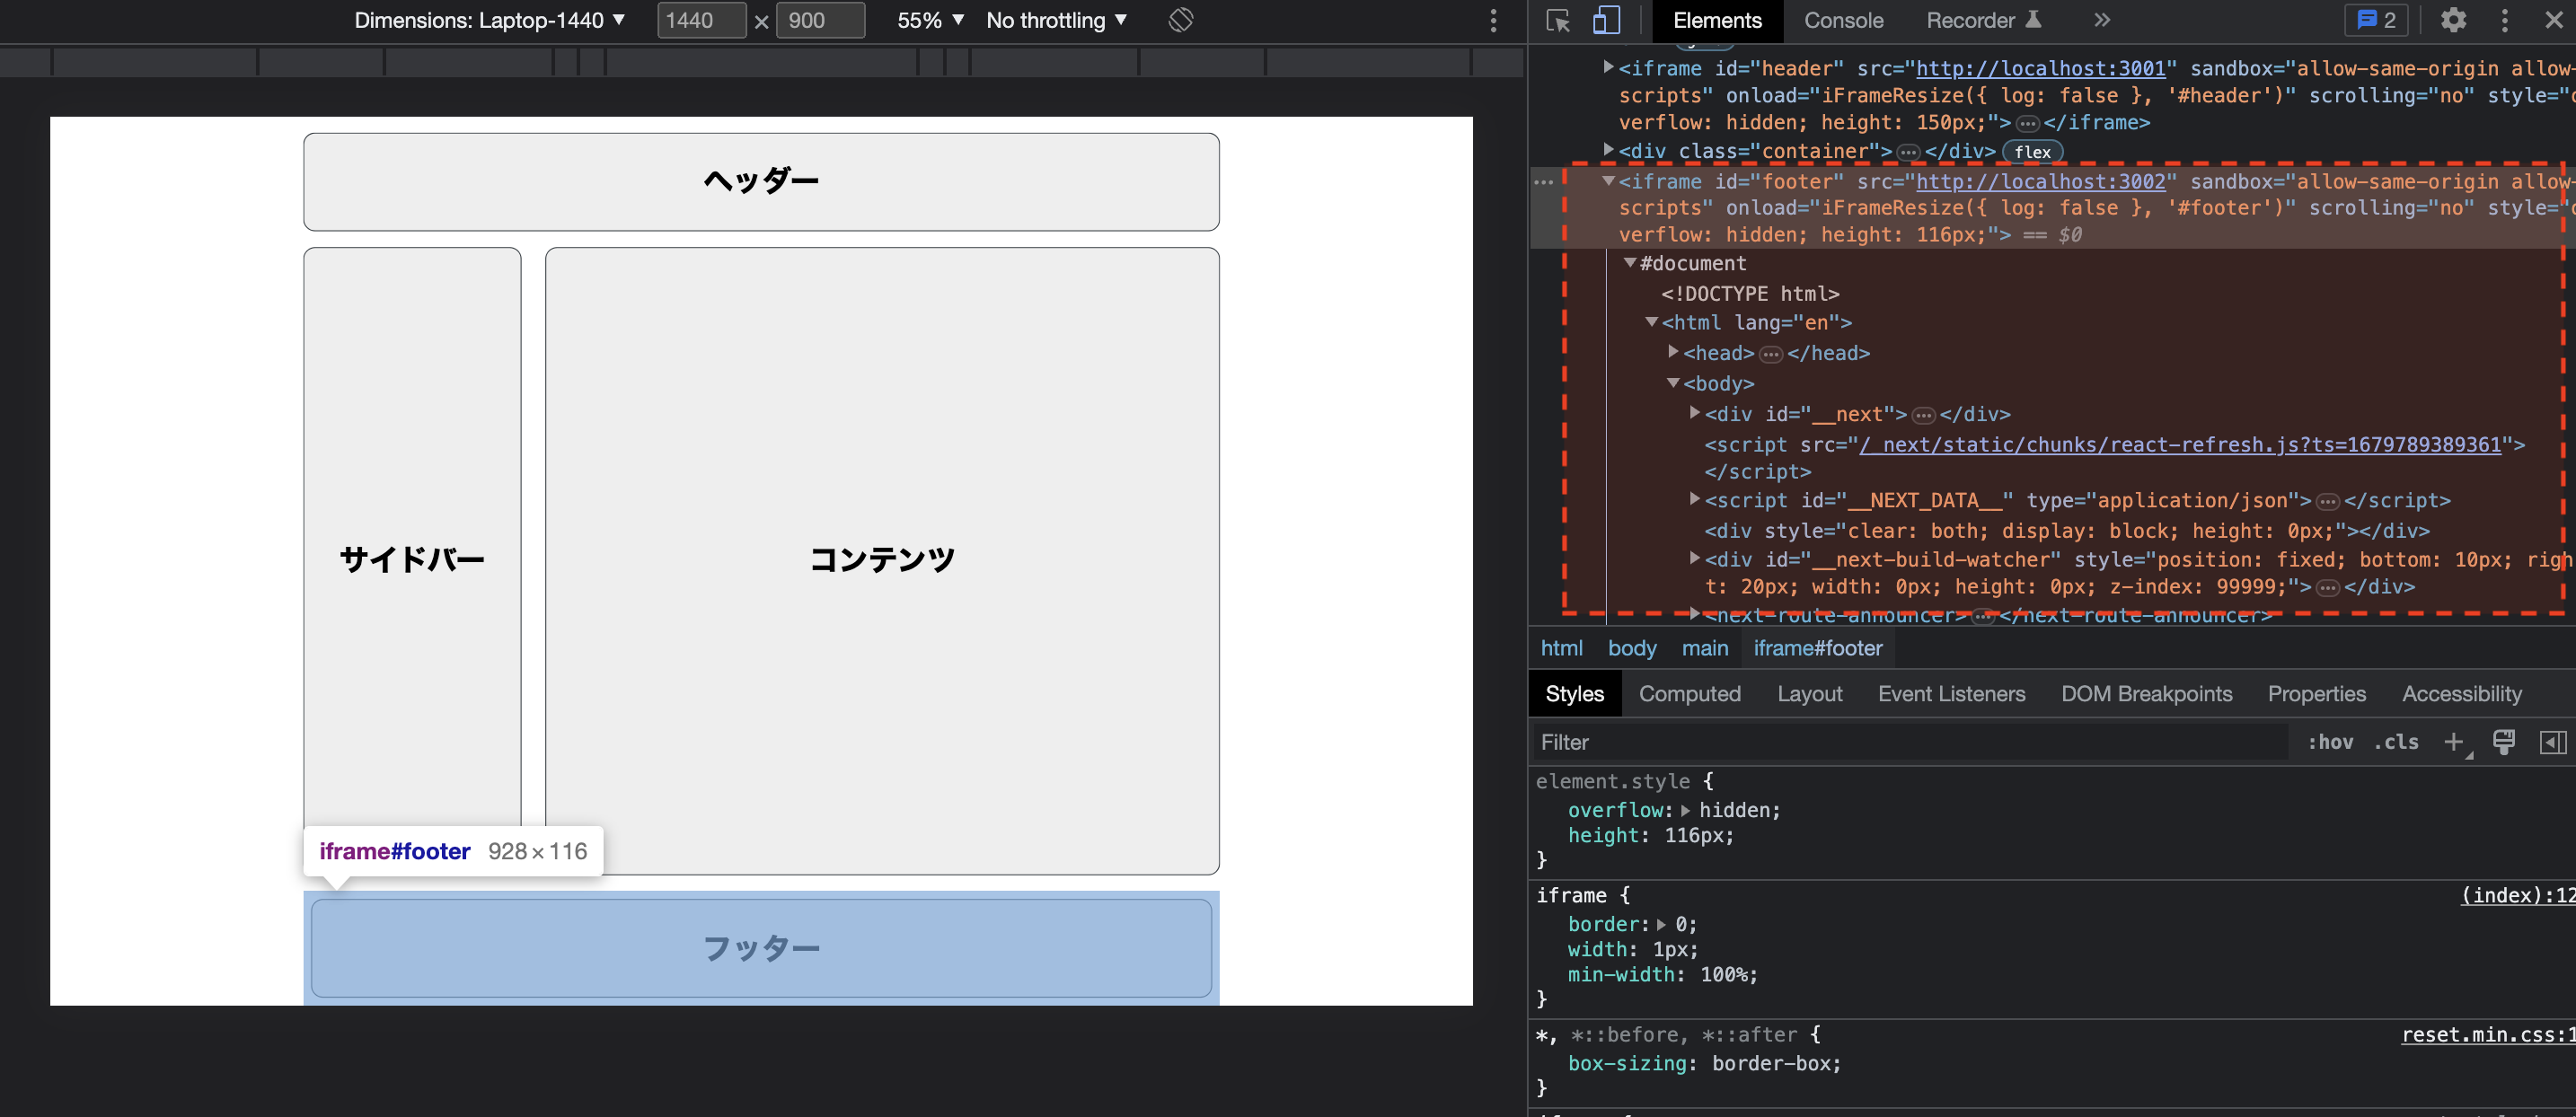
<iframe id="footer" src="http://localhost:3002" sandbox="allow-same-origin allow-scripts" onload="iFrameResize({ log: false }, '#footer')"></iframe>
</main>
メインサーバを起動して動作確認をすると、ヘッダー同様にiframeからNext.jsサーバのコンテンツが配信されているのが分かります。
iframeは、ブラウザー標準の機能であるため、導入しやすいというメリットがあります。また、クライアント側でアプリケーションを構築するので、SPAのような開発体験が可能となります。しかし、検索エンジンによるインデックスができないことや、複数のiframeを使うことでパフォーマンス性が悪くなるなど、考慮する点もあります。近年では、Web Componentsや、Micro frontendsのフレームワークを利用する機会の方が多くなっています。
# Web Components
Web Componentsは、ブラウザー標準仕様で、HTMLタグをカスタムで実装できる技術になります。Web Componentsは、Shadow DOMという技術を使うことで、メインのDOM(Light DOM)から独立してカプセル化された要素を作ることができます。カプセル化することで、外部から影響を受けない設計になります。例えば、Shadow DOMはメインのDOMのCSSの影響を受けません。また、メインのDOMからdocument.querySelector()などでShadow DOM内の要素の操作も受け付けません。このように、Web Componentsは、コンポーネントごとの疎結合と独立性を保てることから、Micro Frontendsで広く使われるようになりました。
Web Componentsの簡単な例を見てみましょう。まず、Web Component用のクラスを作成します。クラスはHTMLElementを継承します。
class HelloWorld extends HTMLElement {
  constructor() {
    super();

    this.innerHTML = `
      <div id="hello-world">こんにちは</div>
    `;
  }
}
そして、CustomElementRegistry (opens new window)でWeb Componentsを登録します。第一引数にタグ名を指定し、第二引数にクラスを指定します。
customElements.define('hello-world', HelloWorld);
あとは、メインのHTMLで上記のJavaScriptをインポートすれば、作成したWeb Componentsを使うことができます。
<head>
  <style>
    hello-world {
      font-size: 40px;
    }
  </style>
  <script type="module" src="./index.js"></script>
</head>
<body>
  <main>
    <hello-world></hello-world>
  </main>
</body>
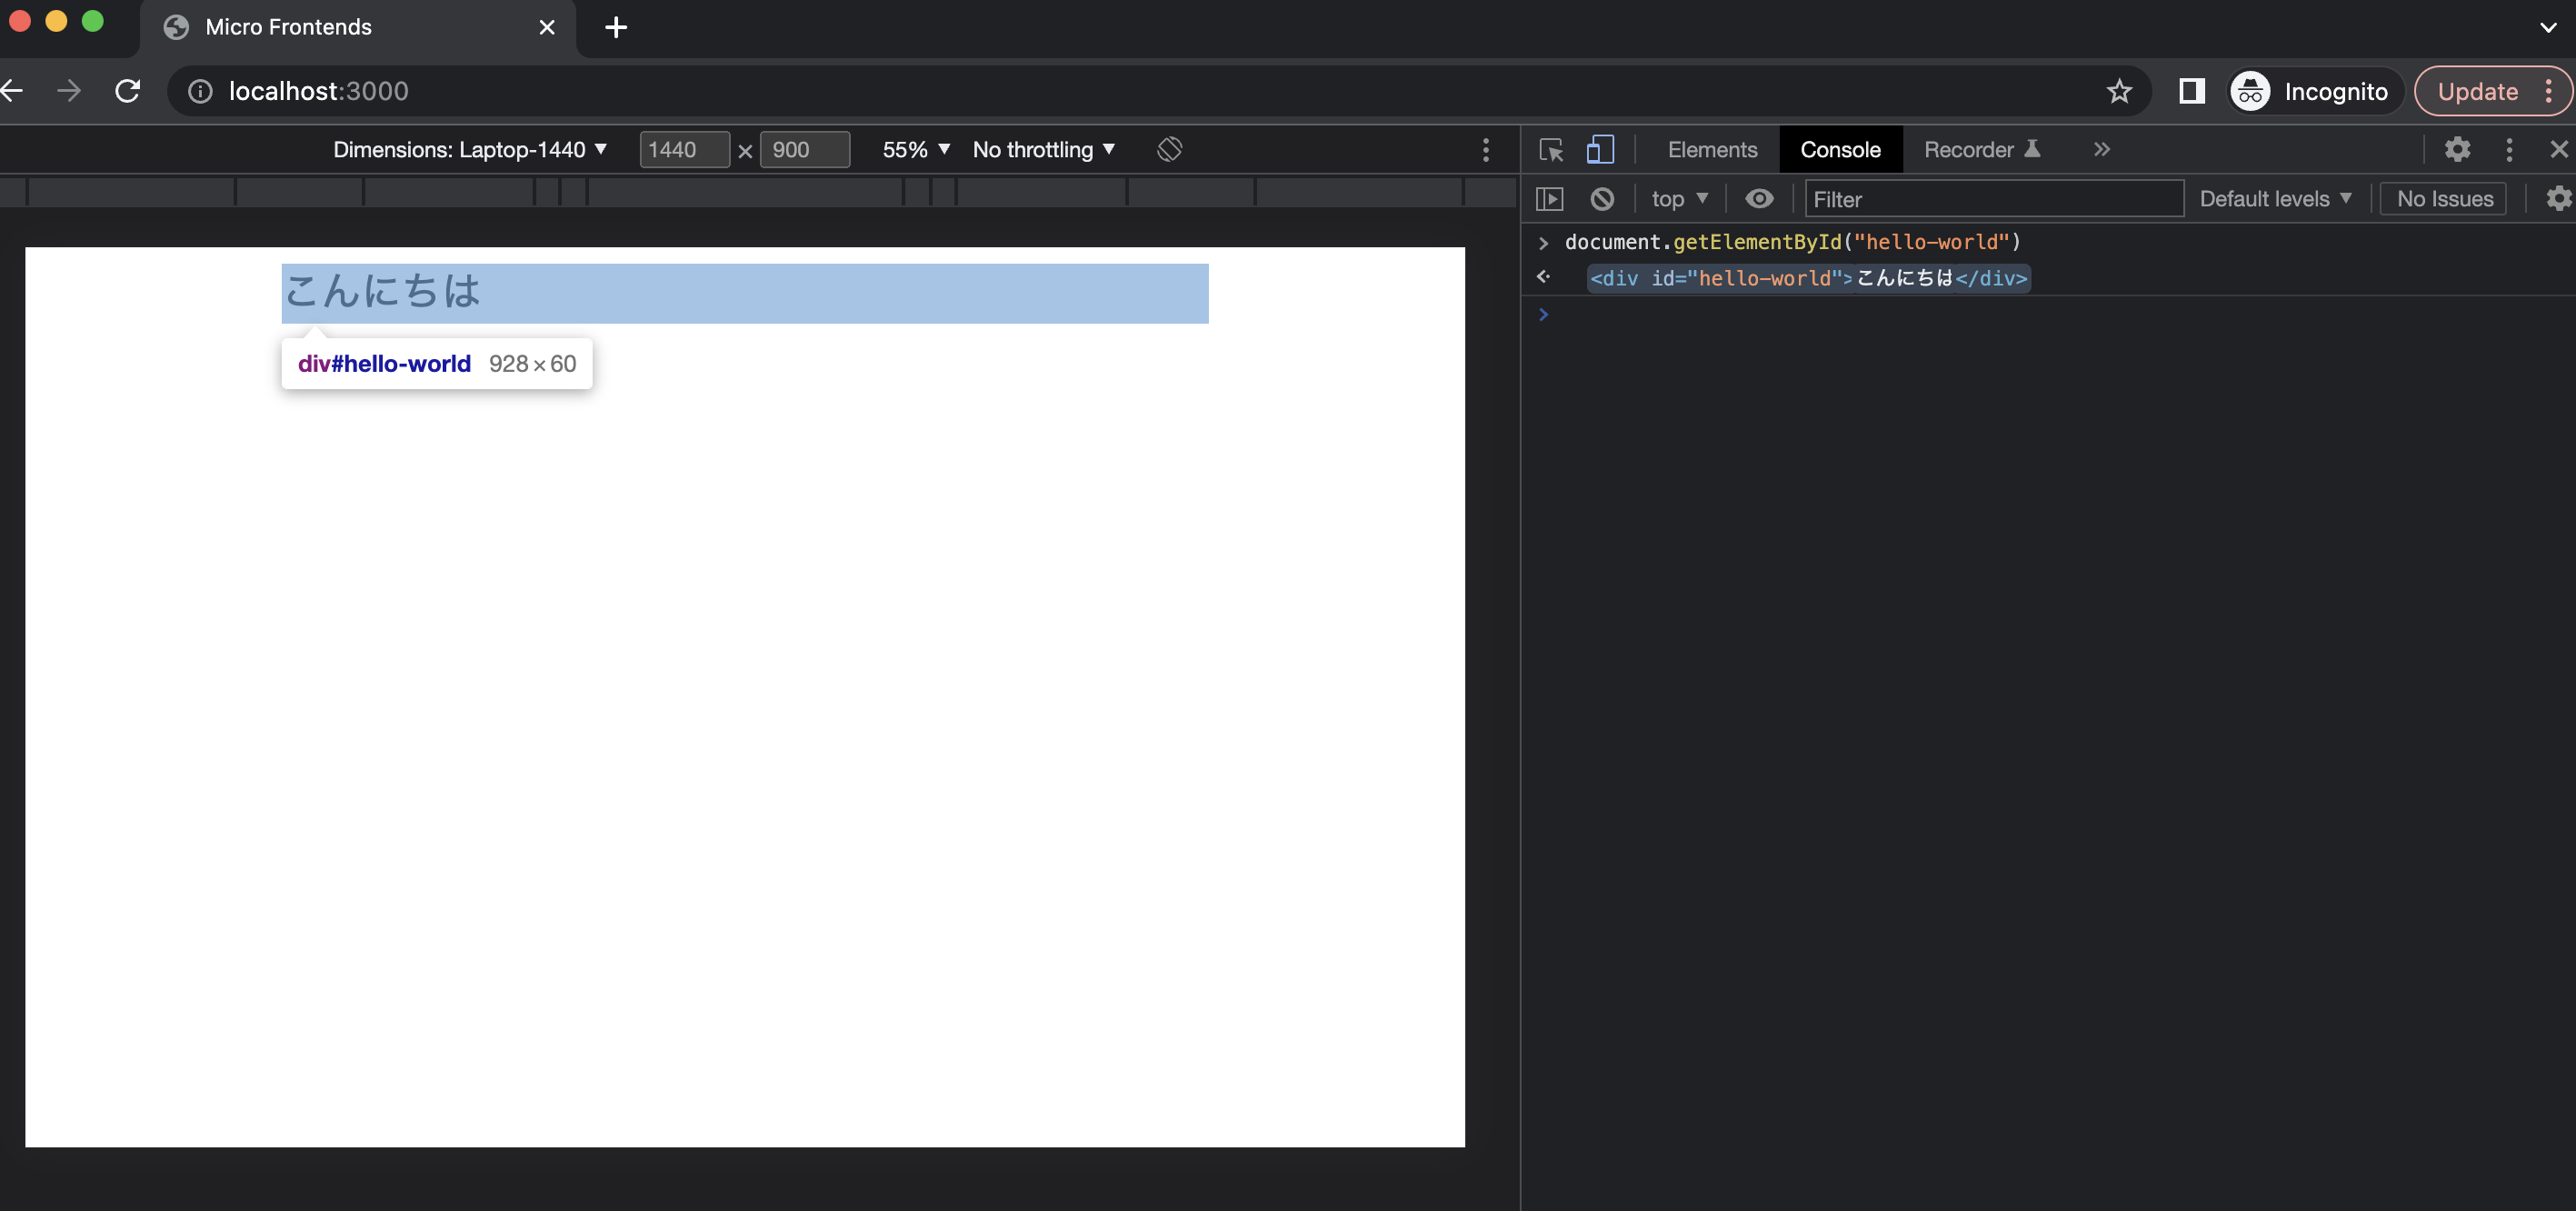
しかし、上記の実装ではdocument.getElementById()でWeb Components内の要素を取得できてしまいます。これでは、外部からの影響を受けてしまいます。
カプセル化を実現するためにShadow DOMを使用しましょう。
Shadow DOMは、this.attachShadow({ mode: 'closed' });で作成します。mode: closedで外部からアクセスを受け付けないようにします。
class HelloWorld extends HTMLElement {
  constructor() {
    super();

    const shadow = this.attachShadow({ mode: 'closed' });
    shadow.innerHTML = `
      <div id="hello-world">こんにちは</div>
    `
  }
}
customElements.define('hello-world', HelloWorld);
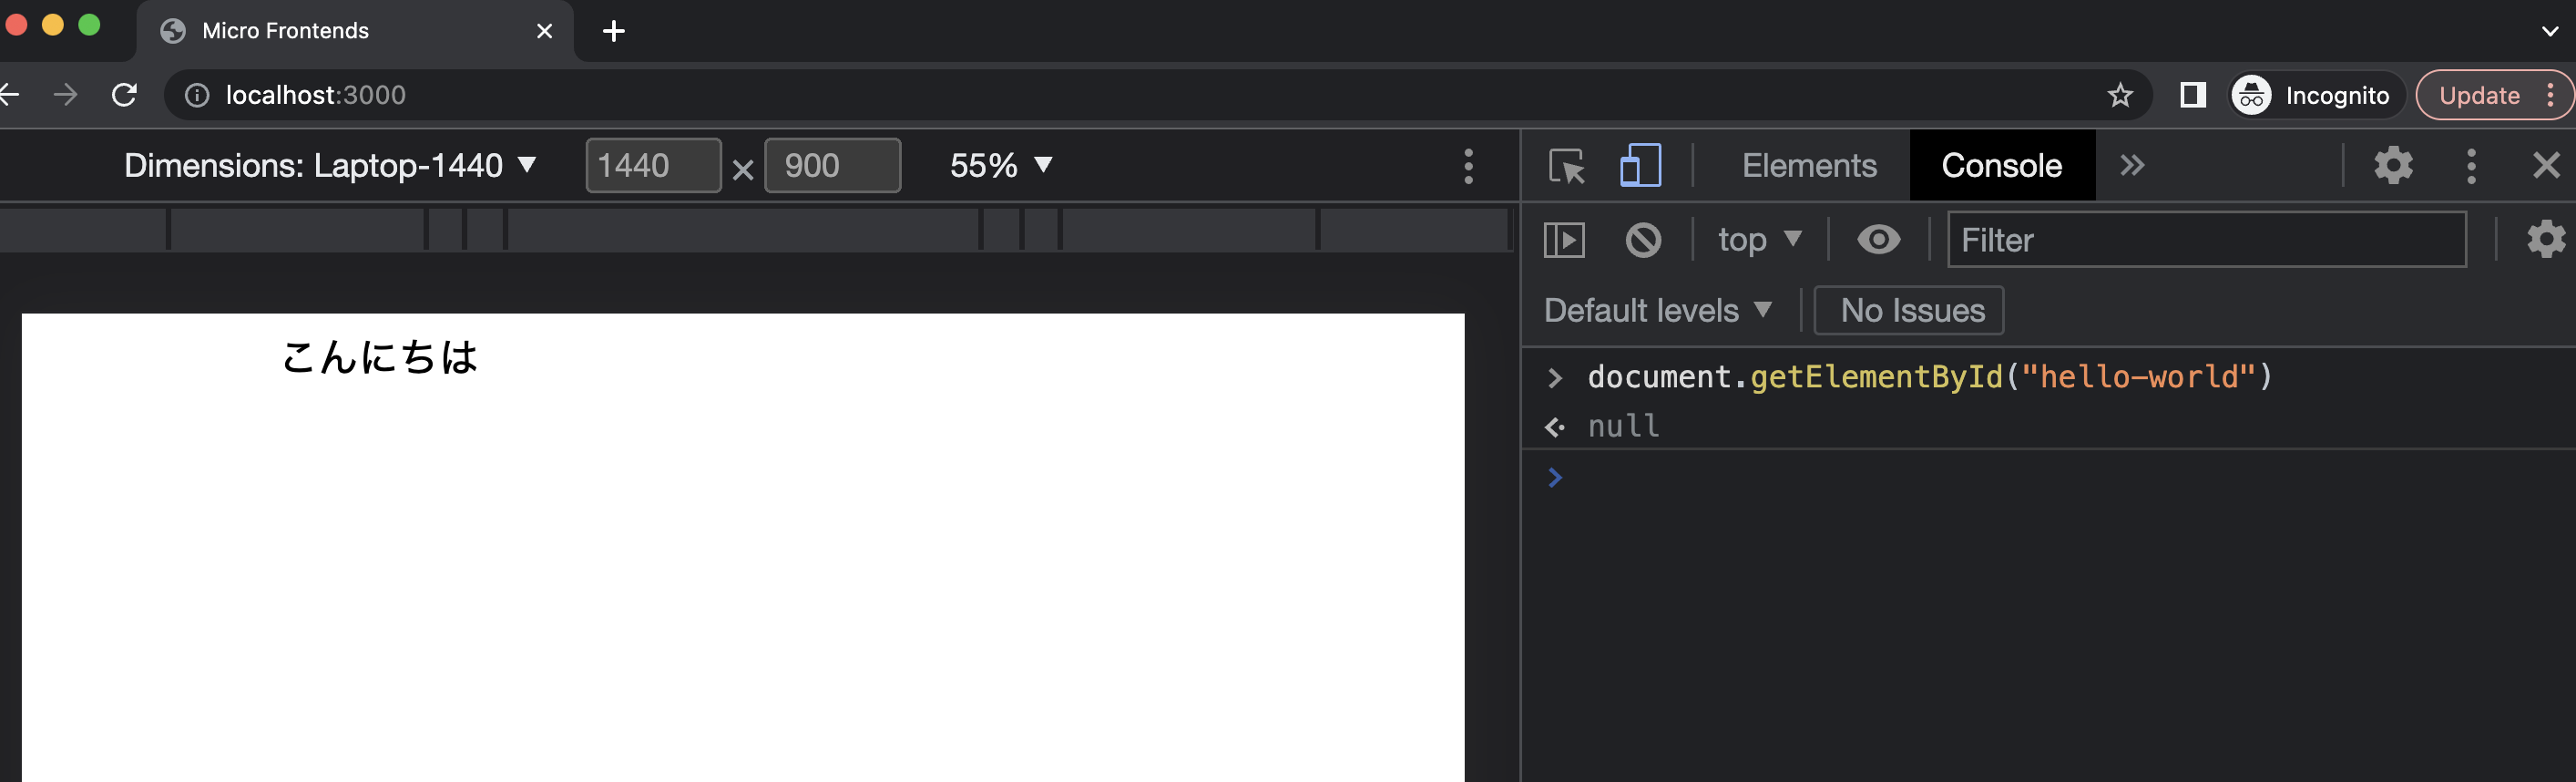
Shadow DOMでカプセル化することで、document.getElementById()でWeb Components内部にアクセスできないようになりました。
メインのHTMLに定義してあるCSSもWeb Components内に移動しましょう。Shadow DOMにスタイルを当てる場合は、次のようにstyleタグを使用します。
class HelloWorld extends HTMLElement {
  constructor() {
    super();

    const shadow = this.attachShadow({ mode: 'closed' });
    shadow.innerHTML = `
      <style>
        #hello-world {
            font-size: 40px;
        }
      </style>
      <div id="hello-world">こんにちは</div>
    `
  }
}
customElements.define('hello-world', HelloWorld);
または、cssファイルを定義してlinkタグで読み込ませることもできます。
class HelloWorld extends HTMLElement {
  constructor() {
    super();

    const shadow = this.attachShadow({ mode: 'closed' });
    shadow.innerHTML = `
      <link rel="stylesheet" href="./main.css">
      <div id="hello-world">こんにちは</div>
    `
  }
}
customElements.define('hello-world', HelloWorld);
以上がWeb Componentsの基本的な使い方になります。
続いて、iframeの章で検証したWebサイトをWeb Componentsに置き換えてみましょう。
<main>
  <header class="header">ヘッダー</header>
  <div class="container">
    <nav class="nav">サイドバー</nav>
    <div class="content">コンテンツ</div>
  </div>
  <footer class="footer">フッター</footer>
</main>
まずは、ヘッダー部分をWeb Componentsに置き換えましょう。
header/index.jsというファイルを作成して、以下のようにWeb Componentsを実装します。
class MyHeader extends HTMLElement {
  constructor() {
    super();

    const shadow = this.attachShadow({ mode: 'closed' });
    shadow.innerHTML = `
      <link rel="stylesheet" href="http://localhost:3001/main.css">
      <header>ヘッダー</header>
    `
  }
}

customElements.define('my-header', MyHeader)
カスタムタグは、<my-header></my-header>で登録します。
CSSはheader/main.cssに配置して、http://localhost:3001/main.css から配信されるようにします。
header {
  width: 100%;
  height: 100px;
  background: #eeeeee;
  display: flex;
  align-items: center;
  justify-content: center;
  font-size: 30px;
  font-weight: bold;
  border-radius: 12px;
  border: 1px solid rgb(47 55 61 / 95%);
}
同様にserve header -p 3001でサーバを起動しましょう。
% serve header -p 3001                                                                                                                (git)-[main]

   ┌──────────────────────────────────────────┐
   │                                          │
   │   Serving!                               │
   │                                          │
   │   - Local:    http://localhost:3001      │
   │   - Network:  http://192.168.11.2:3001   │
   │                                          │
   │   Copied local address to clipboard!     │
   │                                          │
   └──────────────────────────────────────────┘
これで、http://localhost:3001/index.js から上記のJavaScriptが配信されるようになりました。
メインのHTMLで、このJavaScriptを読み込みましょう。また、ヘッダー部分を<my-header></my-header>に置き換えます。
<head>
  <script src="http://localhost:3001/index.js"></script>
</head>
<body>
<main>
  <my-header></my-header>
  <div class="container">
    <nav>サイドバー</nav>
    <div class="content">コンテンツ</div>
  </div>
  <footer>フッター</footer>
</main>
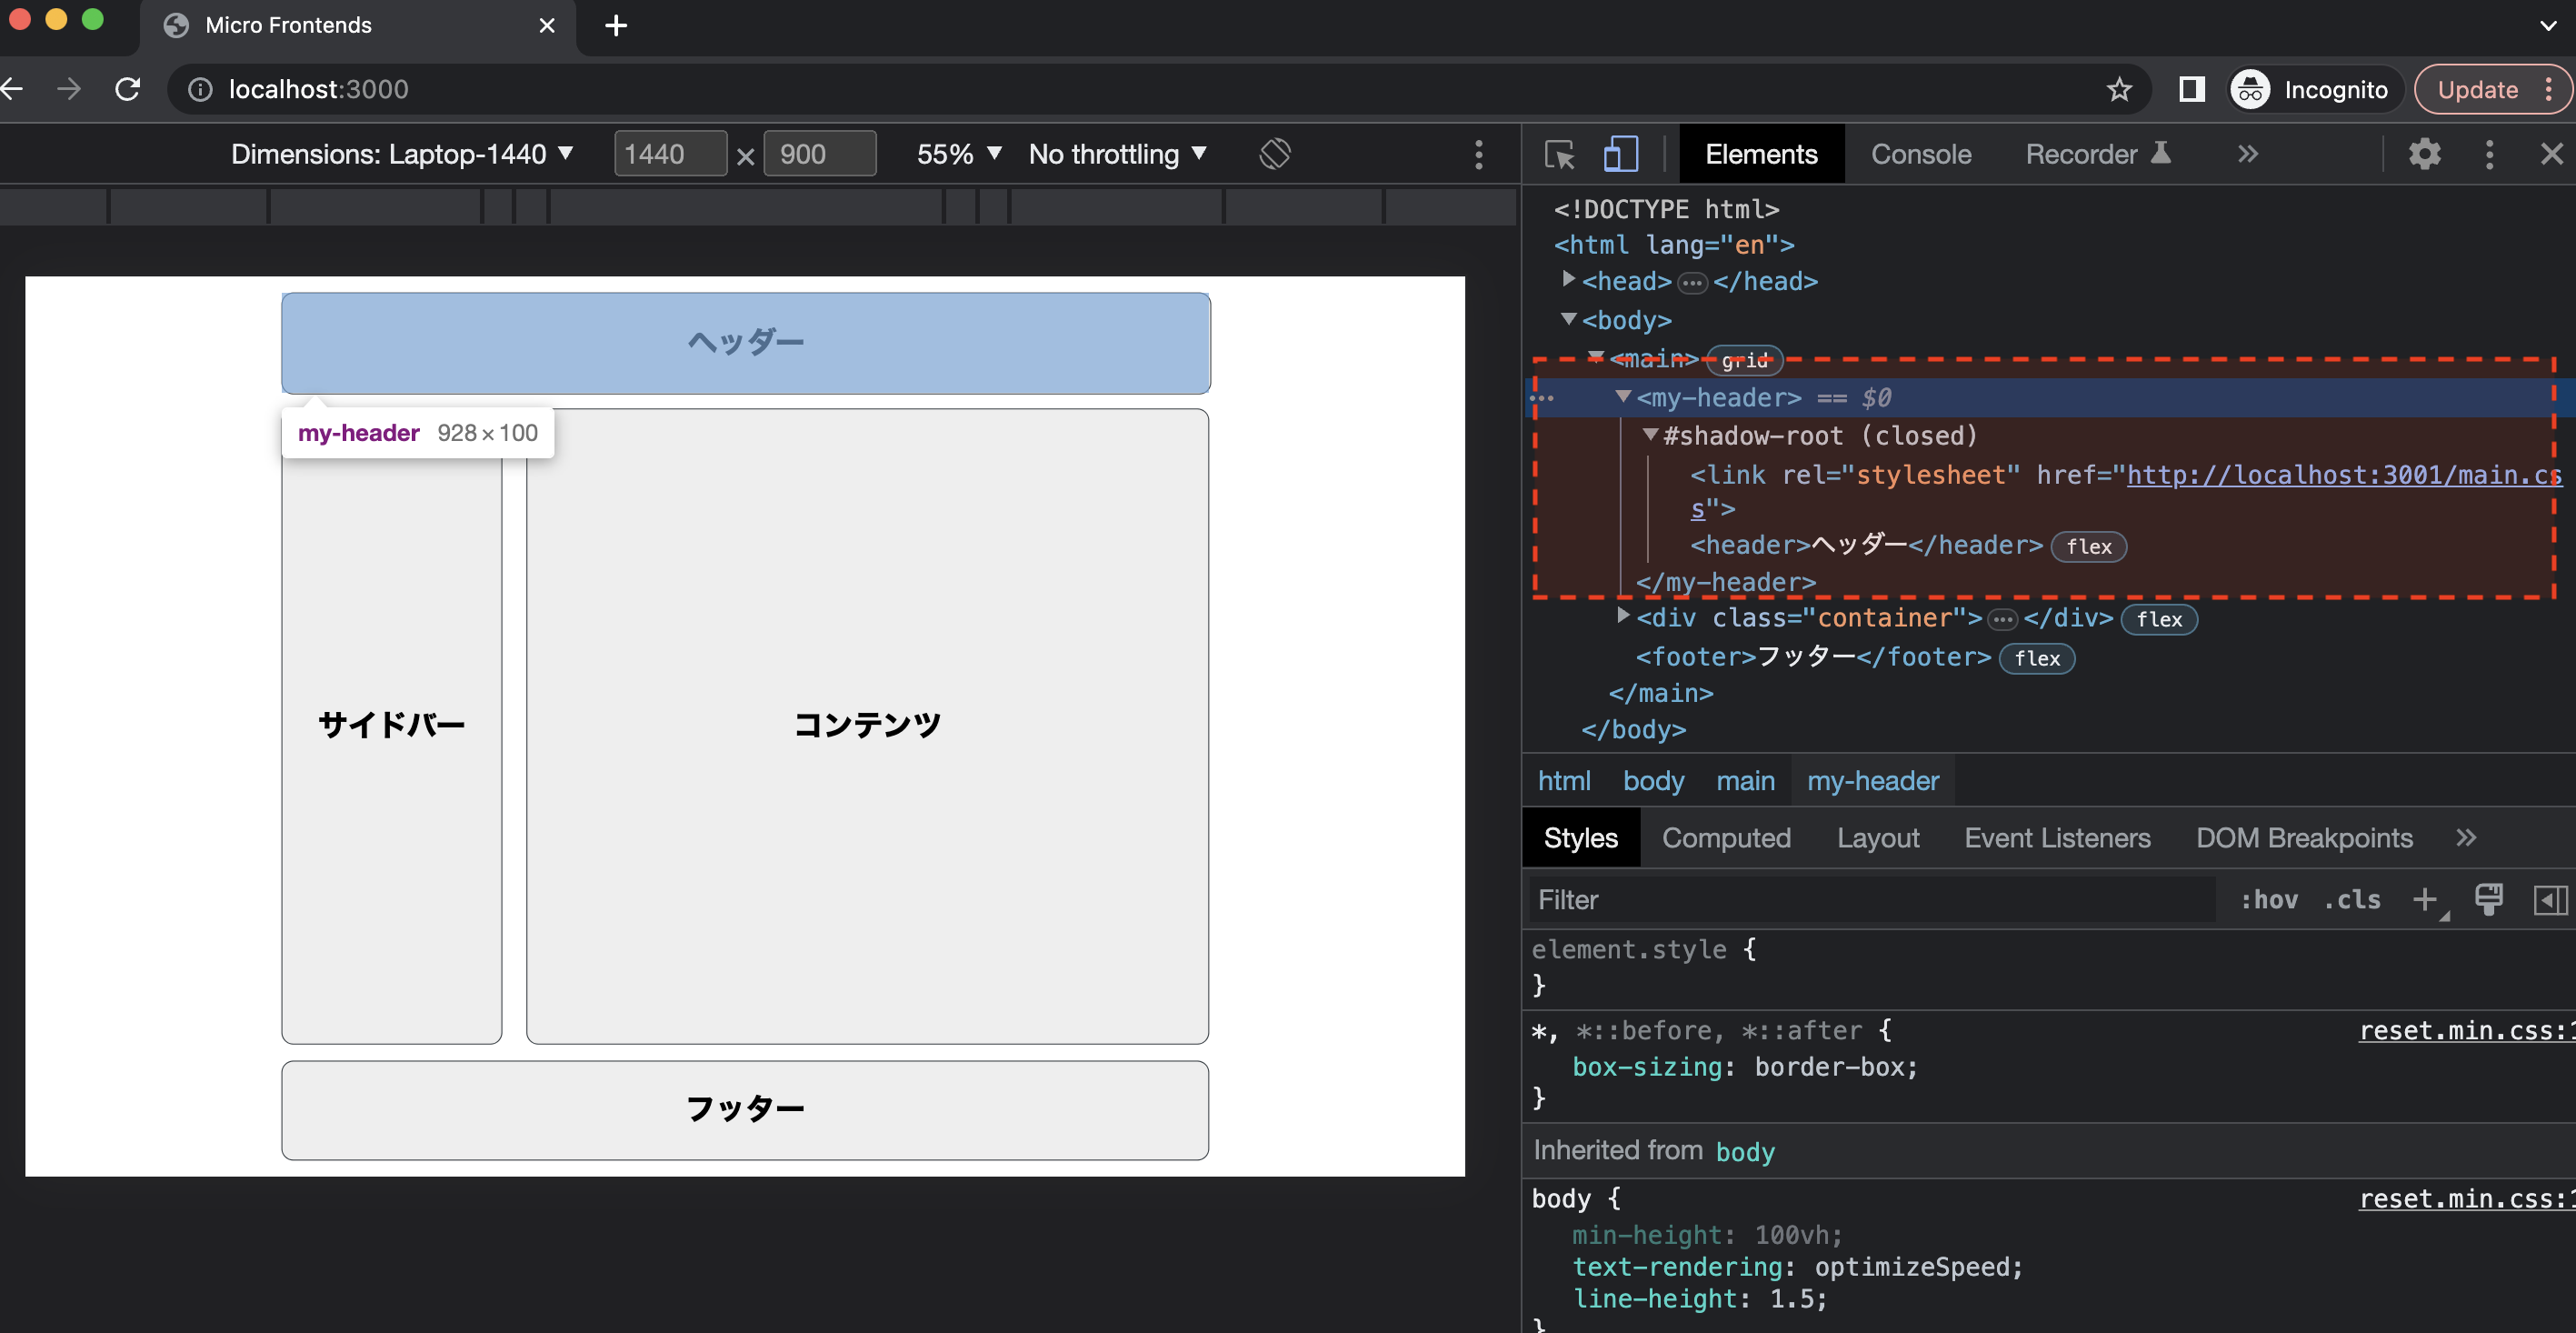
サーバを起動すると、次のようにヘッダーがWeb Componentsに置き換わっているのが分かります。
続いて、フッター部分をReactで切り出してみましょう。
まずは、footerフォルダを作成しましょう。この中に、React環境を構築します。今回は、esbuildを使ってReactをビルドします。
$ mkdir footer
$ yarn add react react-dom
$ yarn add -D esbuild @types/node @types/react @types/react-dom
はじめに、esbuild.config.mjsを作成しましょう。
import esbuild from "esbuild";

const context = await esbuild.context({
  entryPoints: ["src/app.tsx"],
  bundle: true,
  outfile: "dist/bundle.js",
  minify: false,
  sourcemap: true,
  target: ["chrome58", "firefox57", "safari11", "edge18"],
  platform: 'browser',
  format: 'esm',
  define: {
    "process.env.NODE_ENV": '"development"',
  },
  plugins: [{
    name: 'on-end',
    setup(build) {
      build.onEnd((result) => {
        if (result.errors.length) {
          console.error('errors: ', result.errors)
          return
        }
        console.log('✅ updated')
      })
    }
  }]
})

const PORT = 3002
await context.serve({
  port: PORT,
  servedir: 'dist'
})

console.log(`Server listening on http://localhost:${PORT}`)

await context.watch()
http:localhost:3002で開発サーバーを起動します。エントリーポイントとなるファイルは、src/app.tsxになります。ここに、Web Componentsを定義します。
まずは、src/Footer.tsxを作成し、Reactコンポーネントを実装しましょう。
import * as React from 'react'

export function Footer() {
  return (
    <footer
      style={{
        width: '100%',
        height: '100px',
        background: '#eeeeee',
        display: 'flex',
        alignItems: 'center',
        justifyContent: 'center',
        fontSize: '30px',
        fontWeight: 'bold',
        borderRadius: '12px',
        border: '1px solid rgb(47 55 61 / 95%)',
      }}>
      フッター
    </footer>
  )
}
次に、srx/app.tsxを作成し、Web Componentsを実装しましょう。
import * as React from 'react'
import * as ReactDOM from 'react-dom/client';
import { Footer } from './Footer'

class MyFooter extends HTMLElement {
  constructor() {
    super();

    const mountPoint = document.createElement('span')
    this.attachShadow({ mode: 'closed' }).appendChild(mountPoint)

    ReactDOM.createRoot(mountPoint as HTMLElement).render(
      <React.StrictMode>
        <Footer />
      </React.StrictMode>
    )
  }
}
customElements.define("my-footer", MyFooter)
作成したWeb ComponentsをcustomElements.defineで登録します。ここでは、<my-footer></my-footer>で使えるように指定します。
customElements.define("my-footer", WebComponent)
では、サーバーを起動してみましょう。起動すると、http://localhost:3002/bundle.js からビルドされたJavaScriptが配信されようになります。
$ node esbuild.config.js

Server listening on http://localhost:3002
最後に、メインのHTMLをWeb Componentsに置き換えてみましょう。
<head>
  <script src="http://localhost:3001/index.js"></script>
  <script src="http://localhost:3002/bundle.js"></script>
</head>
<body>
<main>
  <my-header></my-header>
  <div class="container">
    <nav>サイドバー</nav>
    <div class="content">コンテンツ</div>
  </div>
  <my-footer></my-footer>
</main>
esbuildで起動したサーバをリソースに設定します。これで、Web Componentsが登録されます。
<head>
  <script src="http://localhost:3001/index.js"></script>
  <script src="http://localhost:3002/bundle.js"></script>
</head>
そして、フッター部分を<my-footer></my-footer>に変更します。
<main>
  <my-header></my-header>
  <div class="container">
    <nav>サイドバー</nav>
    <div class="content">コンテンツ</div>
  </div>
  <my-footer></my-footer>
</main>
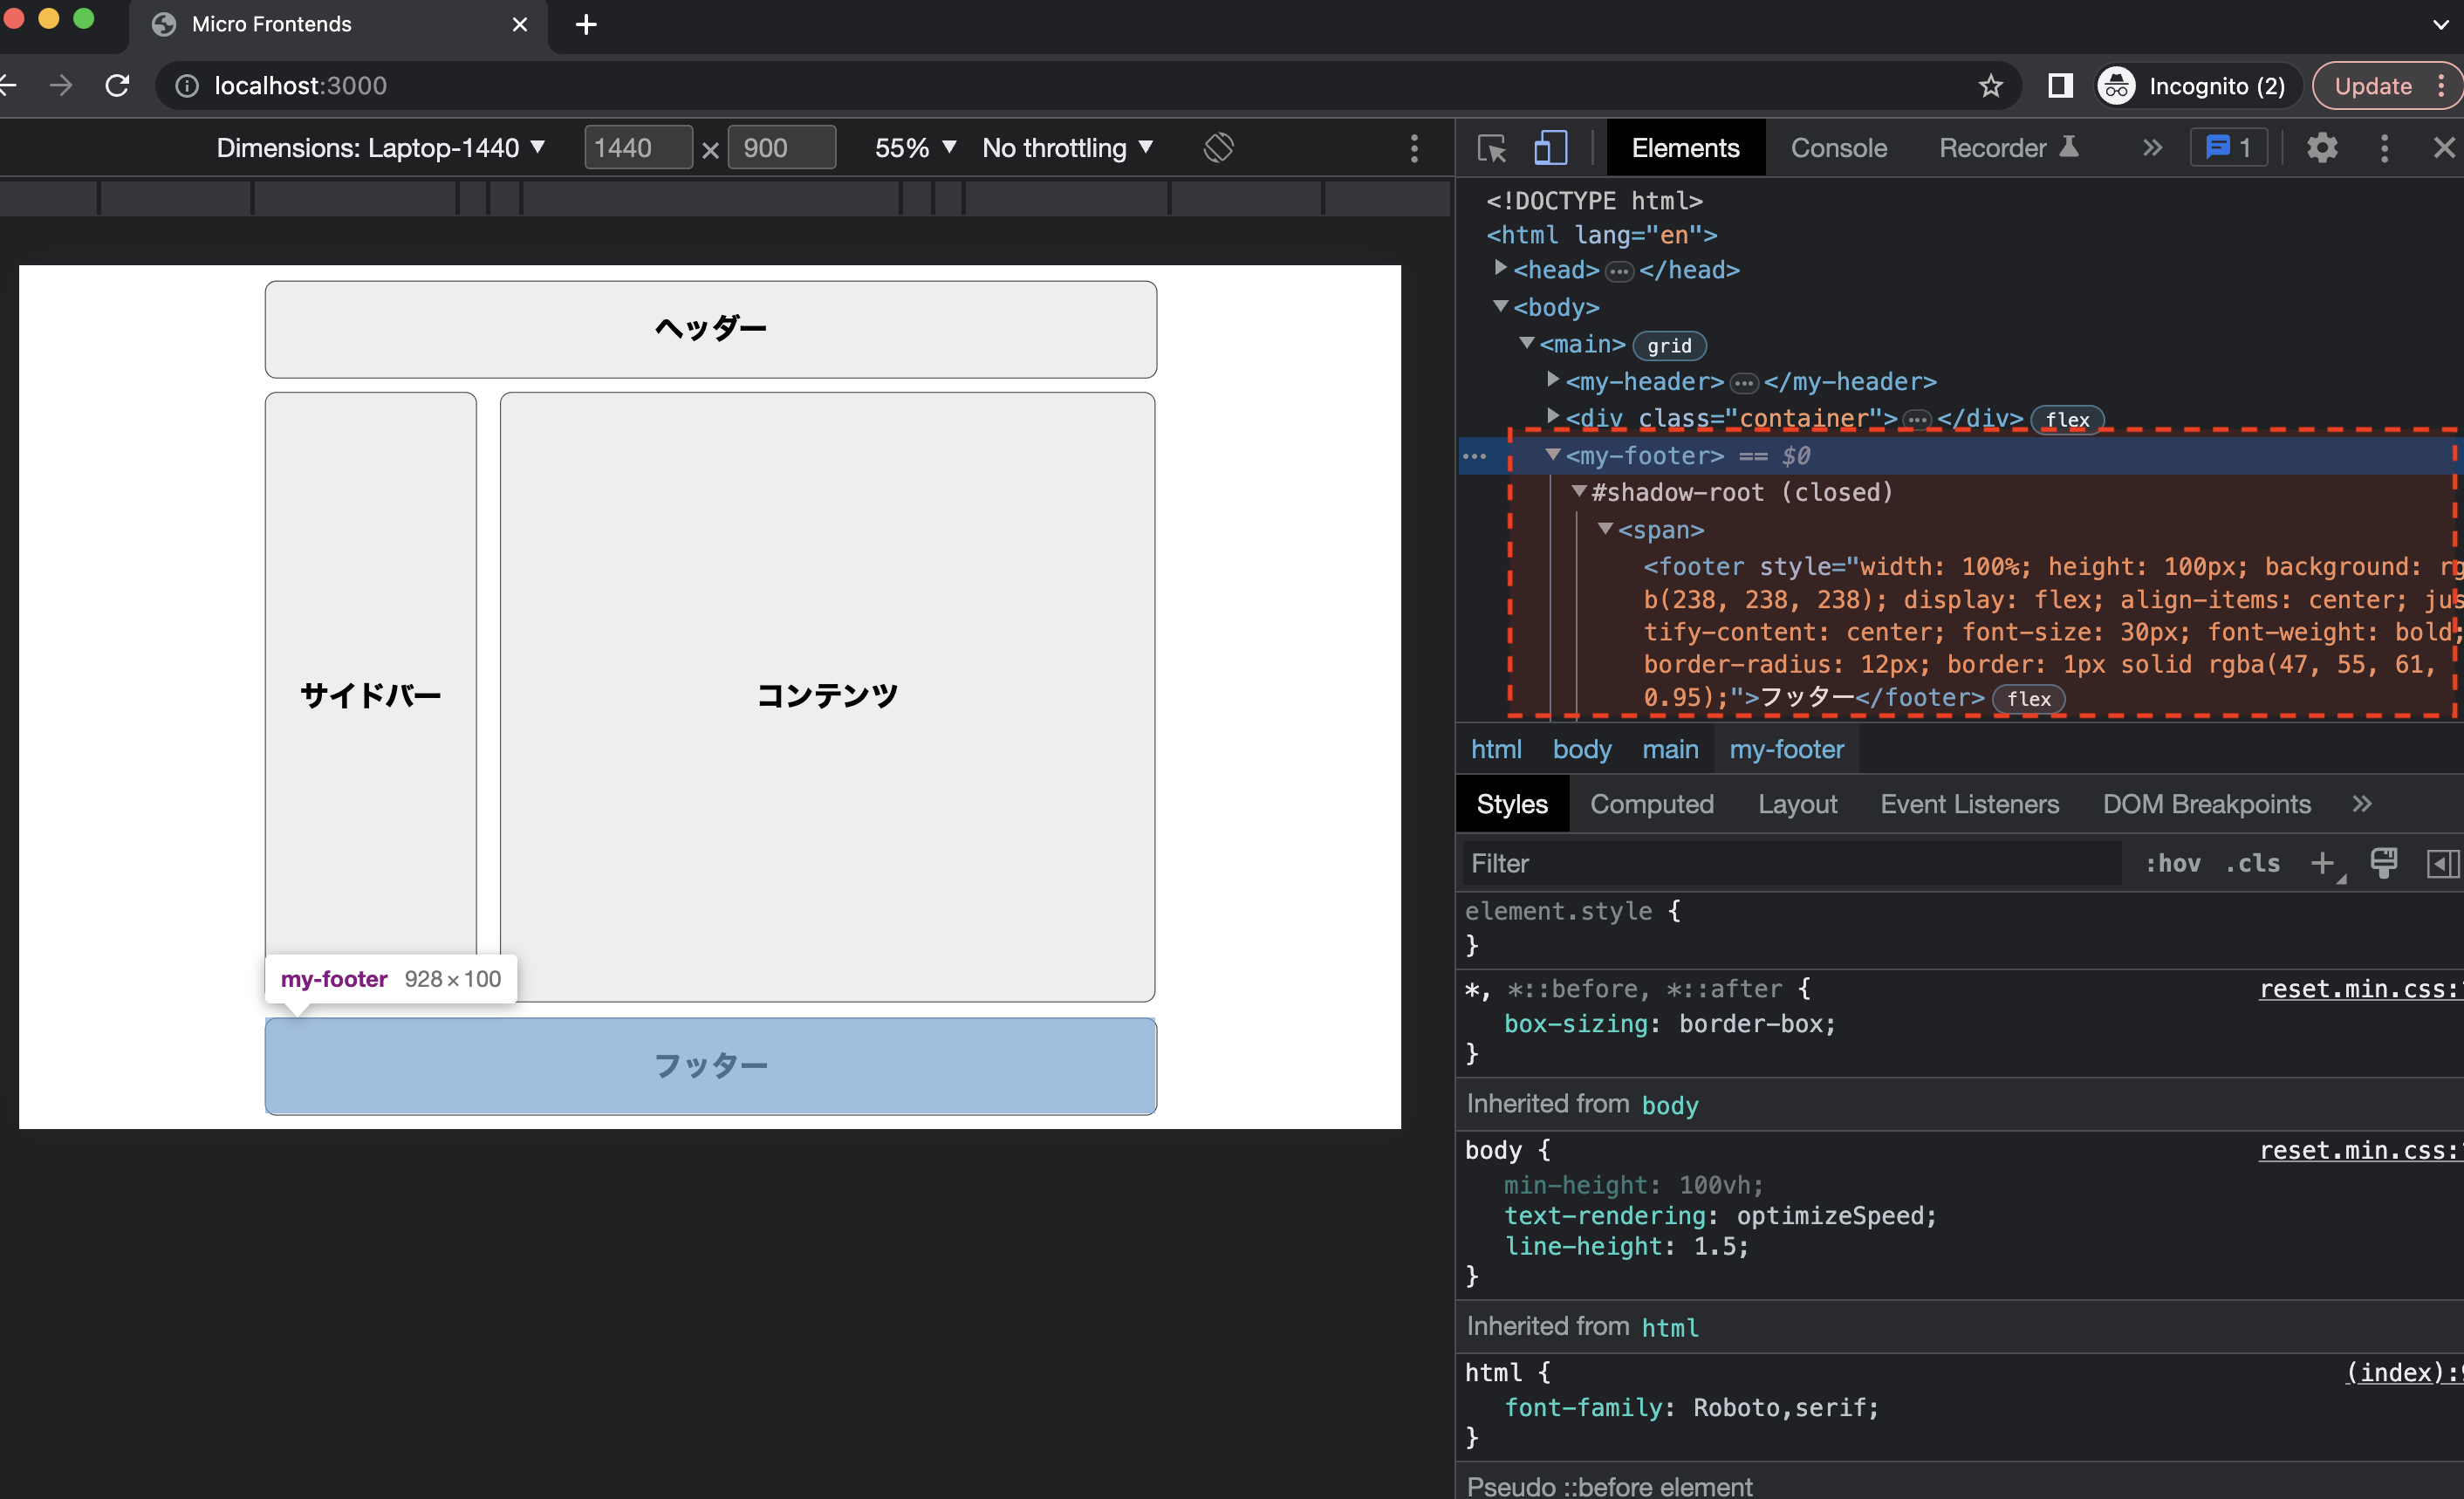
サーバを起動してみましょう。以下のように、フッターが表示されているのが分かります。
<my-footer></my-footer>はReactコンポーネントで実装しているので、useStateやその他のカスタムHooksを使うことができます。
import * as React from 'react'
import { useState } from "react";

export function Footer() {
  const [count, setCount] = useState(0)

  return (
    <footer
      style={{
        width: '100%',
        height: '100px',
        background: '#eeeeee',
        display: 'flex',
        alignItems: 'center',
        justifyContent: 'center',
        fontSize: '30px',
        fontWeight: 'bold',
        borderRadius: '12px',
        border: '1px solid rgb(47 55 61 / 95%)',
      }}>
      フッター
      <div>
        counter: {count}
      </div>
      <button onClick={() => setCount(s => s + 1)}>カウント</button>
    </footer>
  )
}
実際の開発では、ReactやVue.jsといったUIフレームワークを使うことがほとんどでしょう。Web Componentsを使うことで、異なるフレームワークでそれぞれのUIを実装することが可能となります。また、Shadow DOMを使えば、外部からの影響を受けずに、それぞれのスタイルやJavaScriptを限定的に実装することができます。
WARNING
ReactからWeb Componentsを使うときは注意が必要です。Web Componentsに対してプリミティブ型しか渡せないことや、イベントのハンドリングを独自に定義する必要があるなど、まだ課題があります。Web Componentsの対応状況はCustom Elements Everywhere (opens new window)で確認することができます。
# single-spa
single-spa (opens new window)は、Micro Frontends用のフレームワークです。React、Vue.js、Angularといった複数のUIフレームワークに対応し、SPAの構築に特化しています。ブラウザー標準のiframeやWeb Componentsを使った場合、ルーティングや各サービスのライフサイクルなど、自分で設計しなければなりません。single-spaは、コンポーネントのライフサイクルを抽象化することで、複数のUIフレームワークに対応し、URLに応じて各サービスの出しわけなど、Micro Frontends構築に必要な機能を提供しています。
single-spaの基本的な使い方について見てみましょう。single-spaの基本的な構成は、次の二つになります。
- Root config (opens new window)
- 各サービスを登録するためのメインとなるアプリケーション
- 複数のApplicationsを組み合わせる
- Applications (opens new window)
- Micro Frontendsのサービスに該当
- UIフレームワークで実装する
Root configは、各サービスを登録するためのメインとなるアプリケーションになります。ルーティングやライフサイクルの制御などをここで行います。Applicationsは、Micro Frontendsのサービスに該当します。例えば、ヘッダーやフッターといった部分をUIフレームワークで実装します。
実際に、single-spaでアプリケーションを実装してみましょう。次のような、ブログサイトを想定して構築していきます。Home、Blog、Aboutとページが分かれていて、それぞれのページをMicro Frontendsで実装していきたいと思います。
フォルダ構成は、次のようになります。root-configが各サービスを登録するためのアプリケーションとなり、home、header、aboutなどのMicro FrontendsのUIを組み合わせる場所になります。
single-spa/
├── package.json
├── packages
│ ├── about
│ ├── header
│ ├── home
│ └── root-config
└── yarn.lock
single-spaは、モジュール解決にSystemJS (opens new window)や、Module Federation (opens new window)を使用することができます。SystemJSは、import-maps (opens new window)のPolyfillになります。import-mapsとはブラウザの仕様で、ブラウザ側でモジュールの読み込みができるようになる機能です。古いブラウザでは対応していない仕様ですが、SystemJSを使うことで同様の機能を使うことができます。 例えば、scriptタグにモジュールを指定することで、アプリケーション側で使用することができます。
<script type="systemjs-importmap">
{
  "imports": {
    "lodash": "https://unpkg.com/lodash@4.17.10/lodash.js"
  }
}
</script>
今回は、SystemJSを使ってライブラリとモジュールの依存性を解決したいと思います。
では、まずはroot-configから実装しましょう。single-spaは、アプリケーションを構築するためのCLIが用意されています。次のように、--moduleTypeにroot-configを指定すると、Root Config用のテンプレートを生成します。
$ npx create-single-spa --moduleType root-config

? Directory for new project ./packages/root-config
? Which package manager do you want to use? yarn
? Will this project use Typescript? Yes
? Would you like to use single-spa Layout Engine Yes
? Organization name (can use letters, numbers, dash or underscore) frontend-design
処理が終了すると、packages/root-configにテンプレートが展開されています。
packages/root-config/
├── babel.config.json
├── package.json
├── src
│ ├── declarations.d.ts
│ ├── frontend-design-root-config.ts
│ ├── index.ejs
│ └── microfrontend-layout.html
├── tsconfig.json
├── webpack.config.js
└── yarn.lock
index.ejsでSystemJSのモジュールを指定できます。今回は、UIフレームワークにReactを使用するので、SystemJSのimport-mapsにreactとreact-domを指定します。
<script type="systemjs-importmap">
    {
      "imports": {
        "single-spa": "https://cdn.jsdelivr.net/npm/single-spa@5.9.0/lib/system/single-spa.min.js",
        "react": "https://cdn.jsdelivr.net/npm/react@17.0.2/umd/react.production.min.js",
        "react-dom": "https://cdn.jsdelivr.net/npm/react-dom@17.0.2/umd/react-dom.production.min.js"
      }
    }
</script>
これで、Micro FrontendsのサービスでReactを使用することができます。
では次に、ヘッダー部分を実装しましょう。
UIを実装する際もCLIを使うことができます。次のように、--moduleTypeにapp-parcelを指定して実行しましょう。
$ npx create-single-spa --moduleType app-parcel

? Directory for new project packages/header
? Which framework do you want to use? react
? Which package manager do you want to use? yarn
? Will this project use Typescript? Yes
? Organization name (can use letters, numbers, dash or underscore) frontend-design
? Project name (can use letters, numbers, dash or underscore) header
処理が終わると、次のようなテンプレートが生成されます。
packages/header/
├── babel.config.json
├── jest.config.js
├── package.json
├── src
│ ├── declarations.d.ts
│ ├── frontend-design-header.tsx
│ ├── root.component.test.tsx
│ ├── root.component.tsx
│ └── styles
├── tsconfig.json
└── webpack.config.js
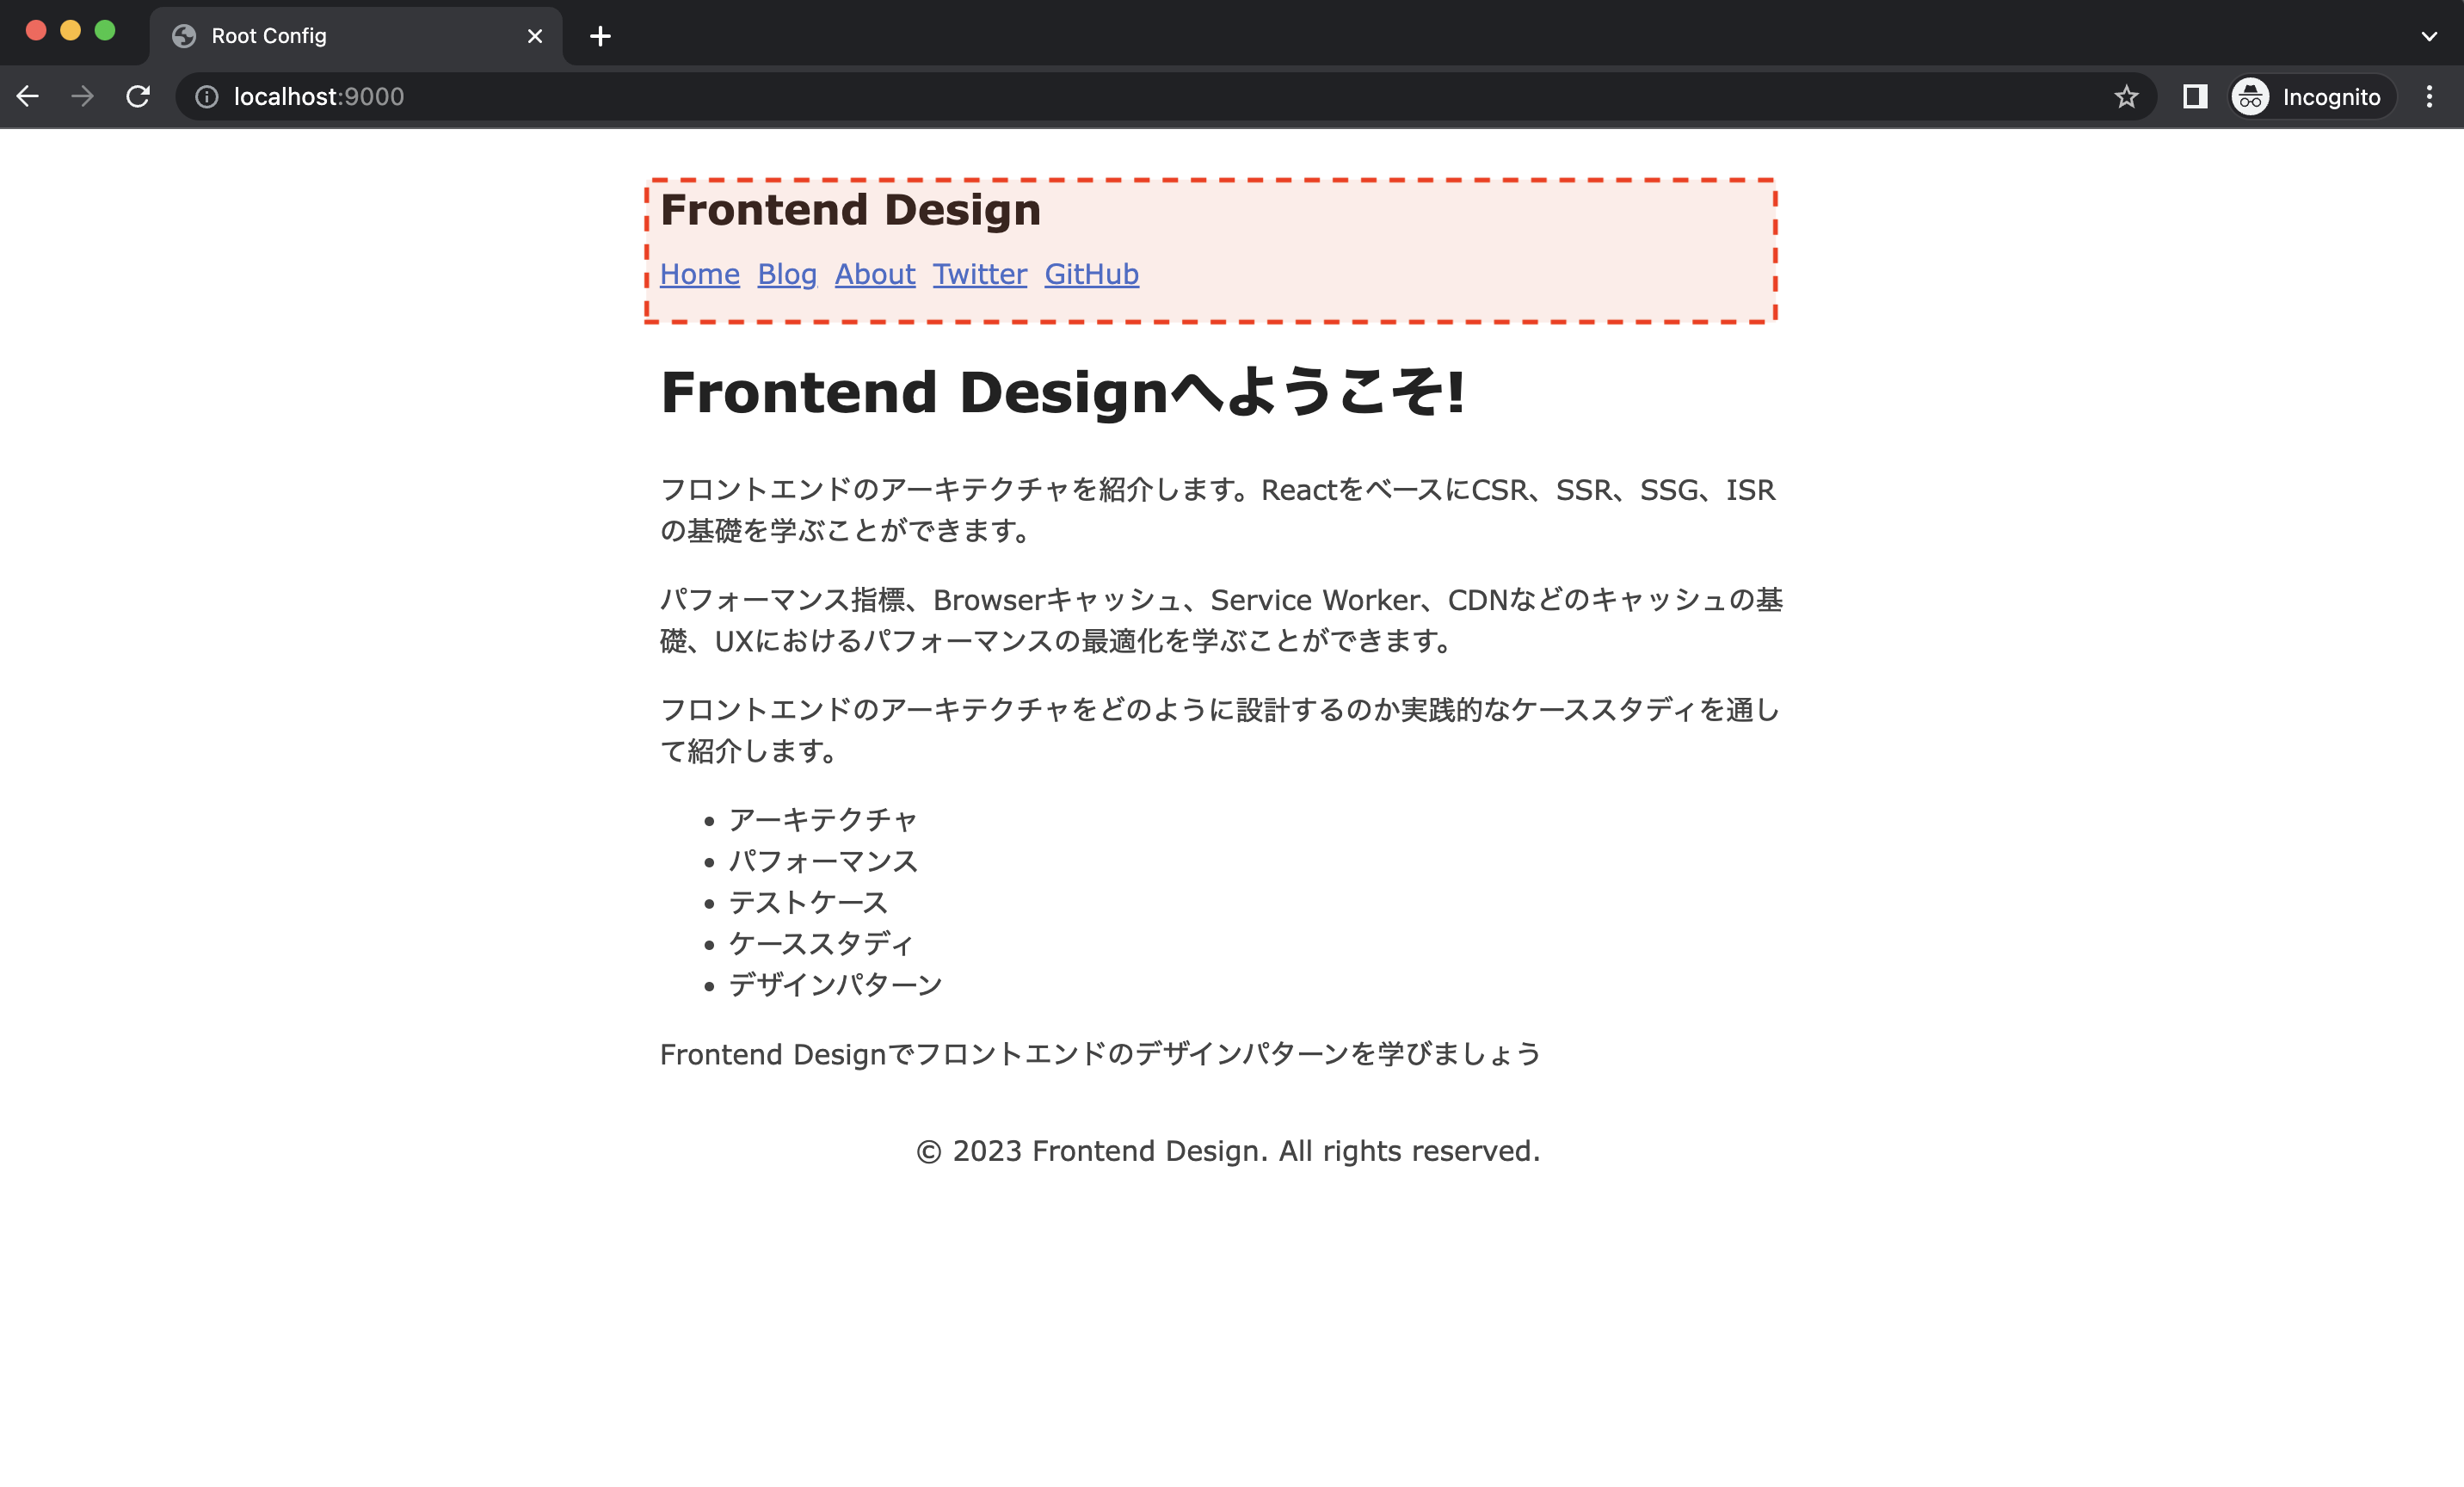
root.component.tsxを開いて、ヘッダー部分を実装します。
import "./styles/global.css";
import { navigateToUrl } from "single-spa";

export default function Root(props) {

  const handleNavigate = (path: string) => {
    navigateToUrl(path);
  };

  return (
    <header
      style={{
        margin: "0 0 2rem",
      }}
    >
      <h2
        style={{
          margin: "0.5rem 0",
        }}
      >
        Frontend Design
      </h2>
      <nav>
        <a onClick={() => handleNavigate("/")}>Home</a>
        <a onClick={() => handleNavigate("/blog")}>Blog</a>
        <a onClick={() => handleNavigate("/about")}>About</a>
        <a href="https://twitter.com" target="_blank">
          Twitter
        </a>
        <a href="https://github.com" target="_blank">
          GitHub
        </a>
      </nav>
    </header>
  );
}
ページ遷移には、navigateToUrl (opens new window)を使うことで、SPAのようなページ遷移が可能となります。
そして、このUIをhttp://localhost:3001から配信したいので、package.jsonのdevサーバにポートを指定します。
{
  "scripts": {
    "start": "webpack serve --port 3001"
  }
}
これで、ヘッダーの実装が終わりました。次に、root-configでこのヘッダーを読み込みましょう。
root-config/src/index.ejsを開いて、SystemJSのimport-mapsにヘッダーのdevサーバを指定します。
  <% if (isLocal) { %>
  <script type="systemjs-importmap">
    {
      "imports": {
        "@frontend-design/root-config": "//localhost:9000/frontend-design-root-config.js",
        "@frontend-design/header": "//localhost:3001/frontend-design-header.js",
      }
    }
  </script>
  <% } %>
これにより、@frontend-design/headerというモジュール名から先ほどのヘッダー部分を取得することができます。
このモジュールをレイアウトに組み合わせて、アプリケーションを実装します。 single-spaのレイアウトは、root-config/src/microfrontend-layout.htmlで指定することができます。<application>タグを書き、nameに先ほどのモジュール名を指定することで、モジュールの読み込みができるようになります。
<single-spa-router>
  <div>
    <application name="@frontend-design/header"></application>
  </div>
</single-spa-router>
これで、ヘッダーの実装が完了しました。では次に、Home画面を実装しましょう。ヘッダーと同じように、CLIを実行します。
$ npx create-single-spa --moduleType app-parcel

? Directory for new project packages/home
? Which framework do you want to use? react
? Which package manager do you want to use? yarn
? Will this project use Typescript? Yes
? Organization name (can use letters, numbers, dash or underscore) frontend-design
? Project name (can use letters, numbers, dash or underscore) home
処理が完了すると、次のようなテンプレートが生成されます。
packages/home/
├── babel.config.json
├── jest.config.js
├── package.json
├── src
│ ├── declarations.d.ts
│ ├── frontend-design-home.tsx
│ ├── root.component.test.tsx
│ ├── root.component.tsx
│ └── styles
├── tsconfig.json
├── webpack.config.js
└── yarn.lock
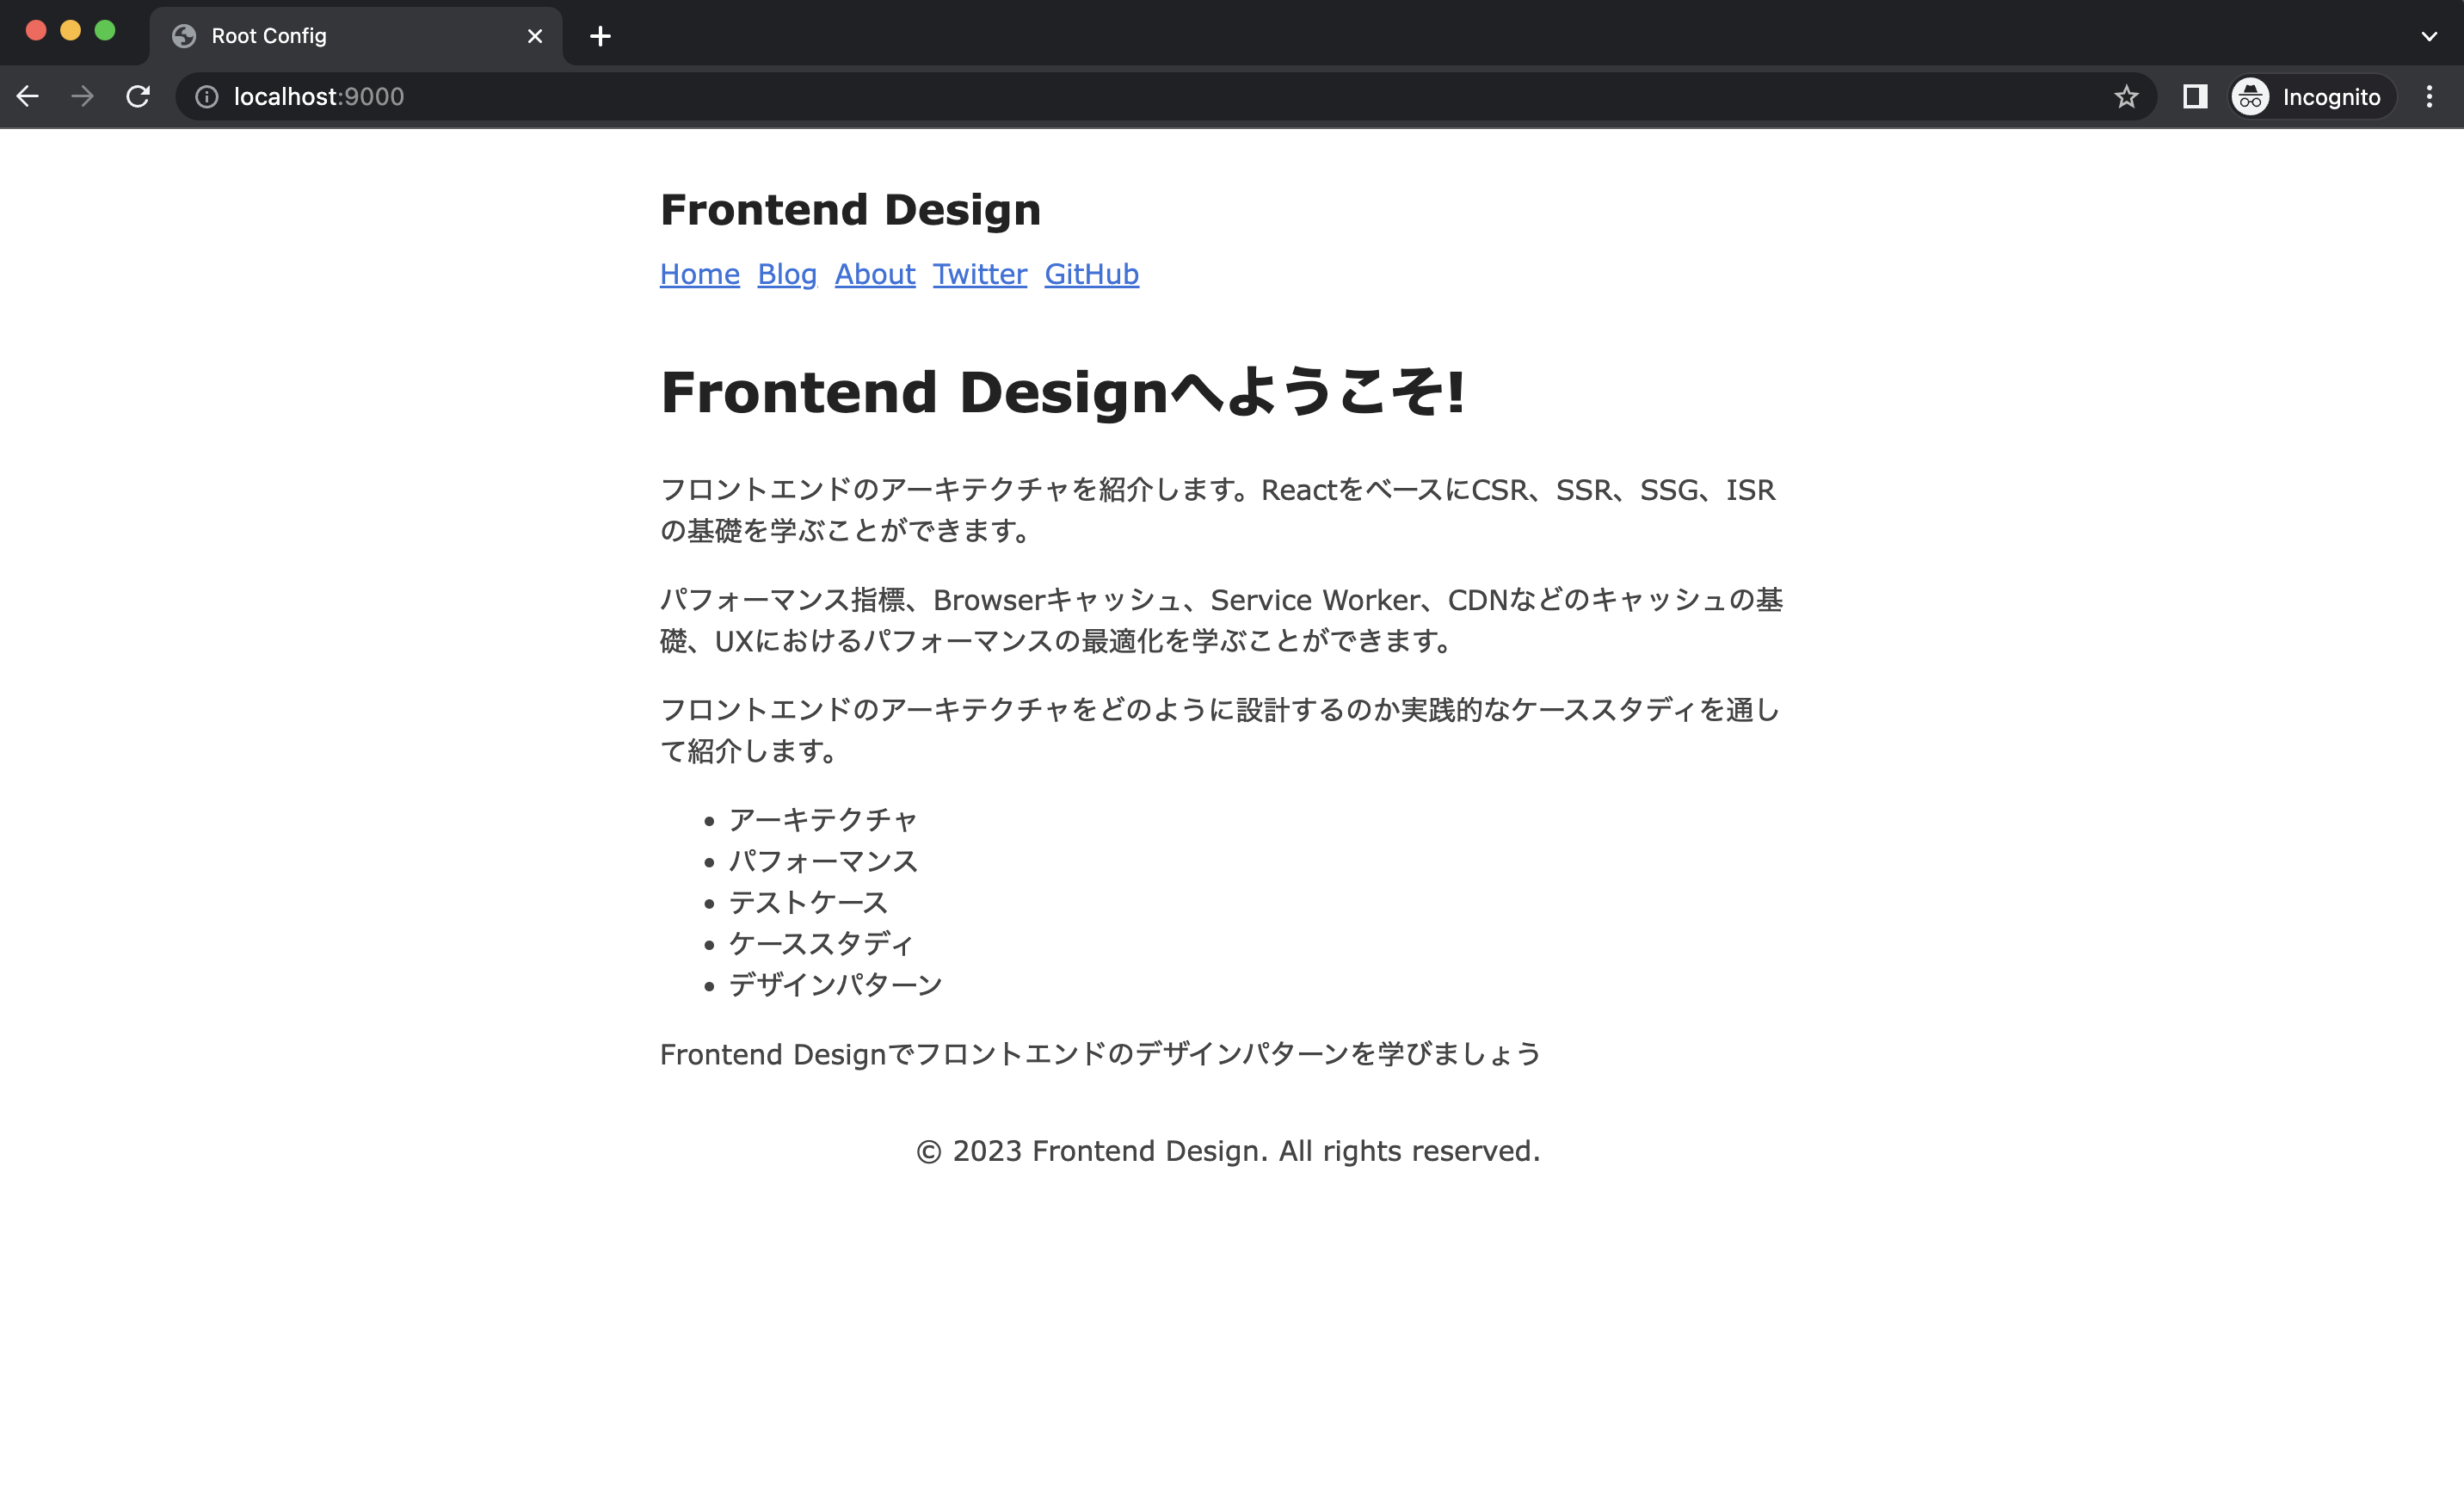
root.component.tsxを開き、Home画面を実装します。
import "./styles/global.css";
export default function Root() {
return (
<>
<main>
<h1>Frontend Designへようこそ!</h1>
<p>
フロントエンドのアーキテクチャを紹介します。ReactをベースにCSR、SSR、SSG、ISRの基礎を学ぶことができます。
</p>
<p>
パフォーマンス指標、Browserキャッシュ、Service
Worker、CDNなどのキャッシュの基礎、UXにおけるパフォーマンスの最適化を学ぶことができます。
</p>
<p>
フロントエンドのアーキテクチャをどのように設計するのか実践的なケーススタディを通して紹介します。
</p>
<ul>
<li>アーキテクチャ</li>
<li>パフォーマンス</li>
<li>テストケース</li>
<li>ケーススタディ</li>
<li>デザインパターン</li>
</ul>
<p>Frontend Designでフロントエンドのデザインパターンを学びましょう</p>
</main>
<footer
style={{
padding: 16,
textAlign: "center",
}}
>
© {new Date().getFullYear()} Frontend Design. All rights reserved.
</footer>
</>
);
}
Home画面は、http://localhost:3002から配信したいので、package.jsonのdevサーバにポートを指定します。
{
  "scripts": {
    "start": "webpack serve --port 3002"
  }
}
これで、Home画面の実装が終わりました。同様に、root-configでホーム画面を追加しましょう。
モジュールを追加するため、root-config/src/index.ejsを開いて、SystemJSのimport-mapsにホーム画面のdevサーバを指定します。
  <% if (isLocal) { %>
  <script type="systemjs-importmap">
    {
      "imports": {
        "@frontend-design/root-config": "//localhost:9000/frontend-design-root-config.js",
        "@frontend-design/header": "//localhost:3001/frontend-design-header.js",
        "@frontend-design/home": "//localhost:3002/frontend-design-home.js",
      }
    }
  </script>
  <% } %>
そして、root-config/src/microfrontend-layout.htmlに<application>タグを埋め込みます。ホーム画面は、URLの/だけ表示したいので、<route>タグを使って、パスを指定します。パスを指定することで、URLに沿ってページの切り替えができるようになります。
<single-spa-router>
  <div>
    <application name="@frontend-design/header"></application>
    <route path="/" exact>
      <application name="@frontend-design/home"></application>
    </route>
  </div>
</single-spa-router>
サーバを起動し、http://localhost:9000にアクセスすると、Home画面が表示されるようになりました。
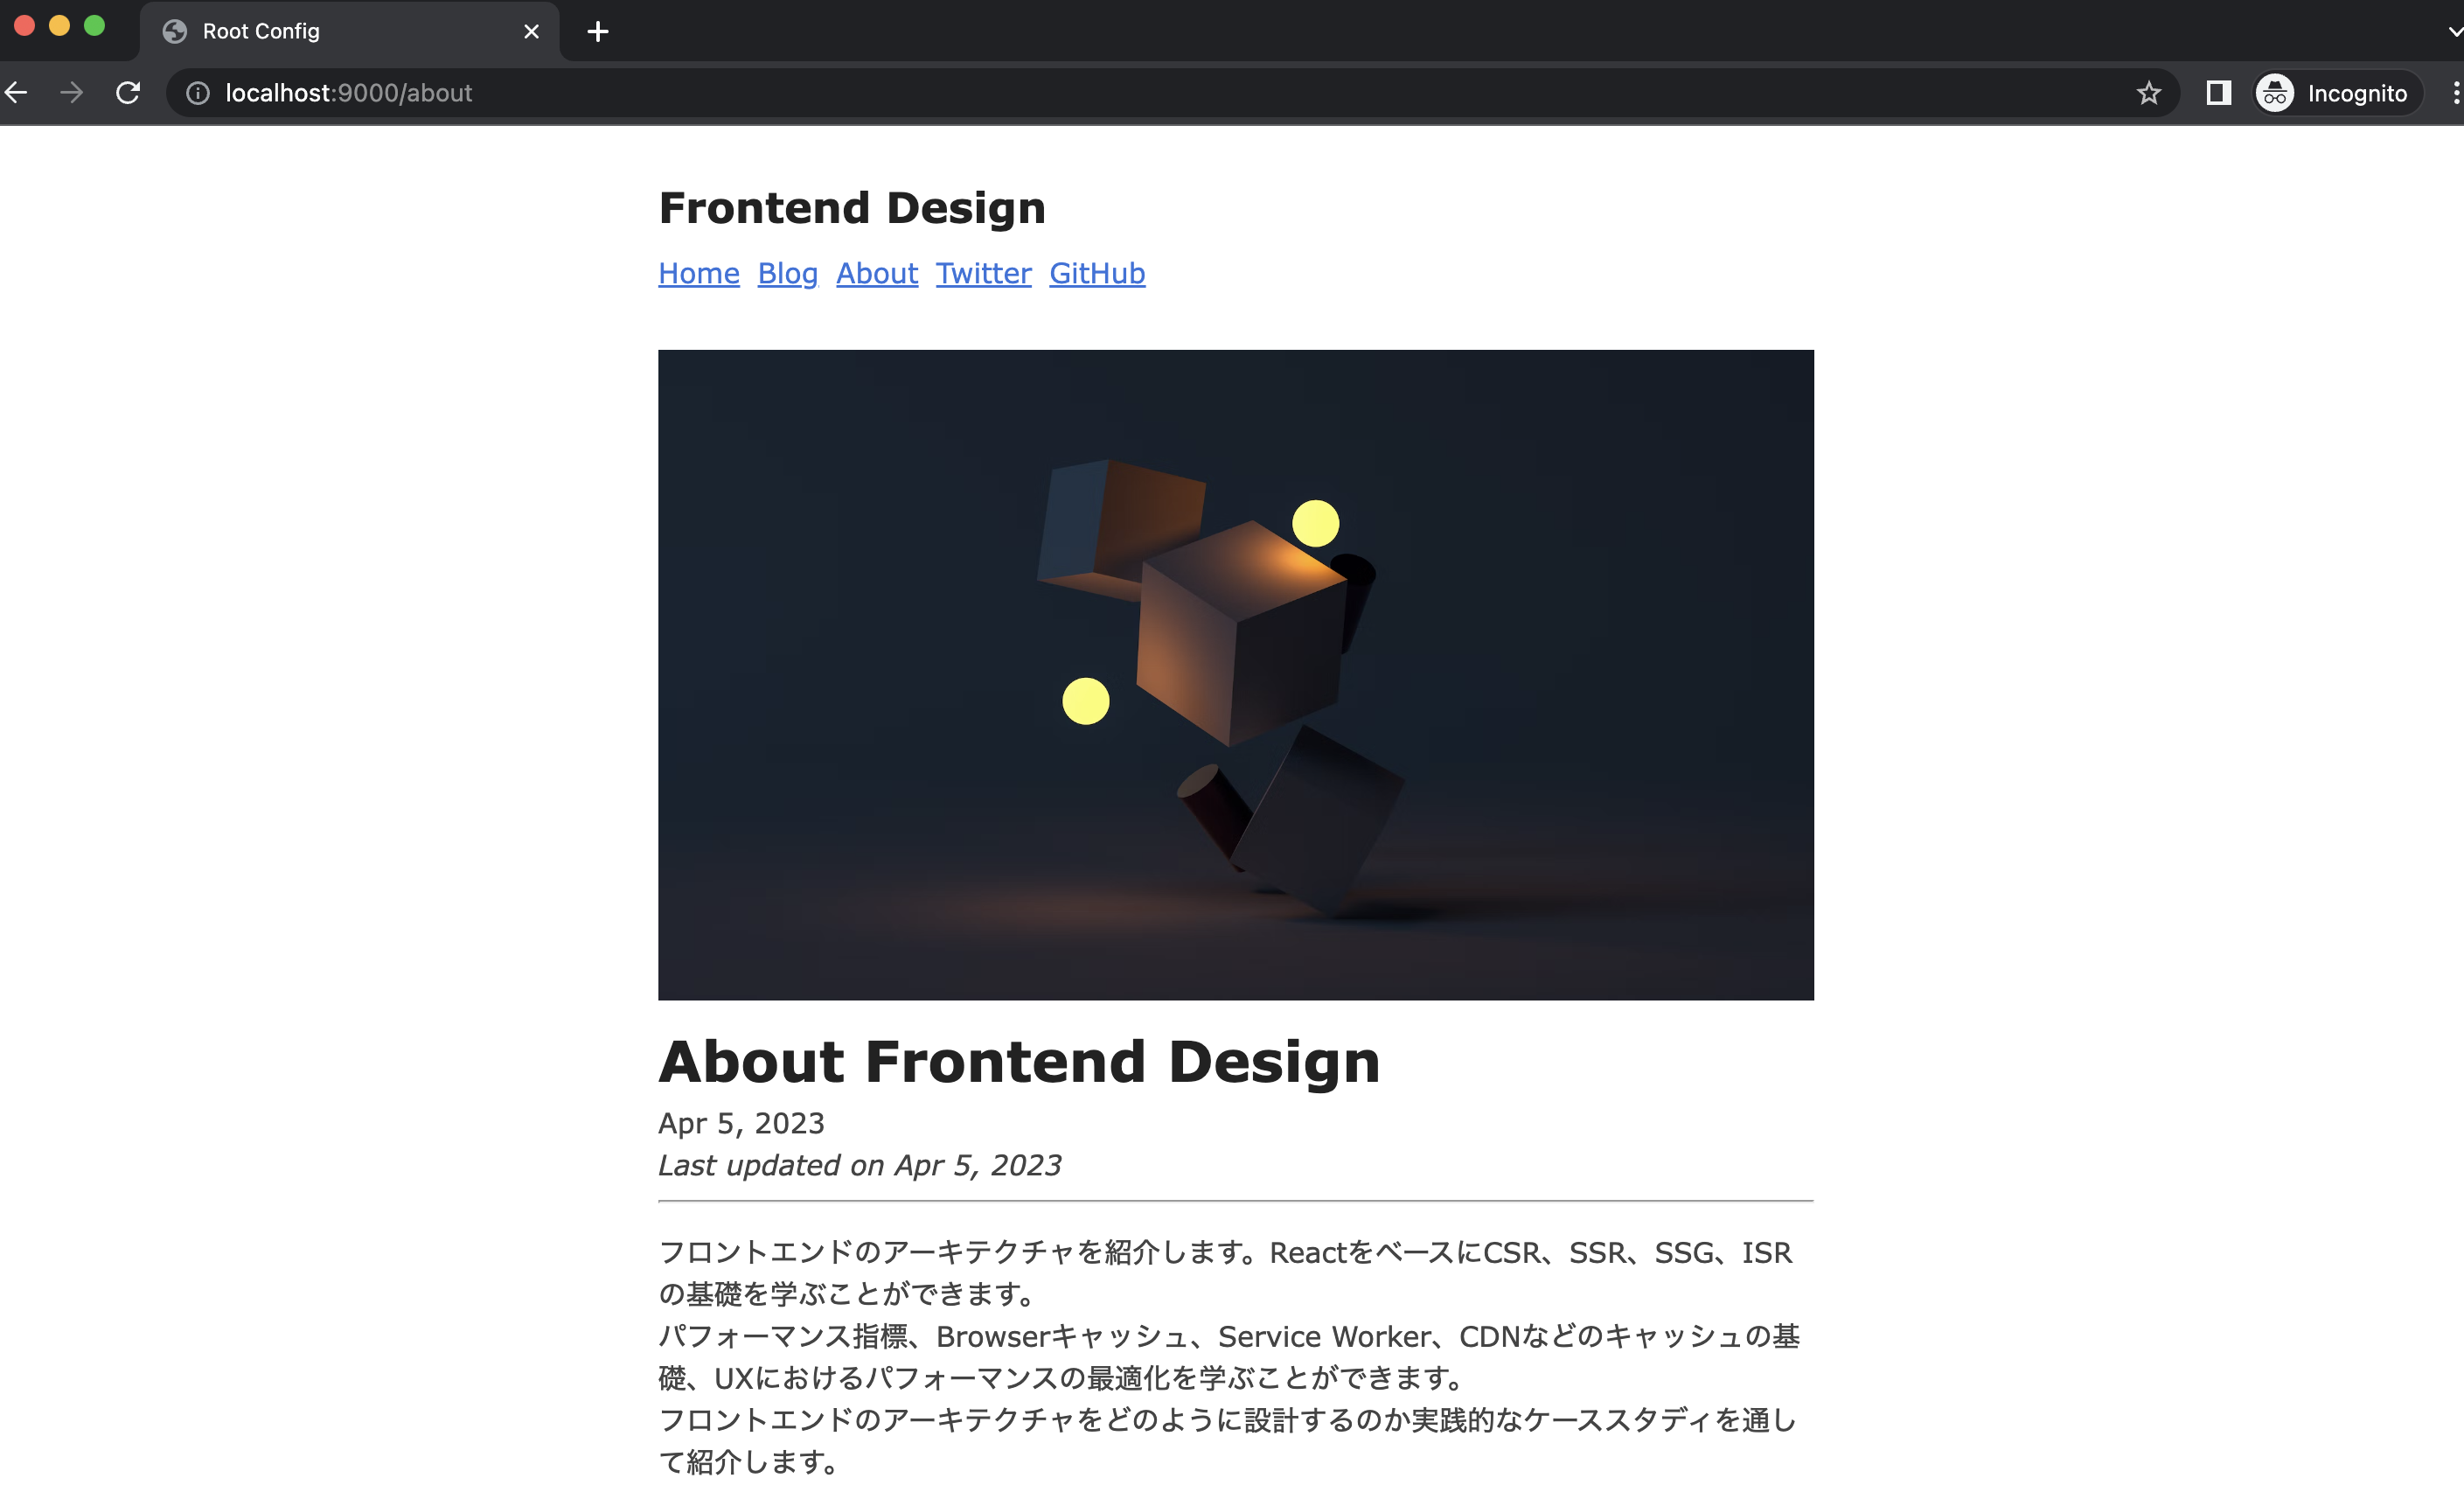
最後に、About画面を作ってみましょう。http://locahost:9000/about で次のようなページが表示されるように実装します。
同様に、CLIでアプリケーションのテンプレートを生成します。
$  npx create-single-spa --moduleType app-parcel

? Directory for new project packages/about
? Which framework do you want to use? react
? Which package manager do you want to use? yarn
? Will this project use Typescript? Yes
? Organization name (can use letters, numbers, dash or underscore) frontend-design
? Project name (can use letters, numbers, dash or underscore) about
処理が完了すると、次のようなテンプレートが生成されます。
packages/about/
├── babel.config.json
├── jest.config.js
├── package.json
├── src
│ ├── declarations.d.ts
│ ├── frontend-design-about.tsx
│ ├── root.component.test.tsx
│ ├── root.component.tsx
│ └── styles
├── tsconfig.json
└── webpack.config.js
root.component.tsxを開き、About画面を実装しましょう。
import "./styles/global.css";

export default function Root(props) {
  return (
    <main>
      <article>
        <img
          width={720}
          height={360}
          src="https://images.unsplash.com/photo-1622737133809-d95047b9e673?ixlib=rb-4.0.3&ixid=MnwxMjA3fDB8MHxwaG90by1wYWdlfHx8fGVufDB8fHx8&auto=format&fit=crop&w=2064&q=80"
          alt=""
        />
        <h1
          style={{
            fontSize: "2rem",
            margin: "0.25rem 0 0",
          }}
        >
          About Frontend Design
        </h1>
        <time dateTime={new Date().toISOString()}>
          {new Date().toLocaleDateString("jp-JP", {
            year: "numeric",
            month: "short",
            day: "numeric",
          })}
        </time>
        <div
          style={{
            fontStyle: "italic",
          }}
        >
          Last updated on{" "}
          <time dateTime={new Date().toISOString()}>
            {new Date().toLocaleDateString("jp-JP", {
              year: "numeric",
              month: "short",
              day: "numeric",
            })}
          </time>
        </div>
        <hr />
        <p>
          フロントエンドのアーキテクチャを紹介します。ReactをベースにCSR、SSR、SSG、ISRの基礎を学ぶことができます。{" "}
          <br />
          パフォーマンス指標、Browserキャッシュ、Service
          Worker、CDNなどのキャッシュの基礎、UXにおけるパフォーマンスの最適化を学ぶことができます。
          <br />
          フロントエンドのアーキテクチャをどのように設計するのか実践的なケーススタディを通して紹介します。
        </p>
      </article>
    </main>
  );
}
About画面は、http://localhost:3003から配信したいので、package.jsonのdevサーバにポートを指定します。
{
  "scripts": {
    "start": "webpack serve --port 3003"
  }
}
これで、About画面の実装が終わりました。同様に、root-configでAbout画面を追加しましょう。
root-config/src/index.ejsを開いて、SystemJSのimport-mapsにAbout画面のdevサーバを指定します。
  <% if (isLocal) { %>
  <script type="systemjs-importmap">
    {
      "imports": {
        "@frontend-design/root-config": "//localhost:9000/frontend-design-root-config.js",
        "@frontend-design/header": "//localhost:3001/frontend-design-header.js",
        "@frontend-design/home": "//localhost:3002/frontend-design-home.js",
        "@frontend-design/about": "//localhost:3003/frontend-design-about.js"
      }
    }
  </script>
  <% } %>
そして、root-config/src/microfrontend-layout.htmlに<application>タグを埋め込みます。About画面は、URLの/aboutだけで表示したいので、<route>タグを使って、パスを指定します。
<single-spa-router>
  <div>
    <application name="@frontend-design/header"></application>
    <route path="/" exact>
      <application name="@frontend-design/home"></application>
    </route>
    <route path="about" exact>
      <application name="@frontend-design/about"></application>
    </route>
  </div>
</single-spa-router>
サーバを起動し、http://localhost:9000にアクセスすると、About画面が表示されるようになりました。
Micro Frontendsは、設計コストが高くなるというデメリットがありますが、single-spaのようなライブラリを使うことで、ルーティングやモジュールの解決を簡素化し、サービスの開発に注力することができます。さらに、Module Federationを使えば、共通のロジックやライブラリをサービス間で共有することも可能です。Micro Frontendsのライブラリは増えつつあるため、アプリケーションのニーズに合わせて、適切に選定するのが重要になります。
# サーバーサイド
各サービスをサーバーサイドで統合するパターンになります。サーバーサイドでコンテンツを生成してからクライアントへ配信するので、SEOで有利になるというメリットがあります。サーバーサイドで各サービスを統合するには、SSI(Server Side Includes)という技術を使います。SSIとは、HTMLファイルにプログラムを埋め込む技術で、任意の場所にプログラムの実行結果を表示することができます。SSIは、従来からある技術で、現在はあまり使われていませんが、Micro Frontendsの統合パターンとして選択肢の一つとなっています。
その他に、サーバーサイドで使用できるフレームワークは、Podium (opens new window)、Tailor (opens new window)、Ara Framework (opens new window)などがあります。この章では、SSIを使うパターンと、Podiumのパターンを見てみましょう。
# SSI
SSIは、サーバ上で各サービスのHTMLを組み合わせて、クライアントへ配信します。
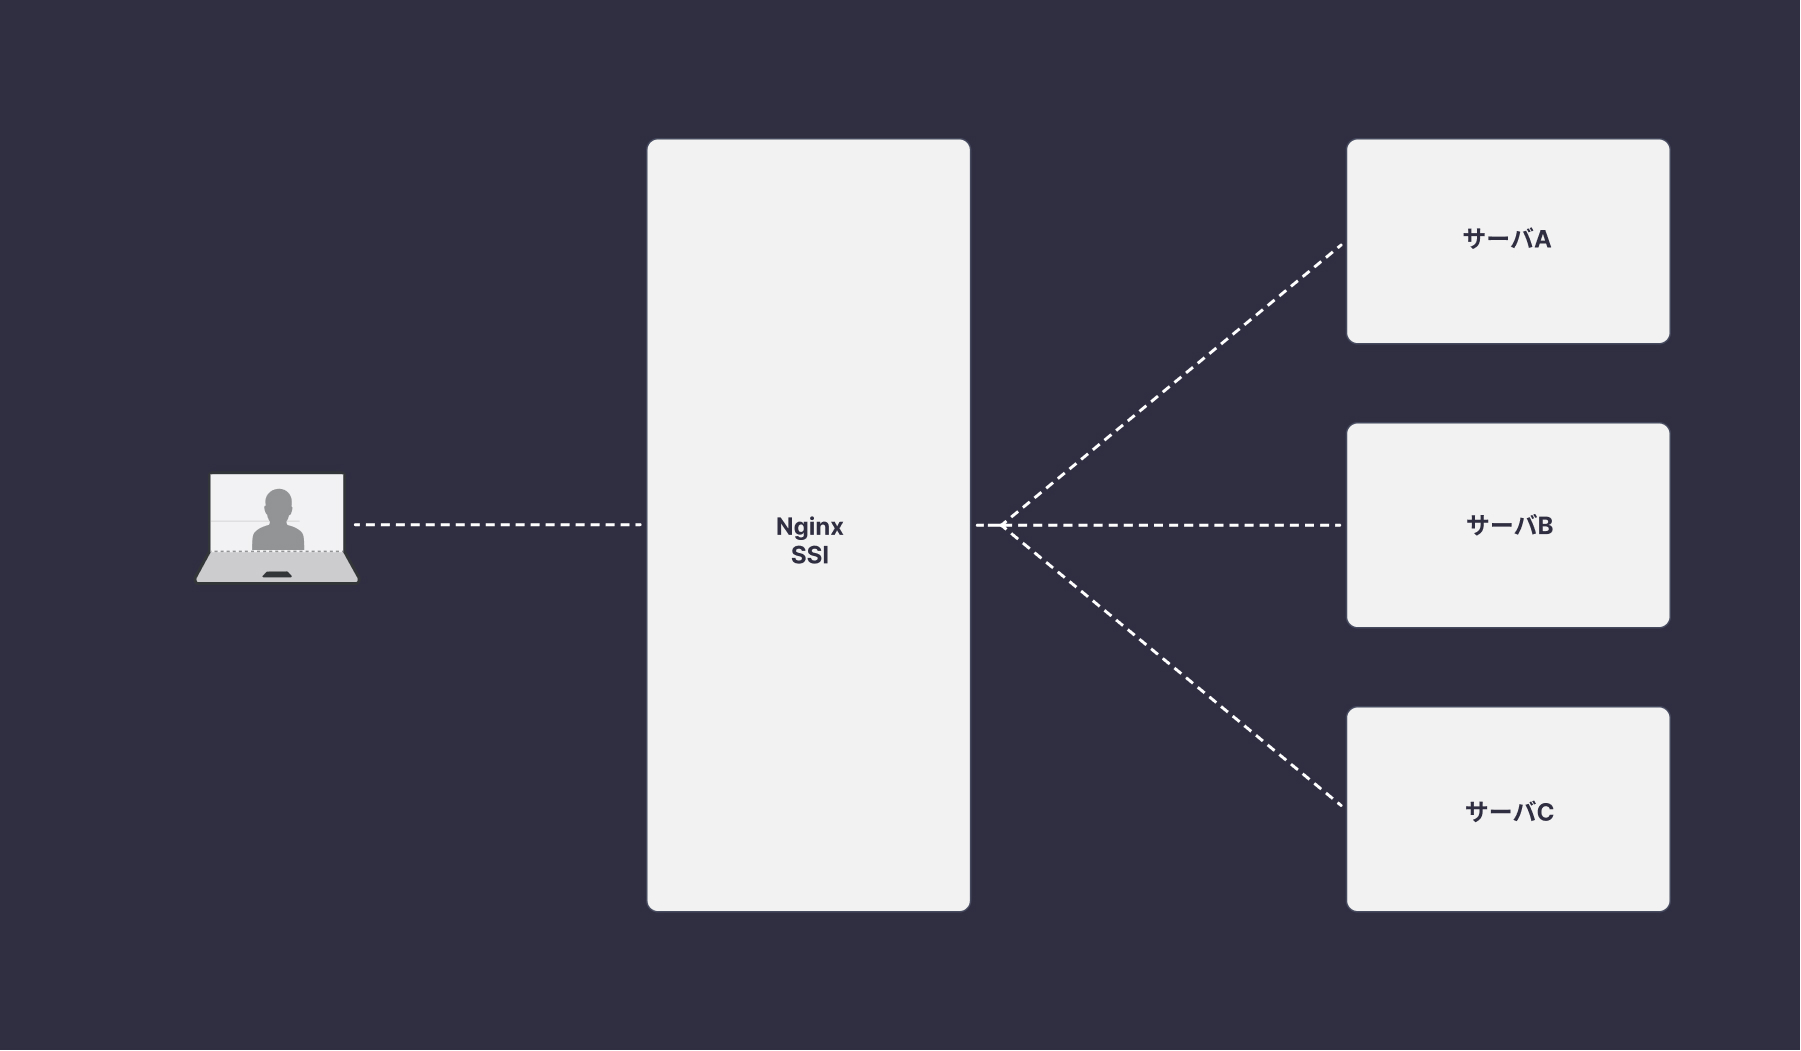
今回は、Nginxサーバを使ってSSIを実装します。次のようなWebサイトをSSIで構築しましょう。
フォルダ構成は次のようになります。
ssi
├── footer          // フッター
├── header         // ヘッダー
├── package.json
├── root          // メインサーバ
└── yarn.lock
まずはじめに、SSIを使ってサービスを組み合わせるためのメインサーバを実装しましょう。rootフォルダに次のような構成でファイルを作成します。
root
├── default.conf
├── docker-compose.yml
└── src
    └── index.html
Nginxサーバは、Dockerのコンテナを使用します。docker-compose.ymlを作成して、Nginxのイメージを指定しましょう。
version: '3'

services:
  nginx:
    image: nginx:latest
    container_name: nginx
    ports:
      - "3000:3000"
    volumes:
      - ./default.conf:/etc/nginx/conf.d/default.conf
      - ./src:/usr/share/nginx/html
ホストからは、http::localhost:3000でアクセスできるように設定します。
次に、default.confを作成し、Nginxの設定をします。
server {
   listen 3000;

   location / {
      root /usr/share/nginx/html;
   }
}
この段階では、HTMLを配信するだけの設定になっています。SSIを有効にするために、ssi onを追加しましょう。
server {
   listen 3000;
   ssi on; # 追加

   location / {
      root /usr/share/nginx/html;
   }
}
これでサーバ側の設定が完了しました。次に、HTMLにSSIを埋め込むためのタグを追加しましょう。src/index.htmlを作成し、ヘッダー部分を<!--#include virtual="/header.html" -->に置き換えます。
<main>
  <!--#include virtual="/header.html" -->
  <div class="container">
    <nav>サイドバー</nav>
    <div class="content">コンテンツ</div>
  </div>
  <footer>フッター</footer>
</main>
<!--#include -->のようなコメント形式で書くことで、プログラムの実行結果を埋め込むことができます。上記では、src/header.htmlを読み込んで該当箇所に挿入しています。
しかし、Micro Frontendsでは独立したサーバから配信される必要があるので、このままではサービス化することができません。別のサーバから取得するためには、Nginxにリバースプロキシの設定をする必要があります。root/default.confを開いて、次のようにプロキシの設定を追加しましょう。
# サーバをheaderという名前でグループ化する
upstream header {
   # host.docker.internalでホストのlocalhostにアクセスする
   server host.docker.internal:3001;
}

server {
   listen 3000;
   ssi on;

   location / {
      root /usr/share/nginx/html;
   }

   # /header/でアクセスされたら、upstreamディレクティブで指定したサーバへ遷移するように設定
   location /header/ {
      proxy_pass  http://header/;
   }
}
http://localhost:3000/header でアクセスすると、ホスト側のhttp://localhost:3001に転送するように設定しています。host.docker.internalはDockerのコンテナからホストへアクセスするためのhost名になります。今回は、ヘッダー部分をホストのhttp://localhost:3001から配信するため、Dockerでの指定が必要になります。
SSIの取得先も変更しましょう。src/index.htmlを開いて、virtualを/header/に変更します。
<main>
  <!--#include virtual="/header/" -->
  <div class="container">
    <nav>サイドバー</nav>
    <div class="content">コンテンツ</div>
  </div>
  <footer>フッター</footer>
</main>
また、CSSファイルもヘッダーから配信されたものを使いたいので、<link>タグを追加します。
<head>
  <link rel="stylesheet"  href="header/main.css">
</head>
<main>
  <!--#include virtual="/header/" -->
  <div class="container">
    <nav>サイドバー</nav>
    <div class="content">コンテンツ</div>
  </div>
  <footer>フッター</footer>
</main>
では、http://localhost:3001から配信するため、headerフォルダを作成し、HTMLとCSSを追加しましょう。
header/
├── index.html
└── main.css
serveコマンドで、静的サーバを立ち上げます。
$ npx serve header -p 3001

   ┌──────────────────────────────────────────┐
   │                                          │
   │   Serving!                               │
   │                                          │
   │   - Local:    http://localhost:3001      │
   │   - Network:  http://192.168.11.6:3001   │
   │                                          │
   │   Copied local address to clipboard!     │
   │                                          │
   └──────────────────────────────────────────┘
これで、ヘッダーの実装が完了しました。
メインサーバとなるNginxを起動するため、Dockerを立ち上げます。
$ cd root
$ docker compose up
http://localhost:3000にアクセスすると、ヘッダー部分が統合されているのが分かります。
では、次にフッター部分を実装しましょう。フッター部分は、ReactのSSRで実装します。フォルダ構成は、次のようになります。
footer/
├── build
│ └── main.js
├── package.json
├── public
├── server
│ └── render.js
├── server.js
├── src
│ ├── Footer.js
│ └── index.js
├── webpack.config.js
└── yarn.lock
まずは、サーバ部分を実装します。server.jsを作成しましょう。サーバはexpressを使用してReactのレンダリング結果を配信します。
const express = require("express");
const { render } = require("./server/render");

const app = express()
app.get('/', (_, res) => {
  render(res)
})
app.use(express.static("public"));
app.use(express.static("build"));

const PORT = process.env.PORT || 3002;
app.listen(PORT, () => {
  console.log(`Serving at http://localhost:${PORT}/`);
});
http://localhost:3002にアクセスすると、フッターがレンダリングして配信されます。次に、server/render.jsを作成し、ReactのSSRを実装します。
import * as React from "react";
import { renderToString } from "react-dom/server";

import { Footer } from "../src/Footer";

export function render(res) {
  res.send(
    renderToString(
      <>
        <div id="app">
          <Footer />
        </div>
        <script src="/footer/main.js"></script>
      </>
    )
  );
}
renderToString (opens new window)は、ReactコンポーネントをHTMLにレンダリングするためのAPIになります。<script>タグには、クライアント側でハイドレーションをするためのJavaScriptファイルを指定します。
TIP
ReactのSSRやハイドレーションのプロセスを詳しく知りたい方は、Streaming-Server-Side-Renderingをご参照ください。
次に、src/index.jsを作成し、クライアントでハイドレーションするための処理を実装します。このJavaScriptは、サーバーサイドでは実行されず、クライアントのみで実行されます。
import React from "react";
import { hydrateRoot } from "react-dom/client";

import { Footer } from "./Footer";

hydrateRoot(
  document.getElementById("app"),
  <Footer  />
);
最後に、src/Footer.jsを作成し、フッターを実装します。
import * as React from 'react'

export function Footer() {
  return (
    <footer
      style={{
        width: '100%',
        height: '100px',
        background: '#eeeeee',
        display: 'flex',
        alignItems: 'center',
        justifyContent: 'center',
        fontSize: '30px',
        fontWeight: 'bold',
        borderRadius: '12px',
        border: '1px solid rgb(47 55 61 / 95%)',
      }}>
      フッター
    </footer>
  )
}
package.jsonでは、JavaScriptを生成するためのWebpackと、サーバを同時に起動するため、次のようなスクリプトを追加しましょう。
{
  "scripts": {
    "dev": "concurrently \" yarn dev:client \" \" yarn dev:server \" ",
    "dev:server": "cross-env NODE_ENV=development babel-node server.js",
    "dev:client": "cross-env NODE_ENV=development webpack --config webpack.config.js --watch"
  }
}
yarn devを実行すると、http://localhost:3002でサーバとWebpackのdevサーバが起動します。
$ yarn dev


$ concurrently " yarn dev:client " " yarn dev:server "
$ cross-env NODE_ENV=development webpack --config webpack.config.js --watch
$ cross-env NODE_ENV=development babel-node server.js
[1] Serving at http://localhost:3002/
[0] asset main.js 1.12 MiB [compared for emit] (name: main)
[0] runtime modules 1.04 KiB 5 modules
[0] cacheable modules 1.08 MiB
[0]   modules by path ./node_modules/ 1.08 MiB
[0]     modules by path ./node_modules/react-dom/ 1000 KiB
[0]       ./node_modules/react-dom/client.js 619 bytes [built] [code generated]
[0]       + 2 modules
[0]     modules by path ./node_modules/react/ 85.7 KiB
[0]       ./node_modules/react/index.js 190 bytes [built] [code generated]
[0]       ./node_modules/react/cjs/react.development.js 85.5 KiB [built] [code generated]
[0]     modules by path ./node_modules/scheduler/ 17.3 KiB
[0]       ./node_modules/scheduler/index.js 198 bytes [built] [code generated]
[0]       ./node_modules/scheduler/cjs/scheduler.development.js 17.1 KiB [built] [code generated]
[0]   modules by path ./src/*.js 910 bytes
[0]     ./src/index.js 202 bytes [built] [code generated]
[0]     ./src/Footer.js 708 bytes [built] [code generated]
[0] webpack 5.78.0 compiled successfully in 495 ms
これで、フッター部分の実装が完了しました。メインサーバに戻り、フッターのタグを埋め込みましょう。root/src/index.htmlを開いて、<footer>タグを<!--#include virtual="/footer/" -->に置き換えます。
<main>
  <!--#include virtual="/header/" -->
  <div class="container">
    <nav>サイドバー</nav>
    <div class="content">コンテンツ</div>
  </div>
  <!--#include virtual="/footer/" -->
</main>
そして、root/default.confで、フッター用のプロキシを追加します。
upstream header {
   server host.docker.internal:3001;
}

# 追加
upstream footer {
   server host.docker.internal:3002;
}

server {
   listen 3000;
   ssi on;

   location / {
      root /usr/share/nginx/html;
   }

   location /header/ {
      proxy_pass  http://header/;
   }

   # 追加
   location /footer/ {
      proxy_pass  http://footer/;
   }
}
そして、Dockerを再起動しましょう。
$ docker compose up
http://localhost:3000にアクセスすると、フッター部分がレンダリングされているのが確認できます。
ハイドレーションが実行されるので、onClickなどのインタラクティブな操作も可能となります。
import * as React from 'react'
import { useState } from "react";

export function Footer() {
  const [count, setCount] = useState(0)

  return (
    <footer
      style={{
        width: '100%',
        height: '100px',
        background: '#eeeeee',
        display: 'flex',
        alignItems: 'center',
        justifyContent: 'center',
        fontSize: '30px',
        fontWeight: 'bold',
        borderRadius: '12px',
        border: '1px solid rgb(47 55 61 / 95%)',
      }}>
      フッター
      <div>
        counter: {count}
      </div>
      <button onClick={() => setCount(s => s + 1)}>カウント</button>
    </footer>
  )
}
SSIは、サーバの設定とタグを追加することで、比較的簡単に実装することができます。SSIの対象が静的コンテンツの場合は、高速にレスポンスできるでしょう。しかし、いずれかのサービスが遅延した場合、ページ全体のロード時間に影響を及ぼす可能性があります。例えば、ヘッダー部分をすぐ取得できても、フッターで遅延が発生すると、その分クライアントでの待ち時間が長くなってしまいます。
Nginxでは、デフォルトでTransfer Encoding Chunked (opens new window)が設定されているため、小分けにしたコンテンツを先行して送ることができます。しかし、ページのロードが完了するまでの時間は依然として影響を受けます。そのため、各サービスがタイムアウトしたときのハンドリングや、fallbackの設定をする必要があるでしょう。また、時間のかかるコンテンツは、クライアント側で遅延実行するなどの工夫が必要になります。SSIは、簡易的に実装できるというメリットがある反面、パフォーマンス面では考慮が必要になります。
# Podium
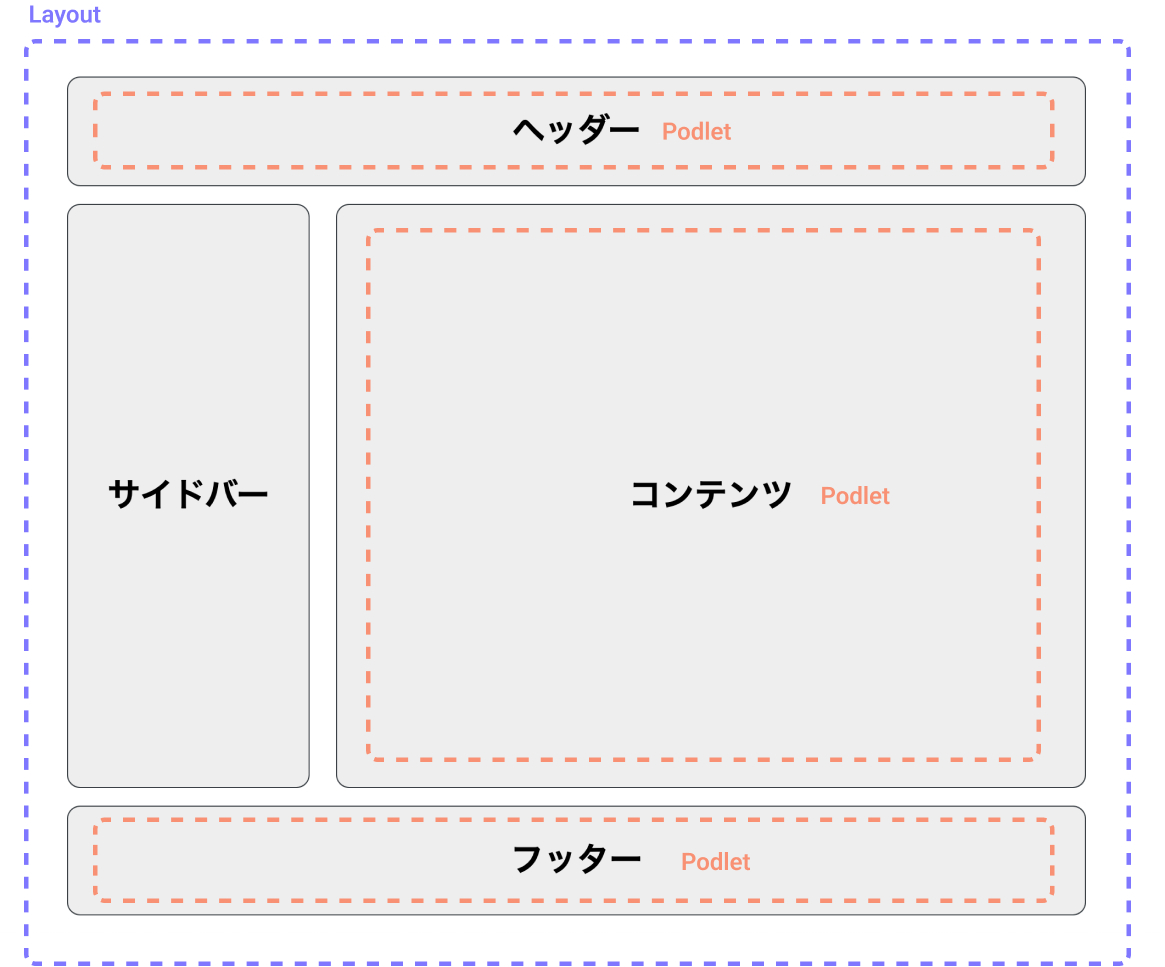
Podiumは、サーバーサイドでMicro Frontendsを実装するためのフレームワークです。メインとなるアプリケーションで、各サービスを組み合わせてからクライアントへ配信します。Podiumのアーキテクチャは、次の2つの概念から構成されます。
- Layout (opens new window)
- メインとなるアプリケーション
- Podlet(サービス)を組み合わせて、アプリケーションを構築する
- Podlet (opens new window)
- Micro Frontendsのサービスに該当する
- 独立したサーバで、任意のフレームワークを使用できる
Layoutは、メインとなるアプリケーションで、各Podlet(サービス)を組み合わせたり、JavaScriptやCSSのアセットを統合するなどの役割を果たします。Podletは、それぞれのUIを構築する役割で、ヘッダーやフッターなどを任意のフレームワークで実装することができます。
それでは、SSIと同様に次のWebサイトをPodiumで実装してみましょう。
フォルダ構成は、次のようになります。
├── footer
├── header
├── layout
├── package.json
└── yarn.lock
まずは、layoutを実装しましょう。フォルダ構成は、次の通りです。
layout
├── index.js
├── package.json
├── public
│ └── main.css
└── yarn.lock
layoutフォルダを作成し、次のパッケージをインストールしましょう。
$ mkdir layout
$ yarn add express @podium/layout @podium/utils
index.jsを作成し、メインとなるアプリケーションを実装します。
const express = require('express');
const Layout = require('@podium/layout');
const utils = require('@podium/utils');
const path = require("path");

const app = express();

const layout = new Layout({
  name: 'layout',
  pathname: '/',
});
layout.view((incoming, body, { head, bundle } = { head: '', bundle: [] }) => `<!doctype html>
<html lang="${incoming.context.locale || 'ja'}">
    <head>
        <meta charset="${incoming.view.encoding || 'utf-8'}">
        <link href="https://fonts.googleapis.com/css2?family=Roboto:wght@400;500;700&display=swap" rel="stylesheet">
        <link rel="stylesheet" href="https://unpkg.com/modern-css-reset/dist/reset.min.css" />
        <link rel="stylesheet" href="/public/main.css" />
        ${incoming.css.map(utils.buildLinkElement).join('\n')}
        ${incoming.js.map(utils.buildScriptElement).join('\n')}
        <title>${incoming.view.title || 'Micro Frontend'}</title>
        ${head || ''}
    </head>
    <body>
        ${body}
        ${bundle.map(utils.buildScriptElement).join('\n')}
    </body>
</html>`
)

app.use(layout.middleware());
app.use('/public', express.static(path.join(__dirname, 'public')))

app.get('/', (req, res) => {
  const incoming = res.locals.podium;

  const document = layout.render(incoming, `
    <main>
      <header>ヘッダー</header>
      <div class="container">
          <nav>サイドバー</nav>
          <div class="content">コンテンツ</div>
      </div>
      <footer>フッター</footer>
    </main>
  `);
  res.send(document);
});

const PORT = 7000
app.listen(7000, () => {
  console.log(`Serving at http://localhost:${PORT}/`)
});
はじめに、Layout用のインスタンスを生成します。このLayoutは、URLのホームで表示したいため、/をpathnameに指定します。
const layout = new Layout({
  name: 'layout',
  pathname: '/',
});
次に、テンプレートととなるビューを指定します。引数に指定されたJavaScriptとCSSの配列をもとに、linkタグとscriptタグを生成しています。JavaScriptとCSSファイルは、パスごとに指定することができます。また、${body}には、後述するrenderのアウトプットが自動的に適用されます。
layout.view((incoming, body, { head, bundle } = { head: '', bundle: [] }) => `<!doctype html>
<html lang="${incoming.context.locale || 'ja'}">
    <head>
        <meta charset="${incoming.view.encoding || 'utf-8'}">
        <link href="https://fonts.googleapis.com/css2?family=Roboto:wght@400;500;700&display=swap" rel="stylesheet">
        <link rel="stylesheet" href="https://unpkg.com/modern-css-reset/dist/reset.min.css" />
        <link rel="stylesheet" href="/public/main.css" />
        ${incoming.css.map(utils.buildLinkElement).join('\n')}
        ${incoming.js.map(utils.buildScriptElement).join('\n')}
        <title>${incoming.view.title || 'Micro Frontend'}</title>
        ${head || ''}
    </head>
    <body>
        ${body}
        ${bundle.map(utils.buildScriptElement).join('\n')}
    </body>
</html>`
)
次に、ルーティングを以下で設定します。layout.renderの実行結果が、先ほどのテンプレートで指定した${body}に展開されます。
app.get('/', (req, res) => {
  const incoming = res.locals.podium;

  const document = layout.render(incoming, `
    <main>
      <header>ヘッダー</header>
      <div class="container">
          <nav>サイドバー</nav>
          <div class="content">コンテンツ</div>
      </div>
      <footer>フッター</footer>
    </main>
  `);
  res.send(document);
});
また、JavaScriptとCSSファイルはincomingに指定すると、先ほどのテンプレートに適用することができます。
app.get('/', (req, res) => {
  const incoming = res.locals.podium;

  incoming.css = ['/main.css']
  incoming.js = ['/main.js']
})
これで、layoutの実装ができました。現状では、すべてのコンテンツをlayoutから配信しているので、各サービスをPodletに切り出しましょう。
まずは、ヘッダー部分を実装します。フォルダ構成は次の通りです。
header
├── index.js
├── package.json
├── public
│ └── main.css
└── yarn.lock
headerフォルダを作成し、次のパッケージをインストールしましょう。
$ mkdir header
$ yarn add express @podium/podlet
そして、index.jsを作成し、Podletを実装します。
const express = require('express');
const Podlet = require('@podium/podlet');
const path = require('path')

const app = express();

const podlet = new Podlet({
  name: 'header',
  version: '1.0.0',
  pathname: '/',
  manifest: '/manifest.json',
  content: '/',
  development: true,
});

podlet.css([
  { value: '/public/main.css' }
])

app.use('/public', express.static(path.join(__dirname, 'public')))
app.use(podlet.middleware())

app.get(podlet.content(), (req, res) => {
  res.status(200).podiumSend(`
    <header>ヘッダー</header>
  `)
})
app.get(podlet.fallback(), (req, res) => {
  res.status(200).podiumSend('<div>loading...</div>')
})

app.get(podlet.manifest(), (req, res) => {
  res.status(200).send(podlet)
})

const PORT = 7001;
app.listen(PORT, () => {
  console.log(`Serving at http://localhost:${PORT}/`)
})
はじめに、Podletインスタンスを生成します。オプションで、パスや名前を指定します。
const podlet = new Podlet({
  name: 'header',
  version: '1.0.0',
  pathname: '/',
  manifest: '/manifest.json',
  content: '/',
  development: true,
});
アセットファイルは、次のようにpublicフォルダから配信します。
podlet.css([
  { value: '/public/main.css' }
])

app.use('/public', express.static(path.join(__dirname, 'public')))
コンテンツの配信は、次のようになります。
app.get(podlet.content(), (req, res) => {
  res.status(200).podiumSend(`
    <header>ヘッダー</header>
  `)
})
Podletは、manifest.jsonというファイルを配信する必要があります。これは、Podletのメタデータで、この情報をもとにLayoutでアプリケーションを構築します。
{
  "name": "header",
  "version": "1.0.0",
  "content": "/",
  "fallback": "",
  "assets": {
    "js": "",
    "css": "/public/main.css"
  },
  "css": [
    {
      "value": "/public/main.css",
      "type": "text/css",
      "rel": "stylesheet"
    }
  ],
  "js": [],
  "proxy": {}
}
manifest.jsonは、次のようにして配信します。
app.get(podlet.manifest(), (req, res) => {
  res.status(200).send(podlet)
})
これで、ヘッダーの実装が完了しました。Node.jsを実行すると、http://localhost:7001からヘッダーのHTMLを配信することができます。
$ node index.js

Serving at http://localhost:7001/
では、layoutからヘッダーを取得して、組み合わせましょう。
layout/index.jsを開いて、ヘッダーのPodletを登録します。uriには、manifest.jsonを指定して、Podletのメタデータを取得します。
const headerPodlet = layout.client.register({
  name: 'header',
  uri: 'http://localhost:7001/manifest.json',
});
ルーターの中で、fetchを実行して、Podletのデータを取得します。取得したデータをもとに、メインとなるレスポンスに含めます。
app.get('/', async (req, res) => {
  const incoming = res.locals.podium;
  const [headerResponse] = await Promise.all([
    headerPodlet.fetch(incoming)
  ])

  incoming.css = [...incoming.css, ...headerResponse.css]
  incoming.js = [...incoming.js, ...headerResponse.js]

  const document = layout.render(incoming, `
    <main>
      ${headerResponse}
      <div class="container">
          <nav>サイドバー</nav>
          <div class="content">コンテンツ</div>
      </div>
      <footer>フッター</footer>
    </main>
  `);
  res.send(document);
});
これで、ヘッダーを統合することができました。ヘッダーで使用しているCSSやJavaScriptファイルをincomingに指定することで、自動的にタグに生成されます。
では次に、フッターを実装しましょう。フッターは、SSI同様にReactで実装します。SSIの例とほぼ同じで、次のようなフォルダ構成になります。
footer
├── build
│ └── main.js
├── package.json
├── public
├── server
│ └── render.js
├── server.js
├── src
│ ├── Footer.js
│ └── index.js
├── webpack.config.js
└── yarn.lock
footerフォルダを作成し、次のパッケージをインストールしましょう。
$ mkdir footer
$ yarn add express @podium/podlet
server.jsを作成し、Podletサーバを実装します。
const express = require('express');
const Podlet = require('@podium/podlet');
const { render } = require("./server/render");
const path = require("path");

const app = express();

const podlet = new Podlet({
  name: 'footer',
  version: '1.0.0',
  pathname: '/',
  manifest: '/manifest.json',
  content: '/',
  development: true,
});
podlet.js([
  { value: '/build/main.js' }
])

app.use('/public', express.static(path.join(__dirname, 'public')))
app.use('/build', express.static(path.join(__dirname, 'build')))
app.use(podlet.middleware());

app.get(podlet.content(), async (req, res) => {
  const html = await render(res)

  res.status(200).podiumSend(html)
})

app.get(podlet.fallback(), (req, res) => {
  res.status(200).podiumSend('<div>loading...</div>')
})

app.get(podlet.manifest(), (req, res) => {
  res.status(200).send(podlet)
})

const PORT = 7002;
app.listen(PORT, () => {
  console.log(`Serving at http://localhost:${PORT}/`);
});
実装内容はほとんどヘッダーと一緒になりますが、フッターはコンテンツの生成をReactで行うため、次のようにしてHTMLを生成します。
app.get(podlet.content(), async (req, res) => {
  const html = await render(res)

  res.status(200).podiumSend(html)
})
renderでは、renderToStringを使ってReactコンポーネントからHTMLを生成します。
import * as React from "react";
import { renderToString } from "react-dom/server";

import { Footer } from "../src/Footer";

export async function render() {
  return renderToString(
    <>
      <div id="app">
        <Footer />
      </div>
    </>
  )
}
これで、フッター部分の実装が完了しました。フッターは、http://localhost:7002からHTMLを配信します。
$ yarn dev

[1] Serving at http://localhost:7002/
それでは、layoutでフッターを統合しましょう。layout/index.jsを開いて、フッターのPodletを登録します。
const footerPodlet = layout.client.register({
  name: 'footer',
  uri: 'http://localhost:7002/manifest.json',
});
そして、ルーターでフッターのPodletの情報を取得し、メインのコンテンツに組み合わせます。
app.get('/', async (req, res) => {
  const incoming = res.locals.podium;
  const [
    headerResponse,
    footerResponse
  ] = await Promise.all([
    headerPodlet.fetch(incoming),
    footerPodlet.fetch(incoming)
  ])

  incoming.css = [...incoming.css, ...headerResponse.css, ...footerResponse.css]
  incoming.js = [...incoming.js, ...headerResponse.js]
  const bundle = [...footerResponse.js]

  const document = layout.render(incoming, `
    <main>
      ${headerResponse}
      <div class="container">
          <nav>サイドバー</nav>
          <div class="content">コンテンツ</div>
      </div>
      ${footerResponse}
    </main>
`, {
    bundle
  });
  res.send(document);
});
フッターは、Reactを使用しているため、クライアントでハイドレーションを実行するためのJavaScriptを読み込ませる必要があります。そのJavaScriptは、bundleとして次のように指定しています。
  const bundle = [...footerResponse.js]

  const document = layout.render(incoming, `
    <main>
      ${headerResponse}
      <div class="container">
          <nav>サイドバー</nav>
          <div class="content">コンテンツ</div>
      </div>
      ${footerResponse}
    </main>
`, { bundle });
  res.send(document);
});
このbundleは、テンプレートで指定した${bundle.map(utils.buildScriptElement).join('\n')}に展開されて、scriptタグが埋め込まれます。
layout.view((incoming, body, { head, bundle } = { head: '', bundle: [] }) => `<!doctype html>
<html lang="${incoming.context.locale || 'ja'}">
    <head>
        <meta charset="${incoming.view.encoding || 'utf-8'}">
        <link href="https://fonts.googleapis.com/css2?family=Roboto:wght@400;500;700&display=swap" rel="stylesheet">
        <link rel="stylesheet" href="https://unpkg.com/modern-css-reset/dist/reset.min.css" />
        <link rel="stylesheet" href="/public/main.css" />
        ${incoming.css.map(utils.buildLinkElement).join('\n')}
        ${incoming.js.map(utils.buildScriptElement).join('\n')}
        <title>${incoming.view.title || 'Micro Frontend'}</title>
        ${head || ''}
    </head>
    <body>
        ${body}
        ${bundle.map(utils.buildScriptElement).join('\n')}
    </body>
</html>`
)
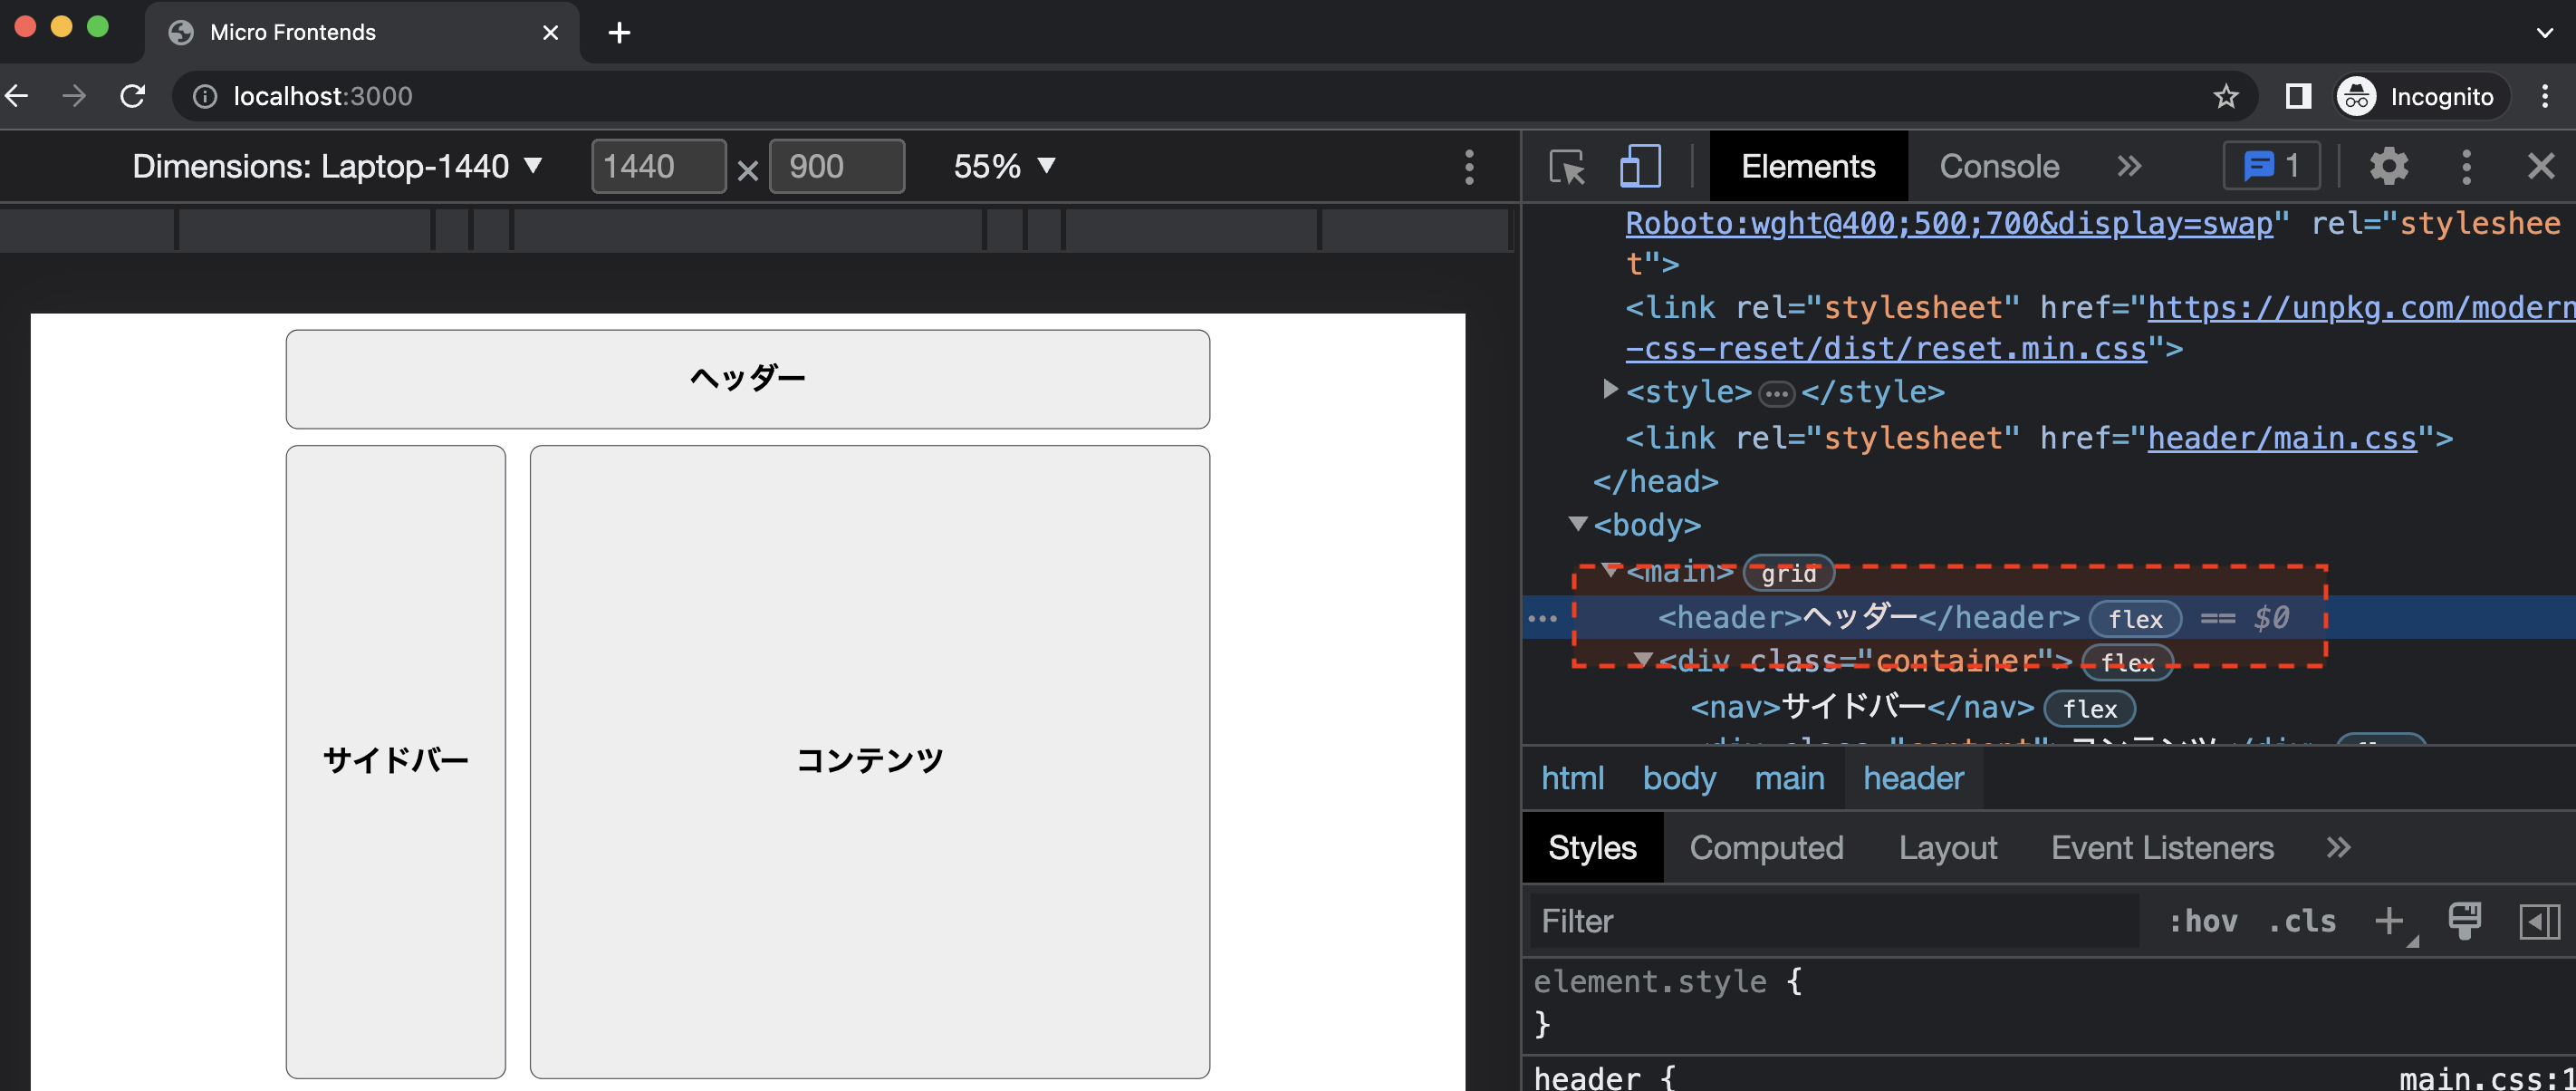
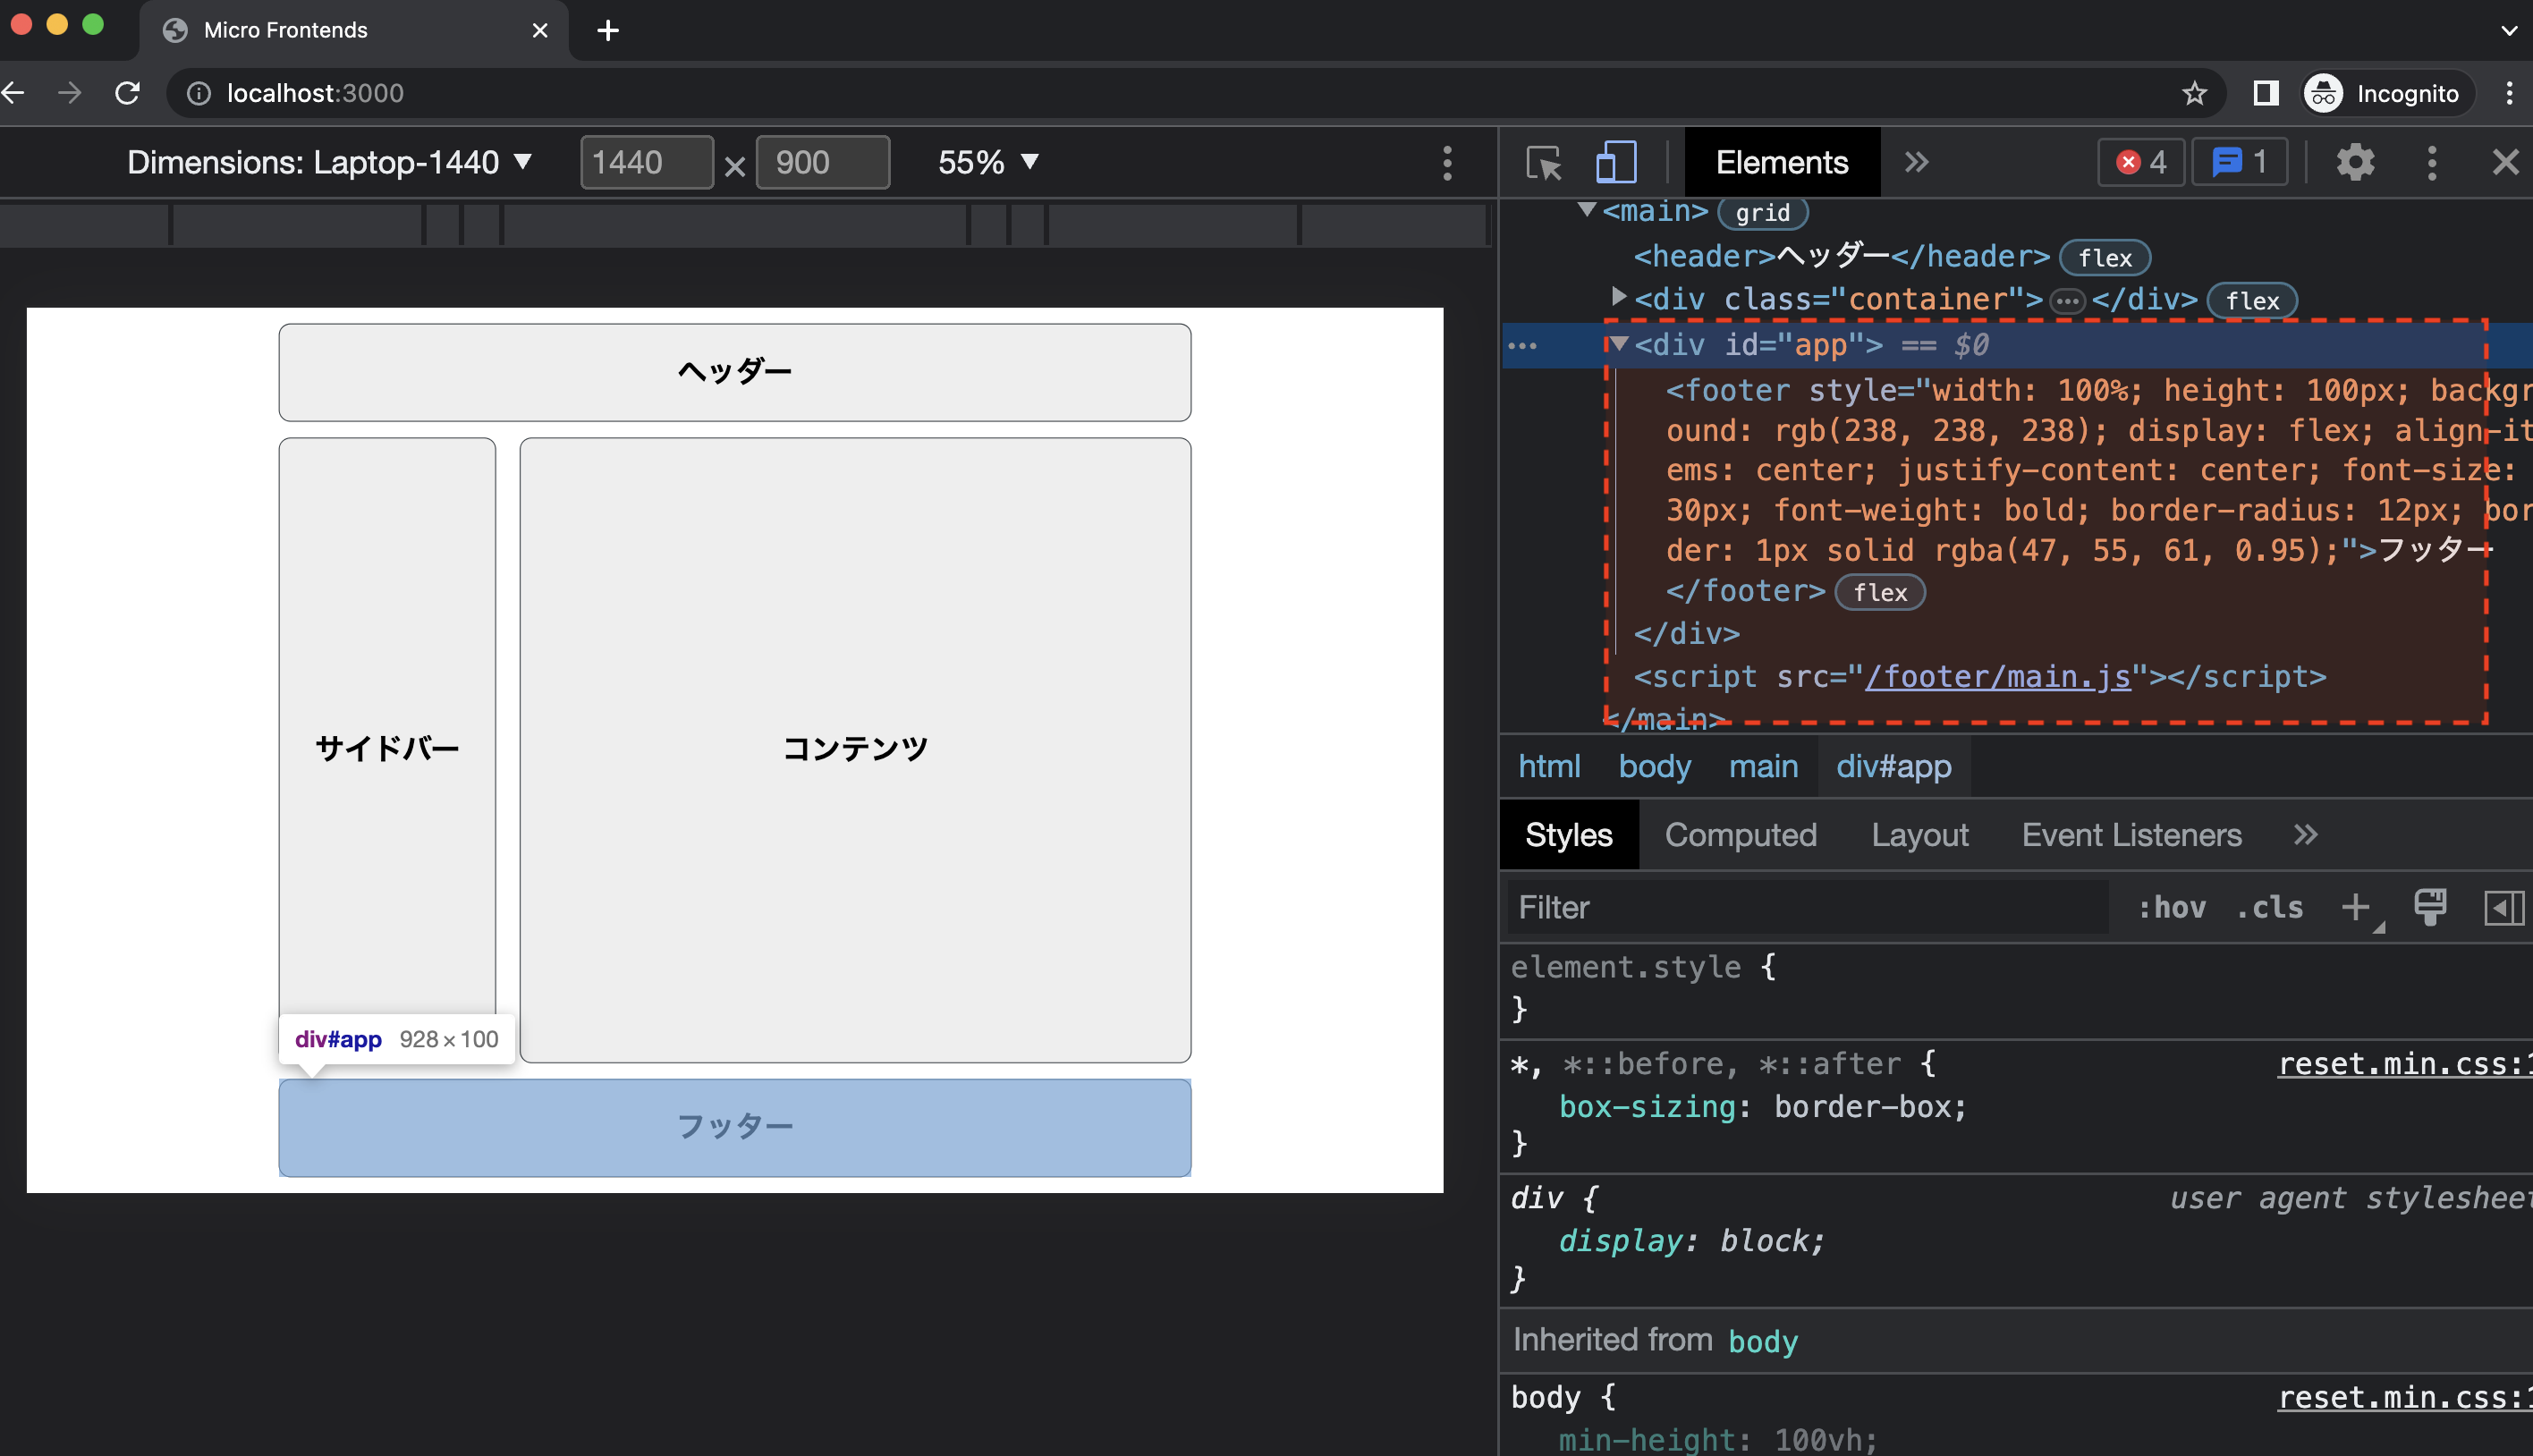
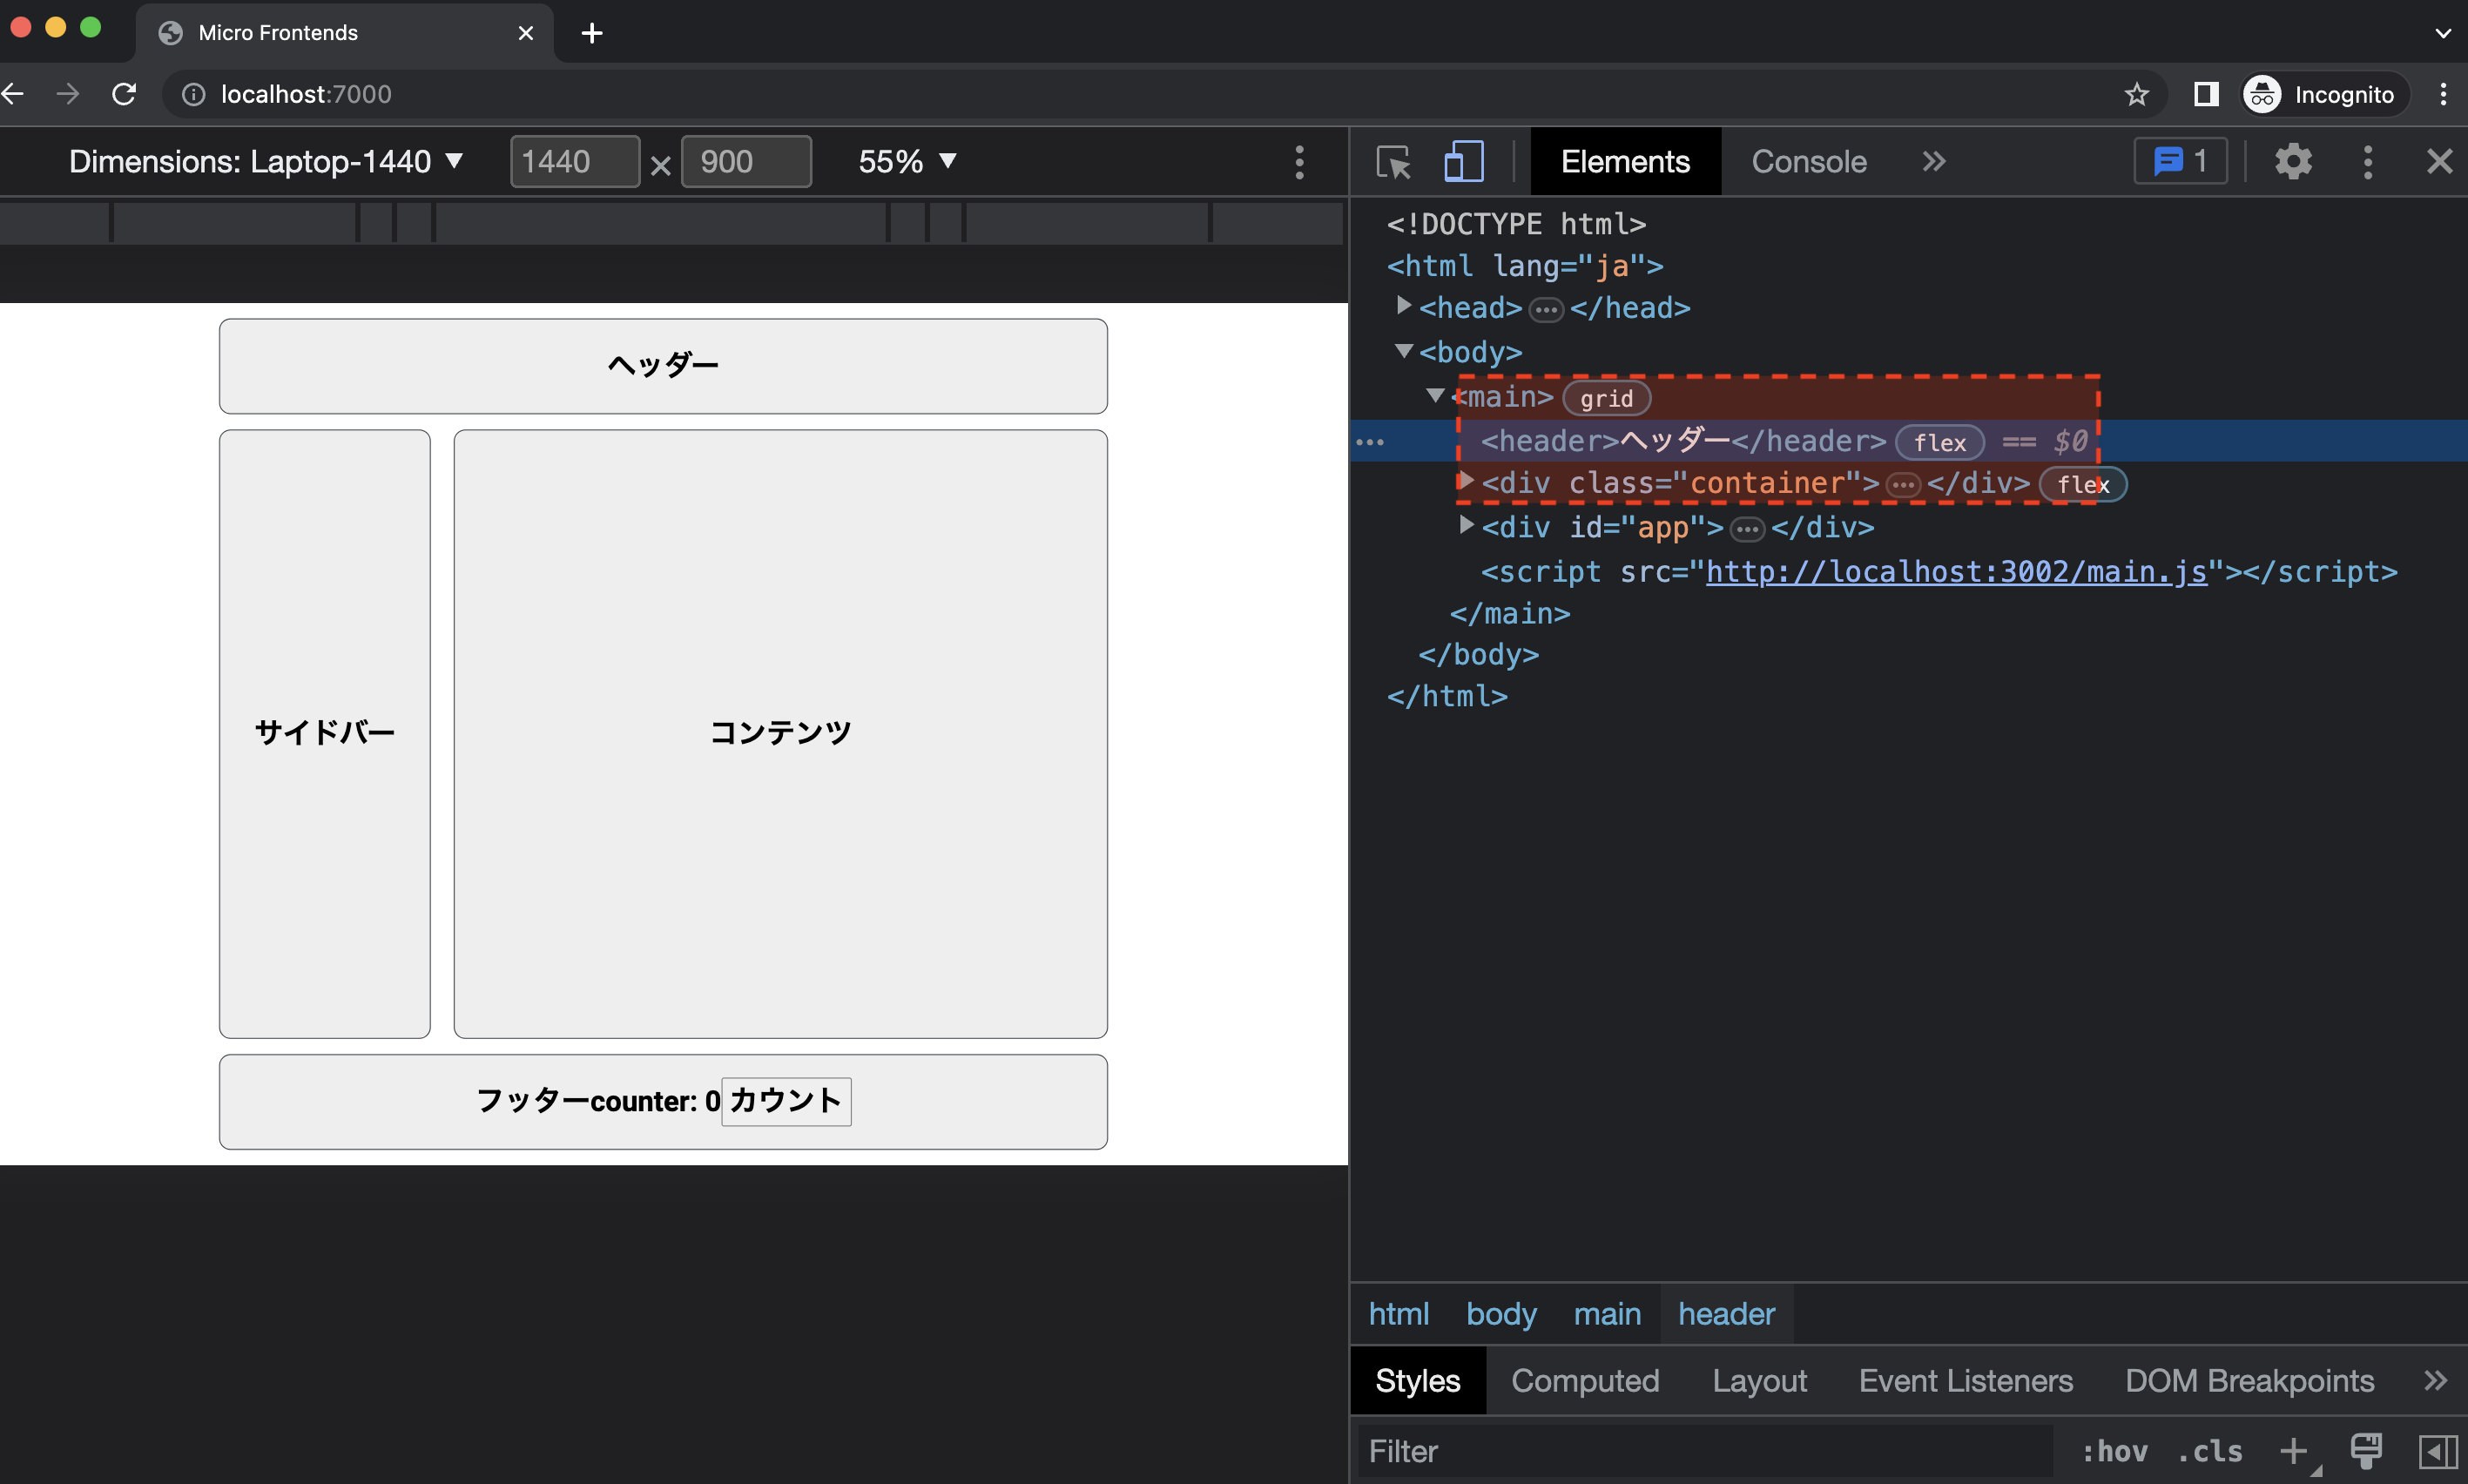
これで、ヘッダーとフッターのMicro Frontends化が完了しました。サーバを起動し、http://localhost:7000へアクセスすると、次のように統合されたHTMLが返ってくるのが確認できます。
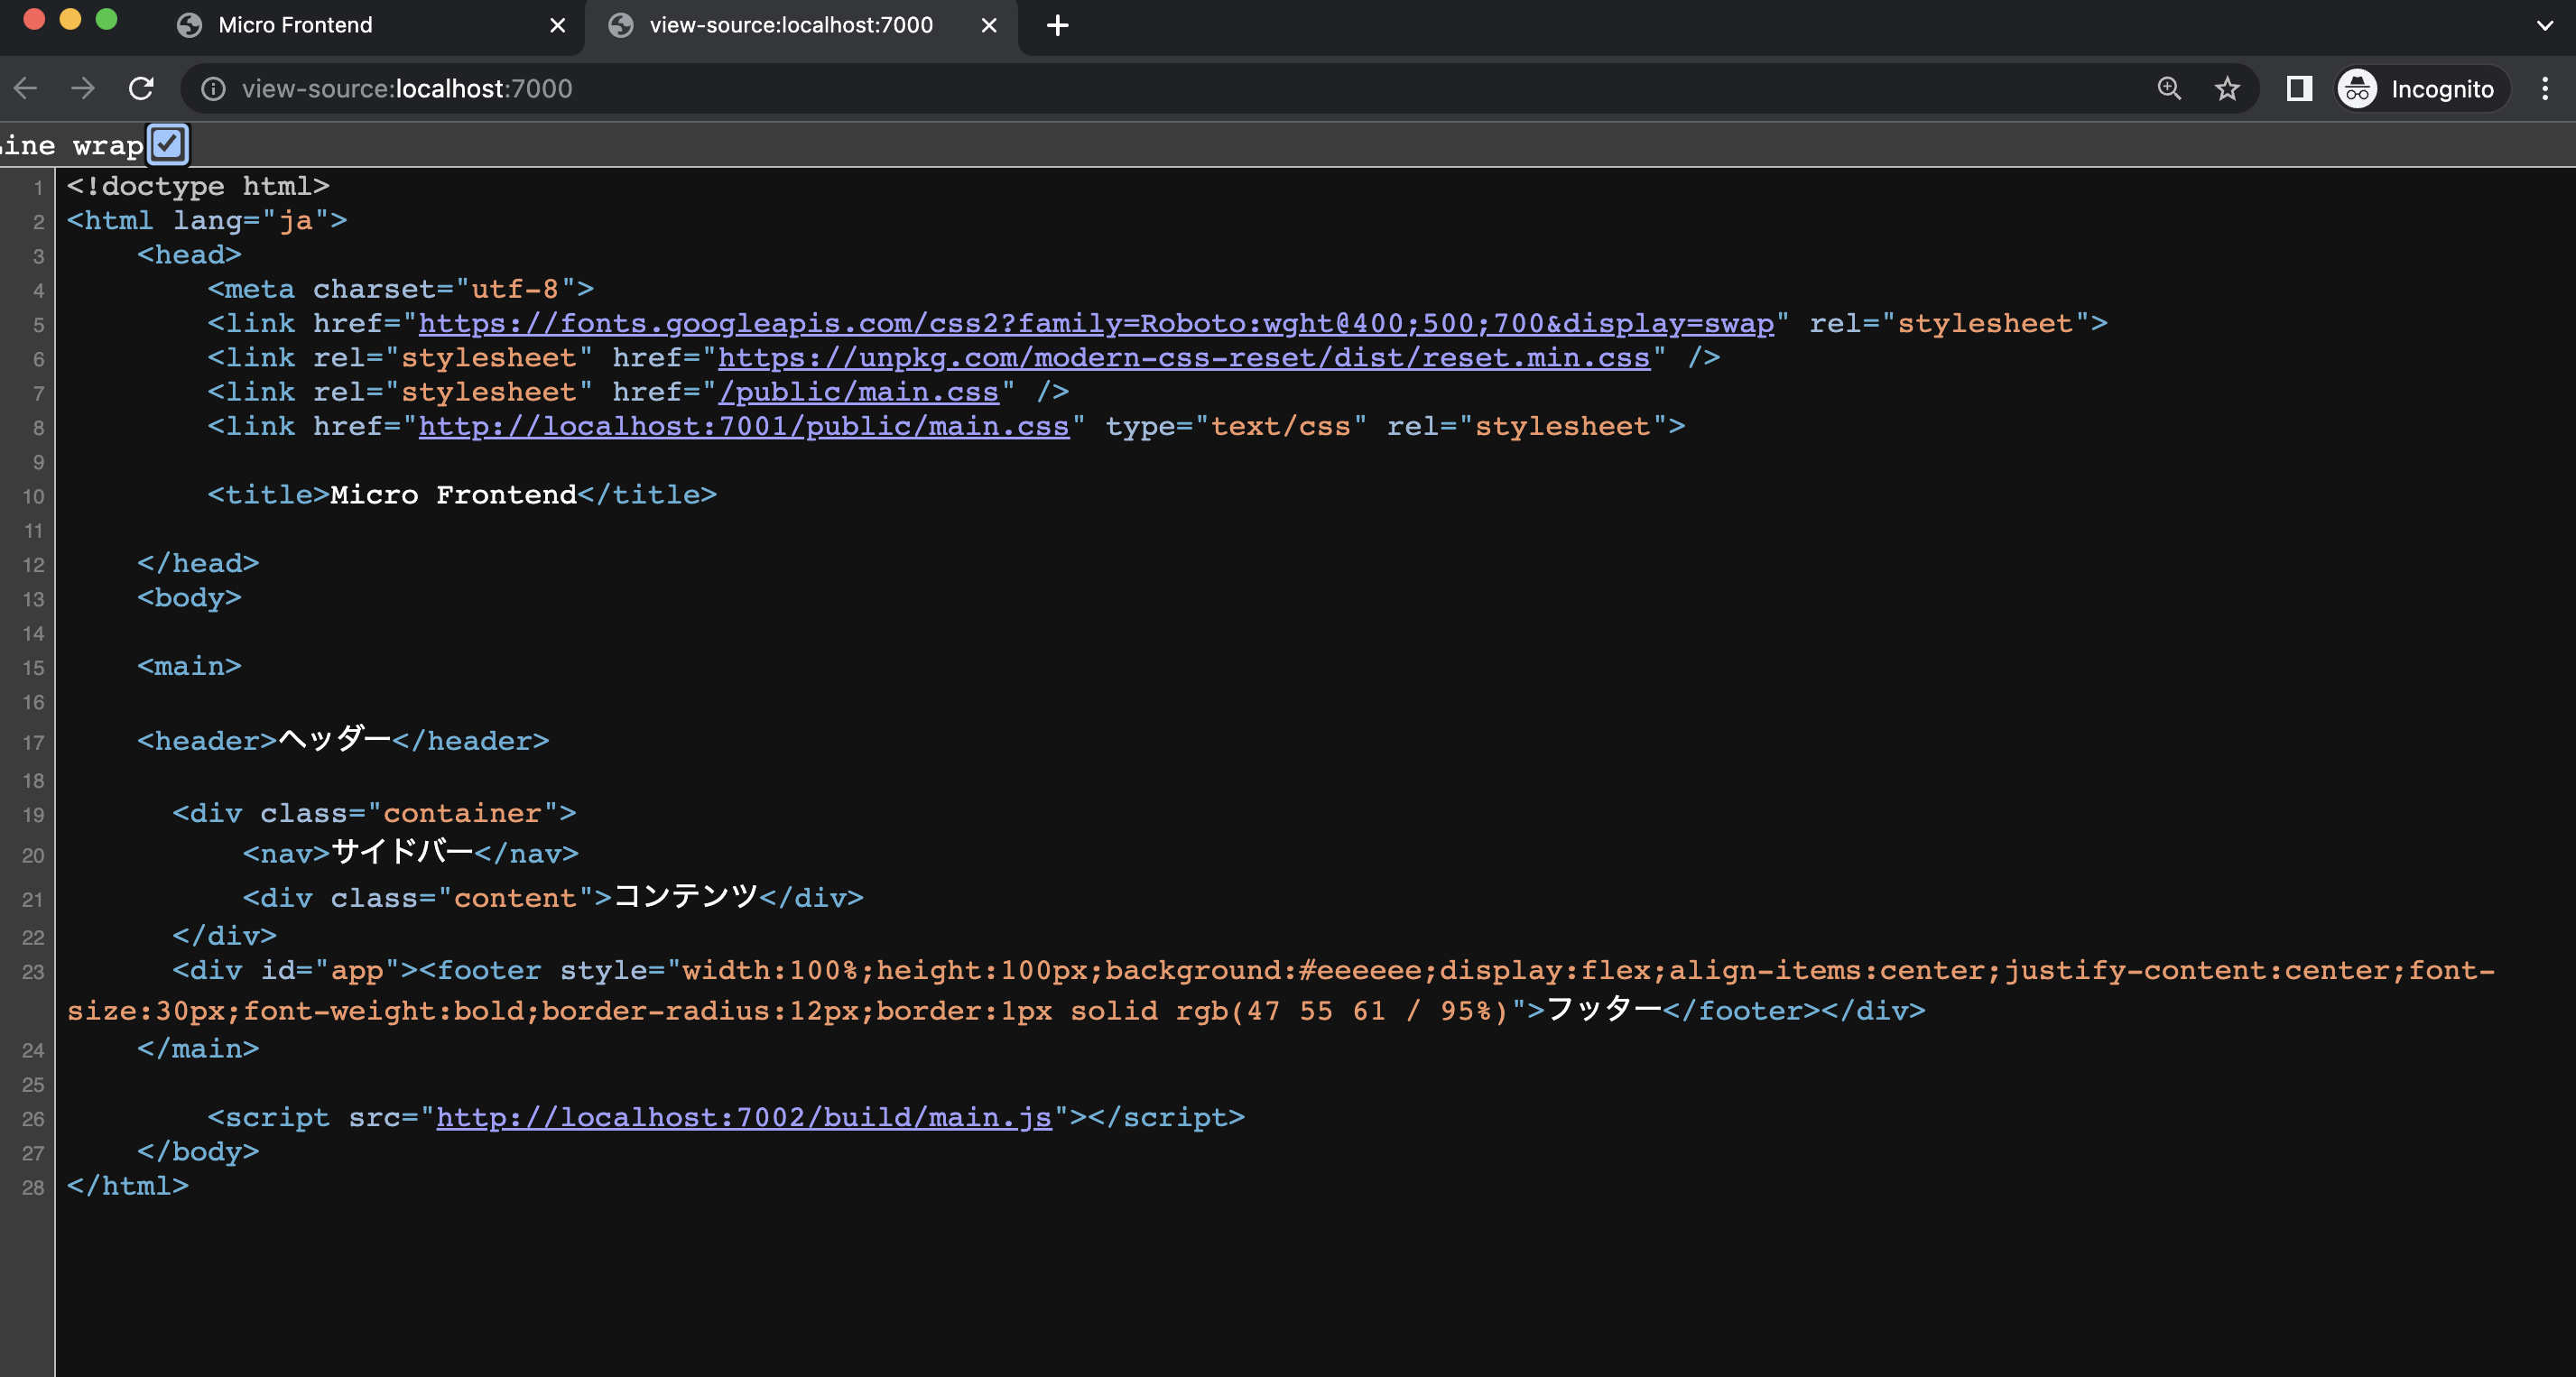
フッターで使用するためのバンドル済みのJavaScriptも読み込まれているのが分かります。これで、クライアントでもインタラクティブな動きを実現することができます。
Podiumは、サーバーサイドでMicro Frontendsの統合を行えるため、初回表示のパフォーマンスが向上するというメリットがあります。仮に、いずれかのPodletのレスポンスが遅れても、fallbackを配信することで、レイテンシーの増加を回避することができます。しかし、フッターの例を見た通り、UIフレームワークを使用した場合は、それぞれのバンドルJavaScriptが負荷になり、アプリケーションが機能するまでの時間(TTI)が遅れる可能性があります。また、複数のライブラリを含めることになるため、サービスが増えるごとにJavaScriptの肥大化が懸念されます。そのため、インタラクティブな動きが少なく、SEOに対応したレスポンスを要求する場合は、有効な選択肢になるでしょう。
# エッジサイド
エッジサイドは、CDNなどのエッジサーバー上でサービスを統合するパターンです。ESI(Edge Side Includes)という、SSIと似たようなマークアップでコンテンツを取得することができます。Akamai、Fastly、Varnish、CloudflareなどがESIをサポートしています。ESIは、以下のような<esi>タグを指定することで、CDN側で解析し、HTMLを生成してくれます。
<esi:include src="https://frontenddesign.example/header" />
ESI以外だと、エッジワーカー上でサービスを統合するパターンもあります。エッジワーカーとは、エッジサーバ上でプログラムを実行できる環境のことをいいます。例えば、Cloudflare Worker (opens new window)などがエッジワーカーになります。Cloudflare Workerは、JavaScript環境を提供しており、任意のプログラムを実行することができます。この実行環境の中で、サービスを統合してHTMLを生成します。
この章では、ESIの仕組みと、Cloudflare Workerでの統合パターンを見ていきましょう。
# ESI
ESIは、CDNのコンテンツを取得するものですが、今回はローカル環境でESIの仕組みを確認したいと思います。ローカル環境でESIを実行するためには、nodesi (opens new window)というライブラリを使用します。nodesiは、<esi>タグを解析してHTMLを生成する機能を提供します。
今回も、次のWebサイトを実装してみましょう。
フォルダ構成は、以下になります。
esi/
├── footer
├── header
├── package.json
├── proxy
├── root
└── yarn.lock
rootは、メインとなるアプリケーションサーバです。今回もheaderとfooterをMicro Frontendsのサービスにします。proxyは、クライアントとrootサーバの間に設置するリバースプロキシになります。proxyの中で、<esi>タグを解析してHTMLを生成します。

headerとfooterのMicro Frontendsは、サーバーサイドパターンの実装時と同じになるので、ここでは省略します。headerは、静的サーバでhttp://localhost:3001から配信し、footerは、Reactで実装し、http://localhost:3002で配信されるものとします。
では、rootのHTMLを見てみましょう。次のようなマークアップで構成されています。
<main>
  <header>ヘッダー</header>
  <div class="container">
    <nav>サイドバー</nav>
    <div class="content">コンテンツ</div>
  </div>
 <footer>フッター</footer>
</main>
そして、ヘッダー部分とフッター部分を<esi>タグに置き換えましょう。srcには、それぞれのURLを指定します。
<main>
  <esi:include src="http://localhost:3001"></esi:include>
  <div class="container">
    <nav>サイドバー</nav>
    <div class="content">コンテンツ</div>
  </div>
  <esi:include src="http://localhost:3002"></esi:include>
</main>
rootサーバを起動すると、http://localhost:3000で確認できます。現状だと、<esi>タグが解析されないので、ヘッダーとフッターには何も表示されません。

本来なら、CDN上で<esi>タグを解析し、HTMLを生成してからコンテンツを配信してくれます。今回は、ローカル環境で実行するので、CDNが提供する機能を擬似的に再現します。クライアントとrootサーバの間に、proxyサーバを設置し、その中で<esi>を解析します。
proxyフォルダは、次のような構成になります。
proxy/
├── package.json
└── server.js
まずは、必要なパッケージをインストールしましょう。express-http-proxy (opens new window)は、リクエスト単位でプロキシを実装できるパッケージです。
$ yarn add express express-http-proxy nodesi
では、server.jsを作成して、次のように実装しましょう。
const express = require('express')
const proxy = require('express-http-proxy')
const NodeESI = require('nodesi')

const esi = new NodeESI({})

const app = express()
app.use('/', proxy('http://localhost:3000', {
  userResDecorator: function (proxyRes, proxyResData) {
    return proxyRes.headers['content-type'].includes('text/html')
      ? esi.process(proxyResData.toString())
      : proxyResData
  }
}))

app.listen(7000, () => {
  console.log('Proxy Server listing on 7000...')
})
proxyサーバは、http://localhost:7000で起動します。クライアントから/ にリクエストされたら、rootサーバのhttp://localhost:3000へコンテンツを取得します。
const app = express()
app.use('/', proxy('http://localhost:3000', {
コンテンツを取得したら、<esi>タグを解析します。<esi>タグの解析には、nodesiのprocessを実行します。タグが解析されると、HTMLに置き換えられます。
userResDecorator: function (proxyRes, proxyResData) {
    return proxyRes.headers['content-type'].includes('text/html')
      ? esi.process(proxyResData.toString())
      : proxyResData
  }
これで、proxyの実装が完了しました。サーバを起動してみましょう。
$ node server.js

Proxy Server listing on 7000...
http://localhost:7000にアクセスすると、ヘッダーとフッターが置き換わっているのが分かります。
ESIは、SSIのように、マークアップで簡単に実装することができます。また、部分ごとにキャッシュを設定できるため、静的コンテンツだけをキャッシュしたい、などのケースでは有効になるでしょう。しかし、ローカル環境では上述したnodesiなどを導入する必要があります。また、ESIを扱えるCDNサービスも限られているため、アプリケーションの要件やユースケースによって適切な選択が必要になります。
# Cloudflare Worker
次に、Cloudflare Workerを使った統合パターンを見てみましょう。
今回も、次のWebサイトを実装してみましょう。
フォルダ構成は、以下になります。
esi/
├── footer
├── header
├── package.json
├── root
└── yarn.lock
rootは、メインとなるアプリケーションです。今回も、headerとfooterをMicro Frontendsのサービスにします。rootで、クライアントからのリクエストを受けて、headerとfooterのコンテンツを取得し、組み合わせてからクライアントへ返します。
では、まずはrootアプリケーションを実装しましょう。Cloudflare Workerは、Wrangler (opens new window)というプロジェクトを管理するためのCLIを提供しています。このCLIを使って、プロジェクトを生成します。
$ npx wrangler init root

 ⛅️ wrangler 2.15.0 (update available 2.16.0)
-------------------------------------------------------
Using npm as package manager.
✨ Created root/wrangler.toml
✔ No package.json found. Would you like to create one? … yes
✨ Created root/package.json
✔ Would you like to use TypeScript? … yes
✨ Created root/tsconfig.json
✔ Would you like to create a Worker at root/src/index.ts? › Fetch handler
✨ Created root/src/index.ts
✔ Would you like us to write your first test with Vitest? … yes
✨ Created root/src/index.test.ts
CLIの処理が完了すると、次のようなファイルが生成されます。
root
├── package.json
├── src
│ ├── index.test.ts
│ └── index.ts
├── tsconfig.json
└── wrangler.toml
wrangler.tomlは、Cloudflare Workerの設定を記述するファイルです。初期設定では、次のようになっています。
name = "root" # Workerの名前
main = "src/index.ts" # エントリーポイントとなるファイル
compatibility_date = "2023-04-18"
mainには、エントリーポイントとなるファイルを指定します。今回は、TypeScriptを実行します。
エントリーポイントとなるsrc/index.tsは、初期設定では次のようになっています。
export interface Env {
	// Example binding to KV. Learn more at https://developers.cloudflare.com/workers/runtime-apis/kv/
	// MY_KV_NAMESPACE: KVNamespace;
	//
	// Example binding to Durable Object. Learn more at https://developers.cloudflare.com/workers/runtime-apis/durable-objects/
	// MY_DURABLE_OBJECT: DurableObjectNamespace;
	//
	// Example binding to R2. Learn more at https://developers.cloudflare.com/workers/runtime-apis/r2/
	// MY_BUCKET: R2Bucket;
	//
	// Example binding to a Service. Learn more at https://developers.cloudflare.com/workers/runtime-apis/service-bindings/
	// MY_SERVICE: Fetcher;
}

export default {
	async fetch(
		request: Request,
		env: Env,
		ctx: ExecutionContext
	): Promise<Response> {
		return new Response("Hello World!");
	},
};
初期設定では、Hello World!という文字列を配信しているのが分かります。基本的に、fetchの中で、任意のデータを配信します。
試しに、ローカル環境で見てみましょう。開発サーバを起動するには、yarn startを実行します。
$ yarn start
curlを実行すると、Hello World!が返ってきました。
$ curl http://localhost:8787

Hello World!
では次に、メインとなるHTMLファイルを配信しましょう。Cloudflare Workerで静的ファイルを配信するには、静的ファイルのフォルダをwrangler.tomlに定義します。ここでは、publicフォルダを指定します。
name = "root"
main = "src/index.ts"
compatibility_date = "2023-04-18"

[site]
bucket = "./public"
次に、静的ファイルを取得するためのパッケージをインストールします。
$ yarn add @cloudflare/kv-asset-handler
パッケージをインストールしたら、src/index.tsを開き、次のように実装します。
import { getAssetFromKV } from "@cloudflare/kv-asset-handler";
import manifestJSON from "__STATIC_CONTENT_MANIFEST";
const assetManifest = JSON.parse(manifestJSON);

export interface Env {
	// Example binding to KV. Learn more at https://developers.cloudflare.com/workers/runtime-apis/kv/
	__STATIC_CONTENT: KVNamespace;
	//
	// Example binding to Durable Object. Learn more at https://developers.cloudflare.com/workers/runtime-apis/durable-objects/
	// MY_DURABLE_OBJECT: DurableObjectNamespace;
	//
	// Example binding to R2. Learn more at https://developers.cloudflare.com/workers/runtime-apis/r2/
	// MY_BUCKET: R2Bucket;
	//
	// Example binding to a Service. Learn more at https://developers.cloudflare.com/workers/runtime-apis/service-bindings/
	// MY_SERVICE: Fetcher;
}

export default {
	async fetch(
		request: Request,
		env: Env,
		ctx: ExecutionContext
	): Promise<Response> {
    try {
      return await getAssetFromKV(
        {
          request,
          waitUntil: ctx.waitUntil.bind(ctx),
        },
        {
          ASSET_NAMESPACE: env.__STATIC_CONTENT,
          ASSET_MANIFEST: assetManifest,
        }
      );
    } catch (e) {
      let pathname = new URL(request.url).pathname;
      return new Response(`"${pathname}" not found`, {
        status: 404,
        statusText: 'not found',
      });
    }
	},
};
getAssetFromKVでpublicフォルダにある静的ファイルを取得しています。デフォルトでは、/にアクセスするとpublic/index.htmlを配信します。次のようにpublic/index.htmlを追加してみましょう。
public/
└── index.html
そして、サーバを起動してみましょう。
$ yarn start
http://localhost:3000/ にアクセスすると、public/index.htmlが配信されているのが分かります。
では、ヘッダー部分をMicro Frontendsに分割してみましょう。Cloudflare WorkerでMicro Frontendsを統合するために使うAPIは、次の二つになります。
HTMLRewriter (opens new window)は、特定のタグや文字列を任意のHTMLに置き換えるために使われます。例えば、次のように書くことで、<header>を<div>に置き換えることができます。
// headerを指定する
const rewriter = new HTMLRewriter().on('header', new HTMLRewriterHandler)
return rewriter.transform(res)

class HTMLRewriterHandler {
  element(element: Element) {
    // <header>を<div>に置き換える
    element.replace('<div>ヘッダー</div>', { html: true })
  }
}
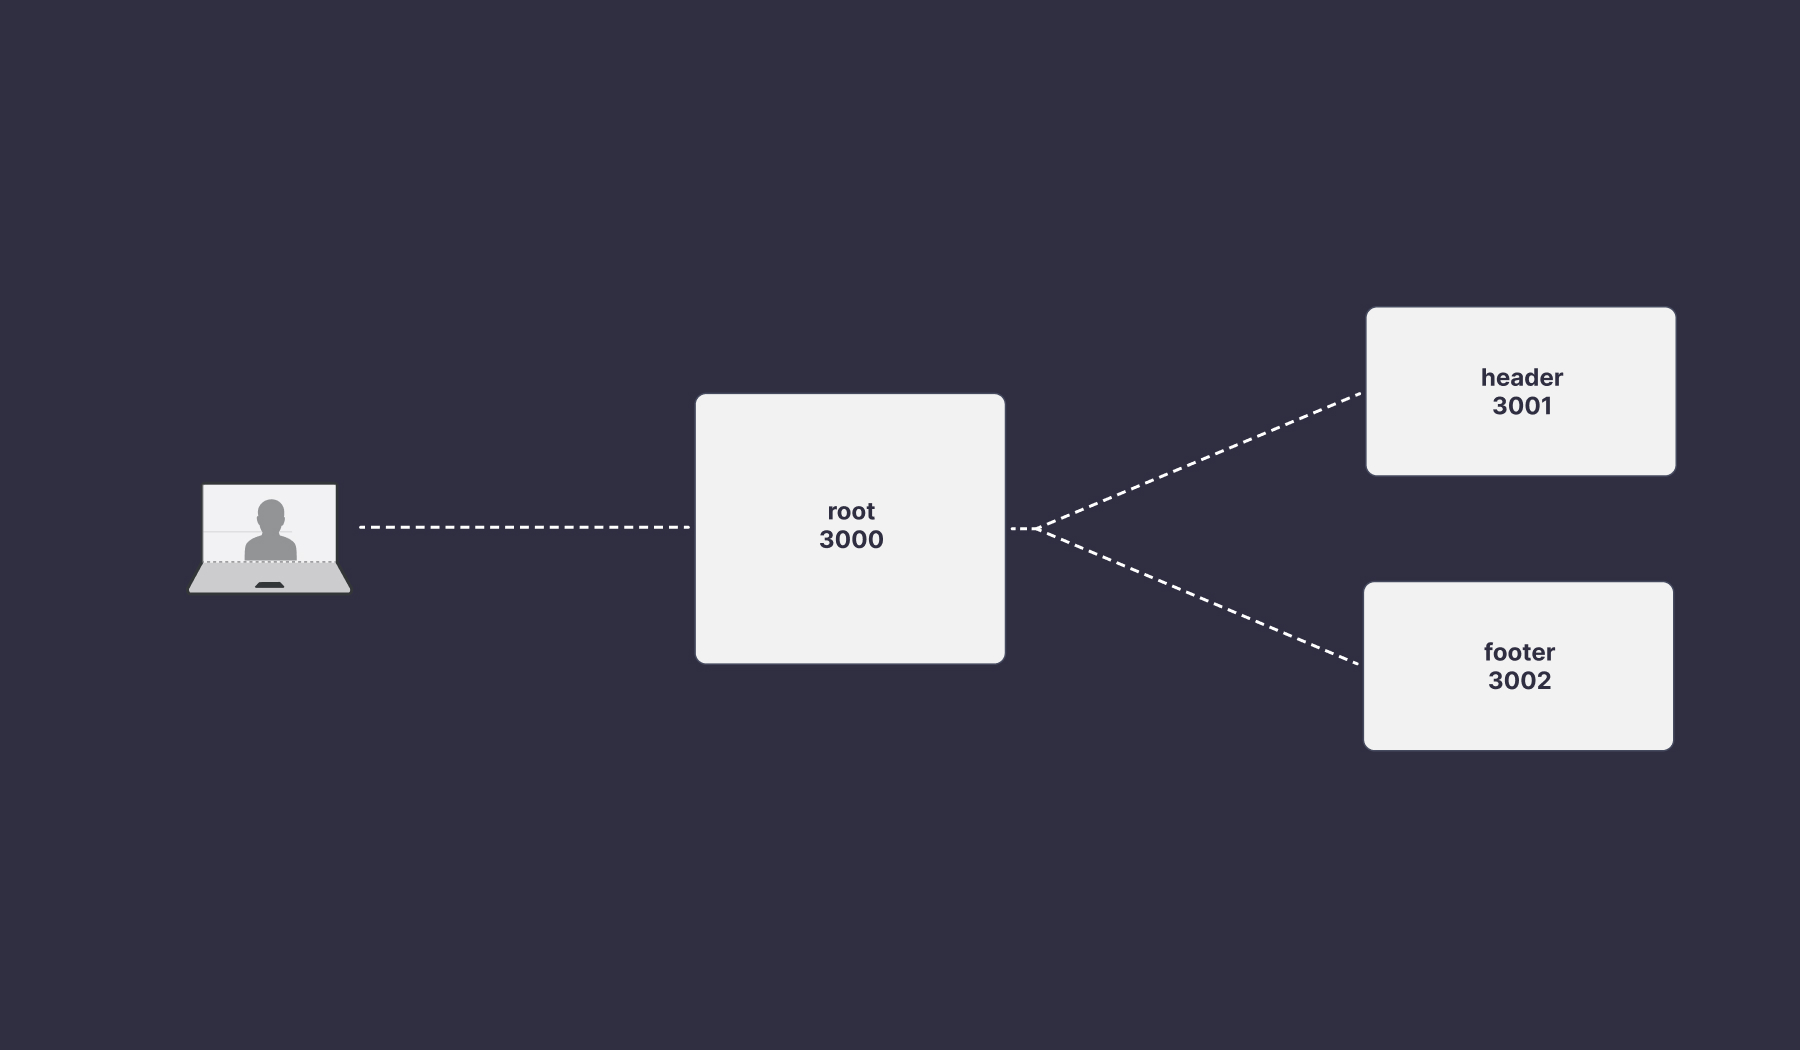
Service bindings (opens new window)は、インターネットを経由せずにWorker同士を接続するための機能です。コードから直接、他のWorkerを呼び出すことができ、ネットワークの遅延なく、リクエストを実行することができます。
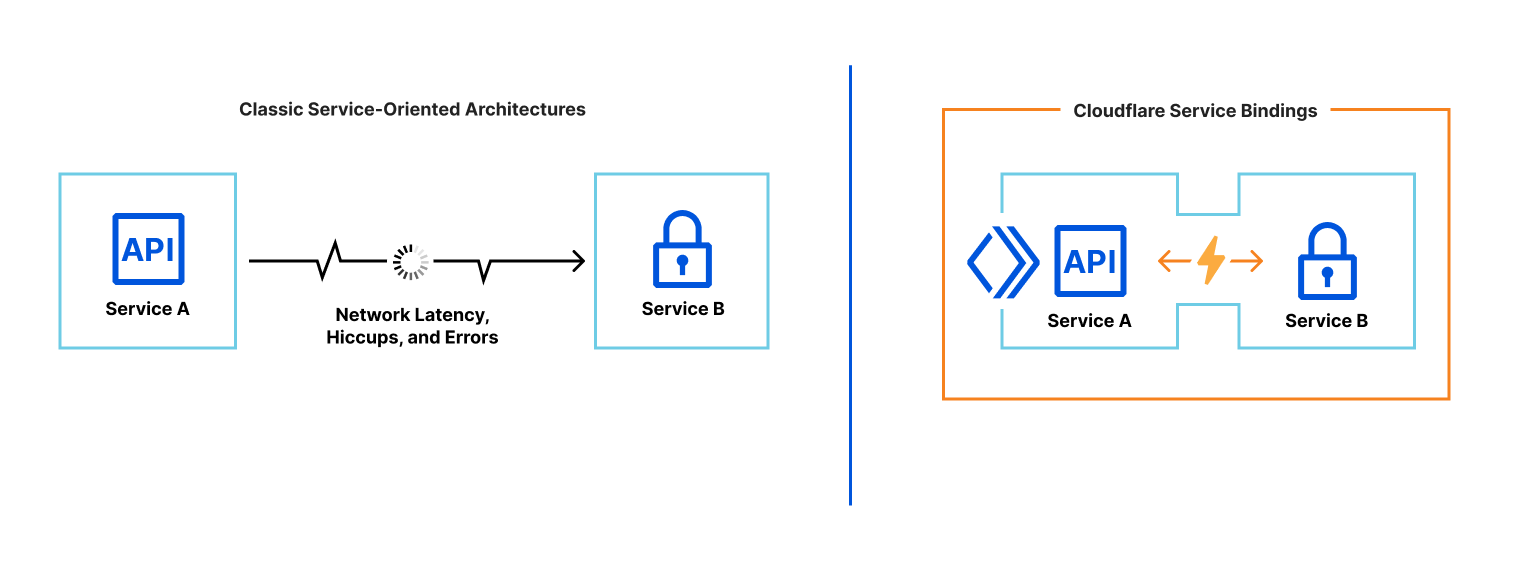
出典: About Service bindings (opens new window)
Wranglerを使う場合、呼び出し側のwrangler.tomlで次のように接続したいService(Worker)を指定します。
name = "root"
main = "src/index.ts"
compatibility_date = "2023-04-18"

[[services]]
binding = "header"
service = "cloudflare-header"
そして、呼び出す側のenvに型を定義し、fetchメソッドを実行するとサービスにリクエストを送ることができます。
export interface Env {
  header: Fetcher;
}
export default {
  async fetch(request: Request, env: Env, ctx: ExecutionContext): Promise<Response> {
    const headerResponse = await env.header.fetch(request.clone());
  }
}
今回は、この二つの機能を使ってMicro Frontendsのサービスを統合したいと思います。具体的には、次のような手順で実装していきます。
headerとfooterのService Bindingsを定義して、rootからアクセスできるようにするrootのfetchメソッド内で、headerとfooterにリクエストを送り、それぞれのコンテンツを取得する- HTMLRewriterを使って、
<header>と<footer>タグを取得したコンテンツに書き換える - 統合したコンテンツをクライアントへ配信する
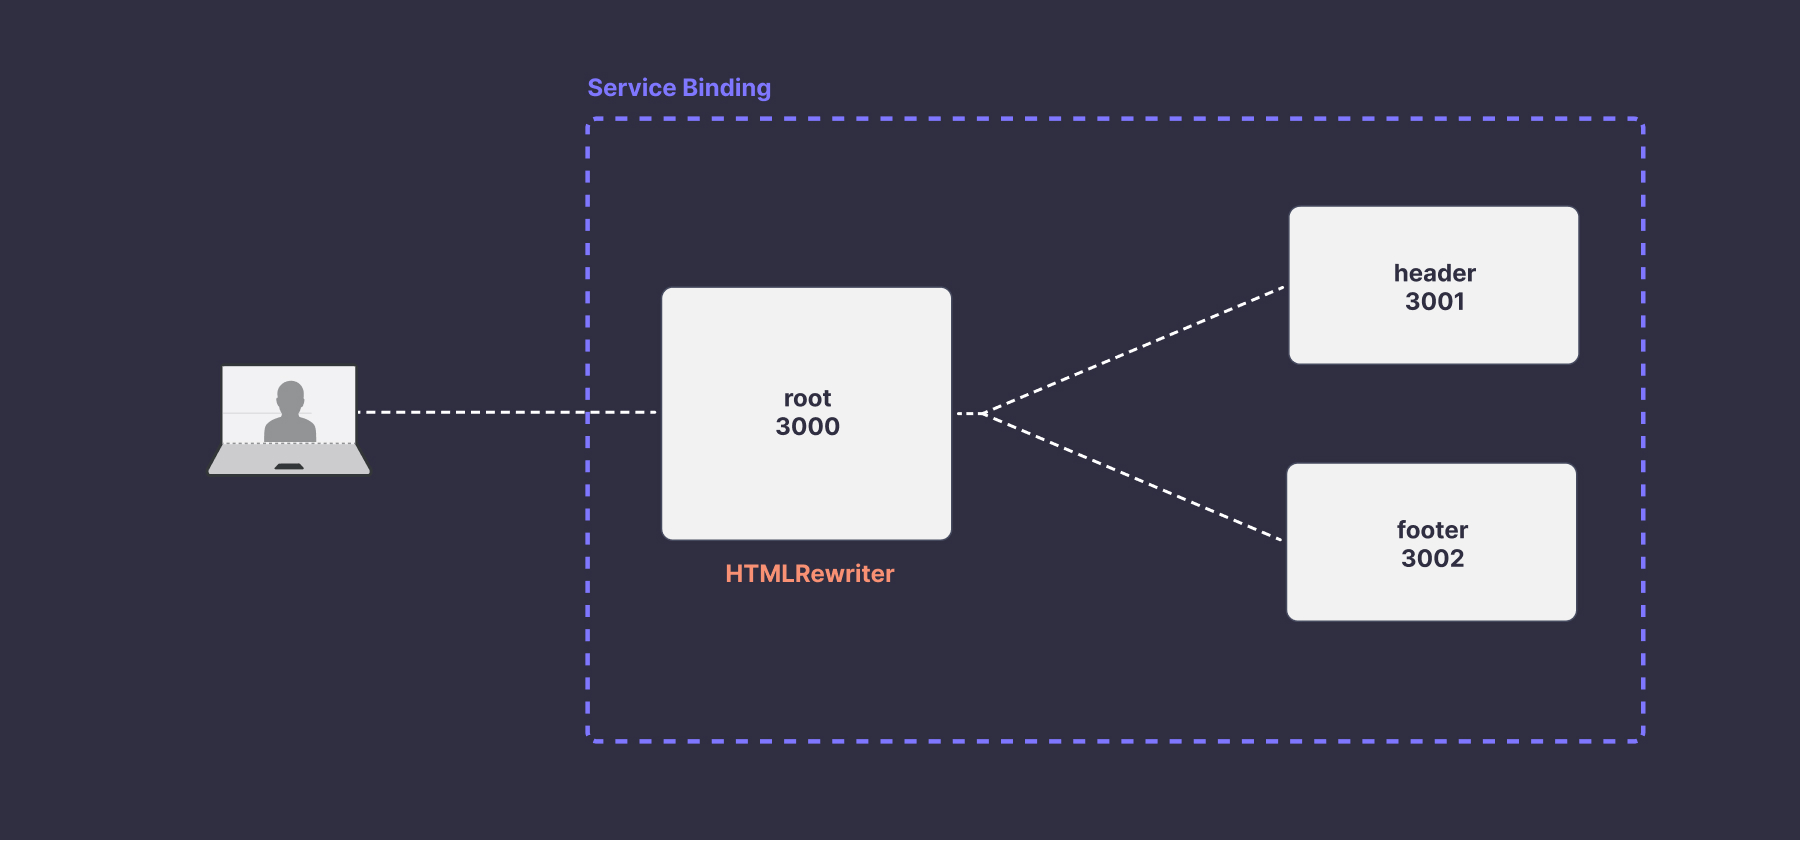
はじめに、rootにService Bindingsの設定をしましょう。root/wrangler.tomlを開いて、headerとfooterのServiceを登録します。
name = "root"
main = "src/index.ts"
compatibility_date = "2023-04-18"

[[services]]
binding = "header"
service = "header"

[[services]]
binding = "footer"
service = "footer"

[site]
bucket = "./public"
次に、public/index.htmlを開いて、<header>タグと<footer>タグを<cloudflare-header>と<cloudflare-footer>に書き換えます。このタグは、HTMLRewriterでコンテンツを置き換えるために使用します。
<main>
  <cloudflare-header></cloudflare-header>
  <div class="container">
    <nav>サイドバー</nav>
    <div class="content">コンテンツ</div>
  </div>
  <cloudflare-footer></cloudflare-footer>
</main>
次に、root/src/index.tsを開いて、次のように実装しましょう。
import { getAssetFromKV } from "@cloudflare/kv-asset-handler";
import manifestJSON from "__STATIC_CONTENT_MANIFEST";
import type { Env } from "./types";
import { headerHTMLRewriterHandler } from "./headerHTMLRewriterHandler";
import { footerHTMLRewriterHandler } from "./footerHTMLRewriterHandler";
const assetManifest = JSON.parse(manifestJSON);

export default {
  async fetch(
    request: Request,
    env: Env,
    ctx: ExecutionContext
  ): Promise<Response> {
    const url = new URL(request.url);
    const pathName = url.pathname;

    if (pathName !== '/') {
      const fragmentAsset = await getFragmentAsset(env, request)
      if (fragmentAsset) return fragmentAsset
    }

    return await renderResponse(request, env, ctx)
  },
};

const renderResponse = async (request: Request, env: Env, ctx: ExecutionContext) => {
  const res = await getAssetFromKV(
    { request, waitUntil: ctx.waitUntil.bind(ctx) },
    {
      ASSET_NAMESPACE: env.__STATIC_CONTENT,
      ASSET_MANIFEST: assetManifest,
    }
  );

  let rewriter = await headerHTMLRewriterHandler(new HTMLRewriter(), env, request) // ヘッダーを取得して、コンテンツを置き換える
  rewriter = await footerHTMLRewriterHandler(rewriter, env, request) // フッターを取得して、コンテンツを置き換える

  return rewriter.transform(res);
}

// Inspired by https://github.com/cloudflare/workers-web-experiments/blob/main/cloud-gallery/helpers/src/fragmentHelpers.tsx
const getFragmentAsset = async (env: Env, request: Request) => {
  const url = new URL(request.url);
  const match = /^\/fragment\/([^/]+)(\/.*)$/.exec(url.pathname);
  if (match === null) return null;

  const serviceName = match[1] as keyof Env;
  const service = env[serviceName];
  if (!isFetcher(service)) {
    throw new Error("Unknown fragment service: " + serviceName);
  }
  return await service.fetch(
    new Request(request.clone())
  );
}

function isFetcher(obj: unknown): obj is Fetcher {
  return !!((obj as Fetcher).fetch);
}
順番に処理を見てましょう。まず、getFragmentAssetは各Serviceの静的ファイルを取得しています。例えば、クライアントからhttp://localhost:3000/fragment/header/main.css とリクエストがきた場合に、headerServiceにあるpublicフォルダからmain.cssを取得しています。rootからは、他のServiceの静的ファイルを参照する仕組みがないので、Service Bindingsを経由して取得しています。
if (pathName !== '/') {
  const fragmentAsset = await getFragmentAsset(env, request)
  if (fragmentAsset) return fragmentAsset
}
次に、renderResponseでは、headerとfooterにアクセスして、HTMLを書き換え、Micro Frontendsを統合しています。
const renderResponse = async (request: Request, env: Env, ctx: ExecutionContext) => {
  const res = await getAssetFromKV(
    { request, waitUntil: ctx.waitUntil.bind(ctx) },
    {
      ASSET_NAMESPACE: env.__STATIC_CONTENT,
      ASSET_MANIFEST: assetManifest,
    }
  );

  let rewriter = await headerHTMLRewriterHandler(new HTMLRewriter(), env, request) // ヘッダーを取得して、コンテンツを置き換える
  rewriter = await footerHTMLRewriterHandler(rewriter, env, request) // フッターを取得して、コンテンツを置き換える

  return rewriter.transform(res);
}
headerHTMLRewriterHandlerでは、次のようにHTMLRewriterを実装して、<cloudflare-header>タグをheaderServiceから取得したコンテンツに書き換えています。また、同時にheaderServiceにあるCSSファイルを<link>タグにして、pubilc/index.htmlに追加しています。
import type { Env, ManifestJSON } from "./types";
import { HTMLRewriterHandler } from "./HTMLRewriterHandler";

export const headerHTMLRewriterHandler = async (
  res: HTMLRewriter,
  env: Env,
  request: Request
) => {
  const manifestJSON = (await (
    await env.header.fetch(new URL("manifest.json", request.url), request)
  ).json()) as ManifestJSON;

  return res
    .on(
      "cloudflare-header",
      new HTMLRewriterHandler(async (element) => {
        // header Serivceからコンテンツを取得
        const headerResponse = await env.header.fetch(request.clone());
        const headerHTML = await headerResponse.text();

        // HTMLを書き換える
        element.replace(headerHTML, { html: true });
      })
    )
    // header SerivceにあるCSSファイルを<link>タグにして、htmlに追加する。
    .on(
      'style[data-href="style"]',
      new HTMLRewriterHandler(async (element) => {
        if (manifestJSON.resources.css.length)
          element.after(manifestJSON.resources.css.join(""), { html: true });
      })
    );
};
これでrootの実装が完了しました。次に、headerServiceを実装しましょう。root同様に、wranglerCLIを使用します。
$ npx wrangler init header

 ⛅️ wrangler 2.15.0 (update available 2.16.0)
-------------------------------------------------------
Using npm as package manager.
✨ Created header/wrangler.toml
✔ No package.json found. Would you like to create one? … yes
✨ Created header/package.json
✔ Would you like to use TypeScript? … yes
✨ Created header/tsconfig.json
✔ Would you like to create a Worker at header/src/index.ts? › Fetch handler
✨ Created header/src/index.ts
✔ Would you like us to write your first test with Vitest? … yes
✨ Created header/src/index.test.ts
header/src/index.tsを開いて、同様に静的ファイルを配信するように実装します。
import { getAssetFromKV } from "@cloudflare/kv-asset-handler";
import manifestJSON from "__STATIC_CONTENT_MANIFEST";
const assetManifest = JSON.parse(manifestJSON);

export interface Env {
  __STATIC_CONTENT: KVNamespace;
}

export default {
  async fetch(request: Request, env: Env, ctx: ExecutionContext): Promise<Response> {
    return await getAssetFromKV(
      { request, waitUntil: ctx.waitUntil.bind(ctx) },
      { ASSET_NAMESPACE: env.__STATIC_CONTENT, ASSET_MANIFEST: assetManifest }
    );
  }
};
静的ファイルは、publicフォルダに配置します。
header/
├── public
│ ├── favicon.ico
│ ├── fragment
│ │ └── header
│ │     └── main.css
│ ├── index.html
│ └── manifest.json
manifest.jsonは、rootから静的ファイルを取得する際に使われるマニフェストファイルになります。自身のServiceの静的ファイルのパスを定義しておきます。
{
  "resources": {
    "html": [],
    "css": [
      "<link rel=\"stylesheet\" href=\"/fragment/header/main.css\"></link>"
    ],
    "js": []
  }
}
このマニフェストファイルをrootで受け取り、次のようにして<link>タグを追加しています。
  const manifestJSON = (await (
    await env.header.fetch(new URL("manifest.json", request.url), request)
  ).json()) as ManifestJSON;

  res.on('style[data-href="style"]', new HTMLRewriterHandler(async (element) => {
    if (manifestJSON.resources.css.length)
      element.after(manifestJSON.resources.css.join(""), { html: true });
  })
マニフェストファイルを経由することで、Serviceのコードを露出することなく、変更を適用することができます。Micro Frontendsのサービスは、常に独立性を保つべきなので、他のサービスへ影響しないように疎結合に設計しています。
これで、headerServiceの実装が完了しました。次に、footerServiceを実装しましょう。footerは、同様にReactで実装していきます。実装方法は、サーバーサイドパターンと同様に、SSRを実行してHTMLを生成し、クライアントでのハイドレーション用にビルドしたJavaScriptファイルを配信します。
フォルダ構成は、次のようになります。
footer/
├── dist
│ ├── client
│ └── server
├── esbuild.client.config.js
├── esbuild.server.config.js
├── package.json
├── public
│ ├── favicon.ico
│ └── manifest.json
├── src
│ ├── Footer.tsx
│ ├── entry.client.tsx
│ ├── entry.server.tsx
│ ├── index.test.ts
│ └── types.ts
├── tsconfig.json
├── types
│ └── index.d.ts
├── wrangler.toml
└── yarn.lock
まずは、wranglerCLIを使用して、プロジェクトを作成します。
$ npx wrangler init footer

 ⛅️ wrangler 2.15.0 (update available 2.16.0)
-------------------------------------------------------
Using npm as package manager.
✨ Created footer/wrangler.toml
✔ No package.json found. Would you like to create one? … yes
✨ Created footer/package.json
✔ Would you like to use TypeScript? … yes
✨ Created footer/tsconfig.json
✔ Would you like to create a Worker at footer/src/index.ts? › Fetch handler
✨ Created footer/src/index.ts
✔ Would you like us to write your first test with Vitest? … yes
✨ Created footer/src/index.test.ts
エントリーポイントとなるfooter/src/index.tsをfooter/src/entry.server.tsxに書き換えて、次のように実装します。
import { renderToReadableStream } from "react-dom/server";
import { getAssetFromKV } from "@cloudflare/kv-asset-handler";
import manifestJSON from "__STATIC_CONTENT_MANIFEST";
const assetManifest = JSON.parse(manifestJSON);
import type { Env } from "./types";
import { Footer } from "./Footer";

export default {
  async fetch(
    request: Request,
    env: Env,
    ctx: ExecutionContext
  ): Promise<Response> {
    try {
      return await getAssetFromKV(
        { request, waitUntil: ctx.waitUntil.bind(ctx) },
        {
          ASSET_NAMESPACE: env.__STATIC_CONTENT,
          ASSET_MANIFEST: assetManifest,
        }
      );
    } catch (e) {}

    const stream = await renderToReadableStream(
      <>
        <div id="app">
          <Footer />
        </div>
        <script src="/fragment/footer/entry.client.js"></script>
      </>
    );

    return new Response(stream, {
      headers: {
        "content-type": "text/html;charset=UTF-8",
      },
    });
  },
};
今回は、ReactのrenderToReadableStream (opens new window)を使い、ストリームでHTMLを配信します。scriptに指定している/fragment/footer/entry.client.jsは、クライアントでハイドレーションするためにビルドされたJavaScriptファイルです。
footerServiceでは、Reactのビルドが必要になるため、footer/wrangler.tomlに以下のようにビルド用のスクリプトを設定しておきます。これで、起動するたびにビルドが実行されるようになります。
[build]
command = "npm run build"
watch_dir = ["src"]

[site]
bucket = "./dist/client"
これでfooterの実装が完了しました。それぞれのサーバをyarn startで起動し、rootにアクセスすると結合されたHTMLが返ってくるのが分かります。
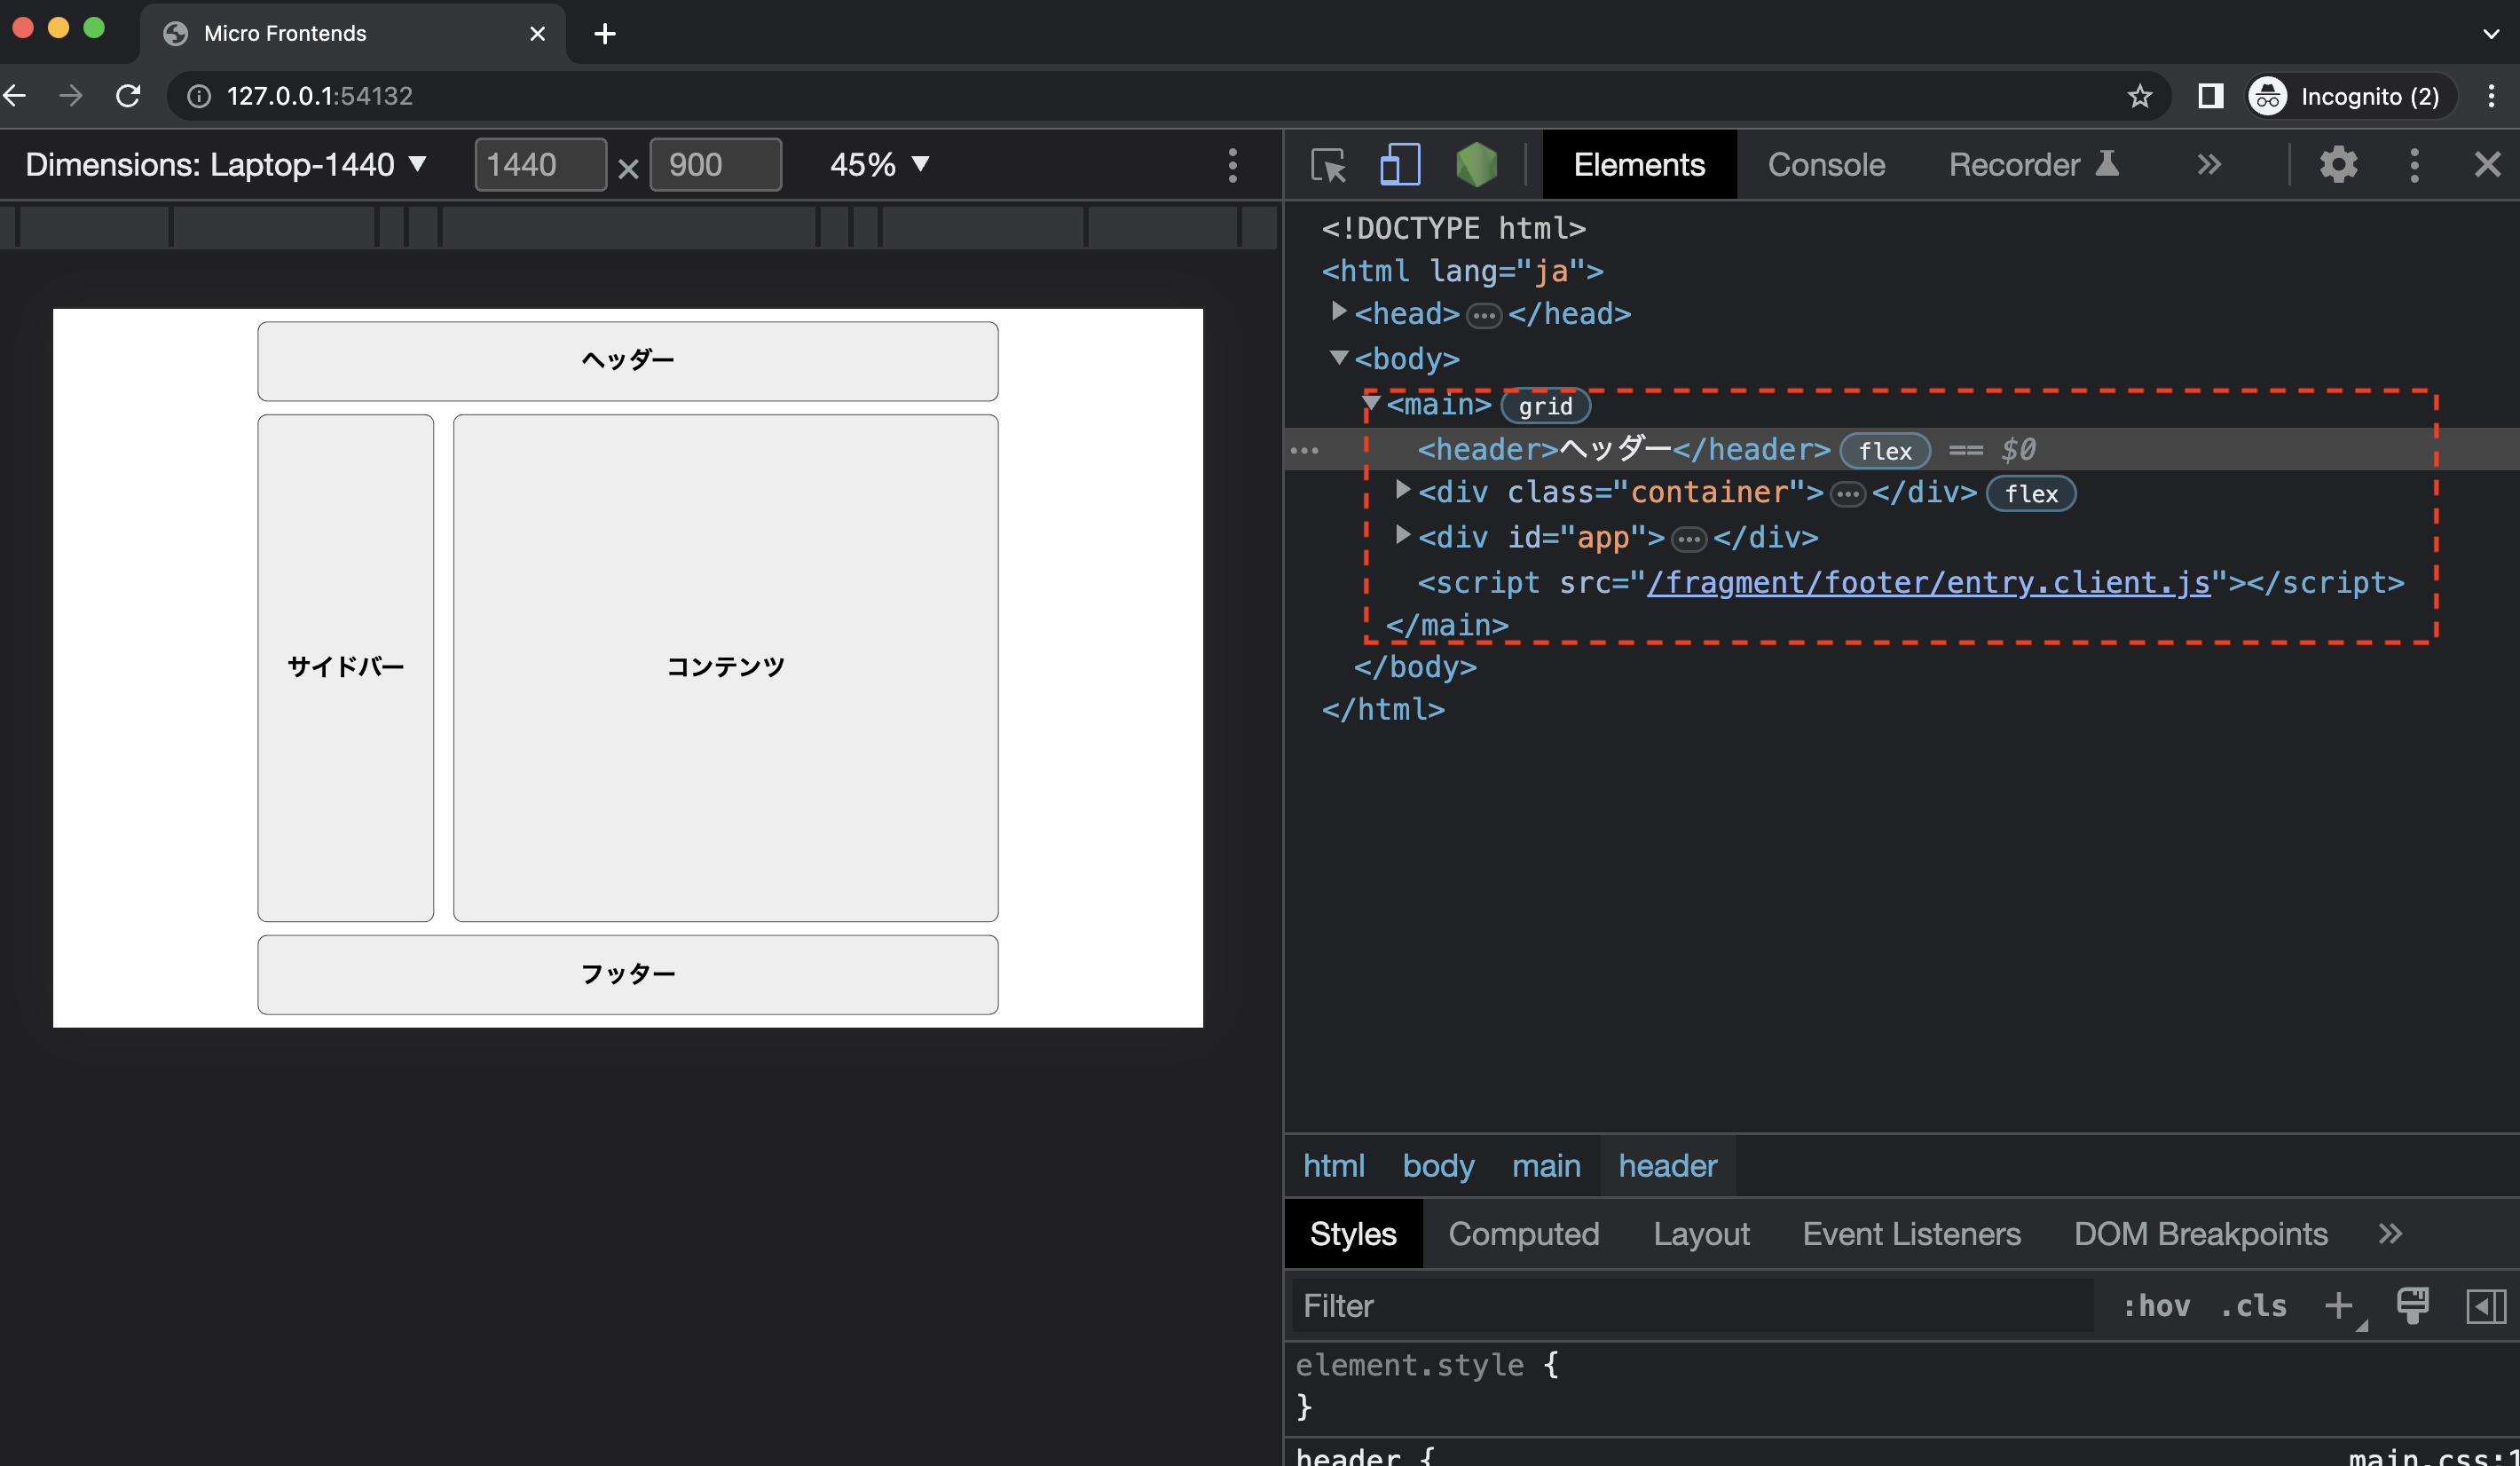
Cloudflare Workerを使うことで、エッジサイドでMicro Frontendsを統合することができました。複数のサービスがあったとしても、Service Bindingの仕組みを使えば、ネットワークの遅延なくServiceの結合をすることができます。Cloudflare Workerのランタイム環境にはいくつか制限 (opens new window)があるものの、パフォーマンス性に特化したいという要件の場合、有効な選択肢になるでしょう。
# ビルド
上記で紹介したクライアント、サーバーサイド、エッジサイド、いずれもランタイムで統合するのに対して、ビルドパターンはビルド時に全てのサービスを統合するパターンになります。各サービスをパッケージにして、メインのアプリケーションでインポートして使用します。
{
  "dependencies": {
    "@microfrontend/header": "^1.0.0",
    "@microfrontend/footer": "^1.0.0"
  }
}
Bit.dev (opens new window)では、様々なコンポーネントが公開してあり、好きなコンポーネントをインポートして使うことができます。自分で開発したコンポーネントもリポジトリ上に登録できるため、NPMパッケージをインポートするように使うことができます。例えば、次のようにインポートすれば、Bit.devが自動的に依存性の解決をしてくれます。
$ bit install @teambit/design.inputs.dropdown
Bit.devを使っていないプロジェクトでも、npmrcへリポジトリの設定をしておけば、次のように任意のコンポーネントをインストールして使うことができます。
$ yarn add @teambit/design.inputs.dropdownn
import { Dropdown } from '@teambit/design.inputs.dropdown';
ビルドパターンは、ビルド時に依存性を解決するため、ランタイムに発生する考慮を低減できるメリットがある一方、バージョニングやデプロイの管理を適切に行う必要があります。例えば、サービスのコンポーネントが更新された場合、メインのアプリケーションでコンポーネントのバージョンアップをして再デプロイする必要があります。そのため、デプロイの疎結合ができなくなります。
Bit.devなどのサービスを利用すれば、バージョニングや依存性の解決、ビルド時のテストでエラーの検知をしてくれますが、アプリケーション全体がBit.devに依存する設計になります。要件やユースケースによって適切に機能するか検討する必要があるでしょう。